Living rulebook
Tokyo Tsukiji Market
TOKYO TSUKIJI MARKET
In TOKYO TSUKIJI MARKET you are a fishing company competing in an open economy, trying to gain more prestigious fishing resources and yen than your opponents. Utilizing a completely player-driven economy and shared market system, only the wisest and toughest fishers will rise to the occasion!
contents
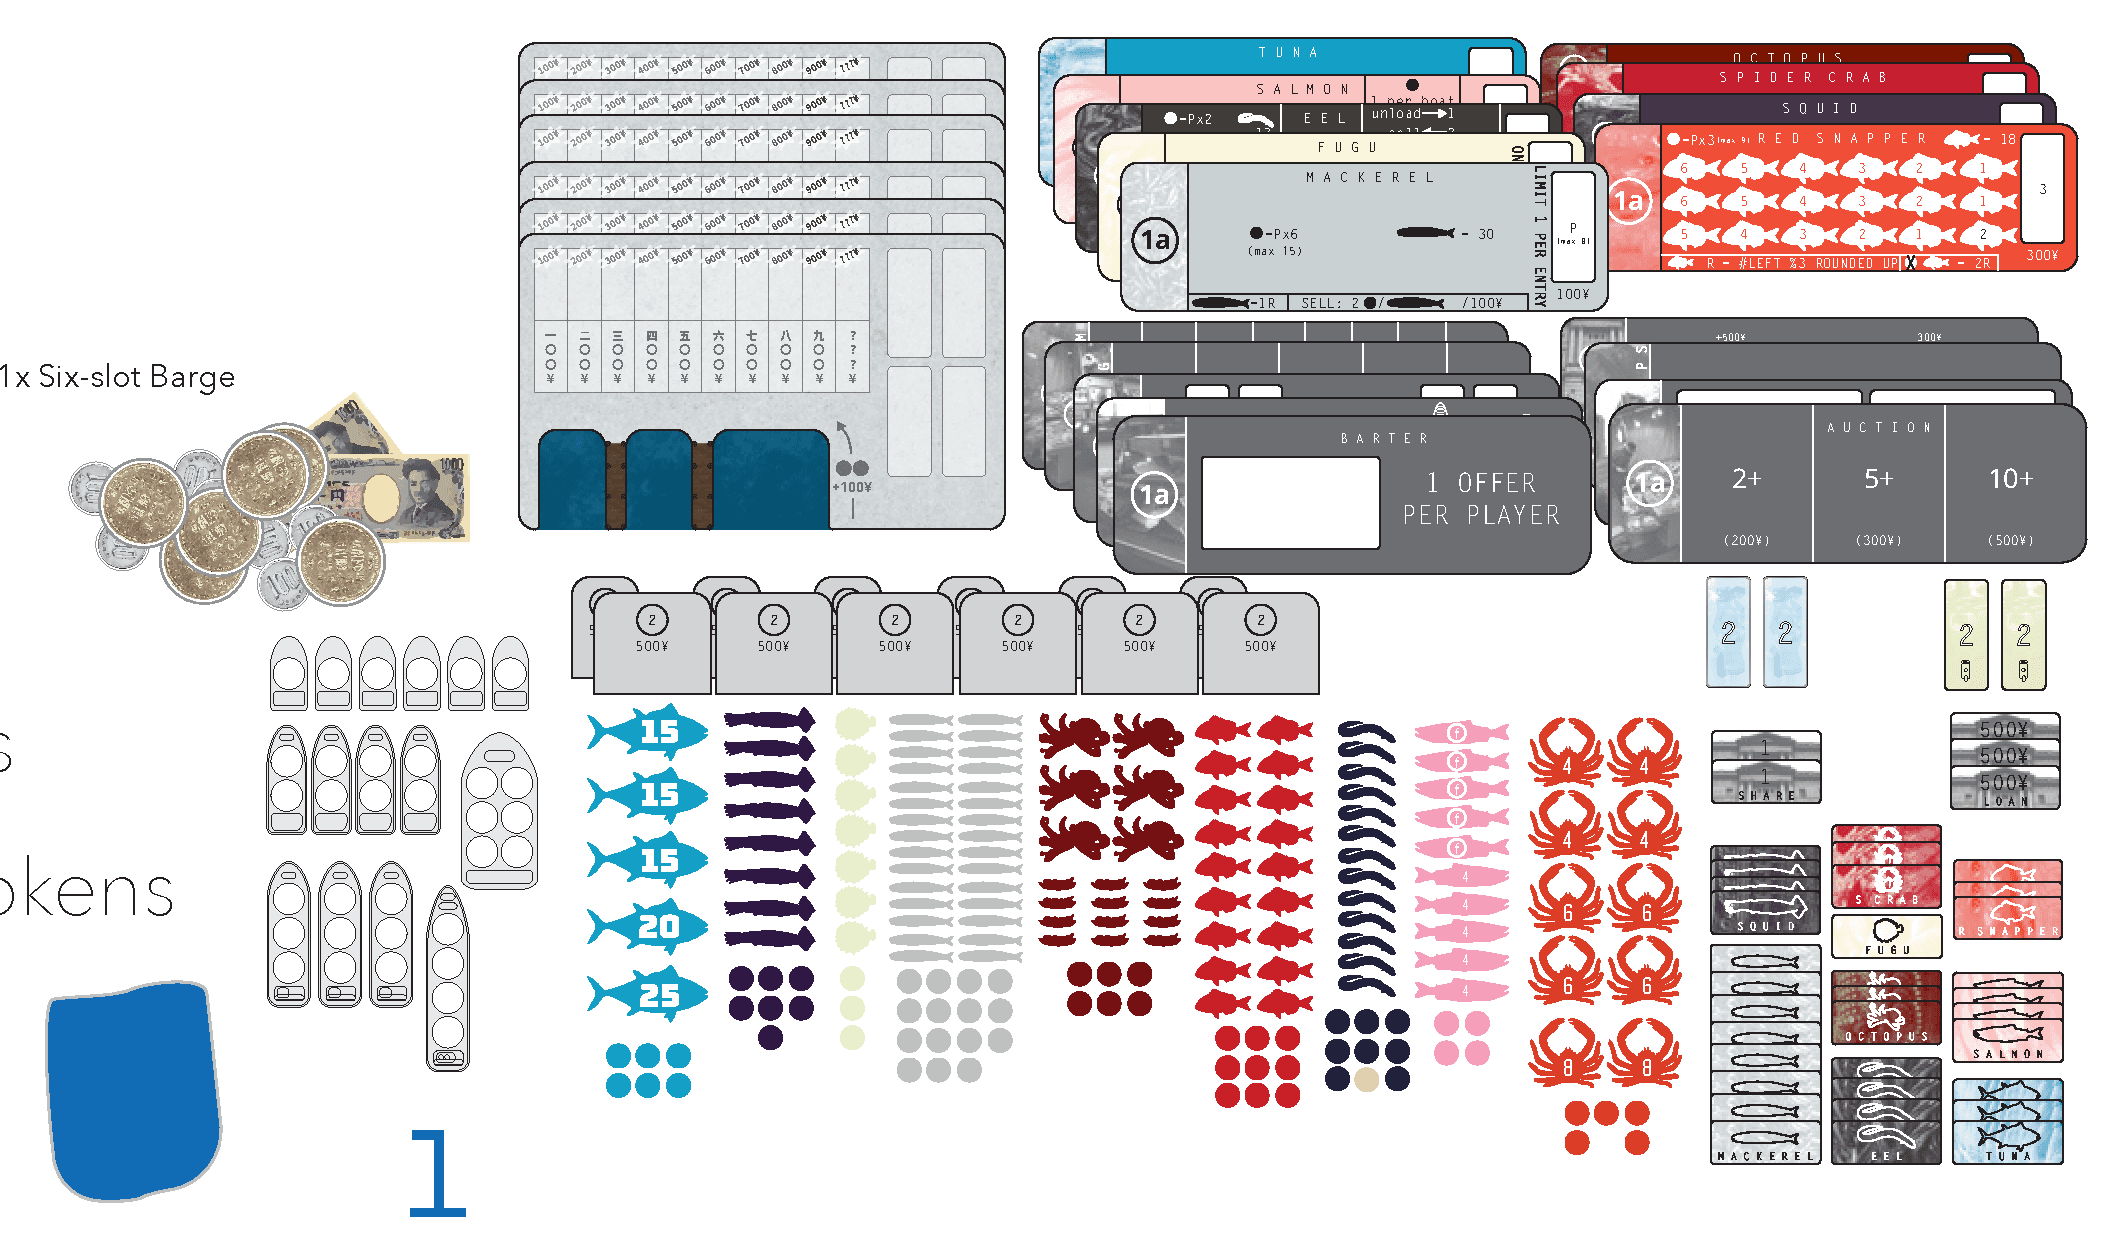
- 6 - Harbor boards
- 12 - Port Coverings (6x Small / 6x Large)
- 15 - Custom resin Fishing Boats (6x One-slot Ships / 4x Two-slot Ships / 3x Three-slot Ships / 1x Four-slot Ship / 1x Six-slot Barge)
- 18 - Market boards (9x Fish / 9x External)
- 64 - Wooden discs (63x Fishing Barrels in 9 Fish types / 1x Value marker (natural-colored))
- 119 - Custom-shaped Fish tokens (In 9 Fish types)
- 42 - Fishing Licenses and other tokens (33x In 9 Fish types / 2x Shares / 3x Loans / 2x Freezers / 2x Carts)
- 60 - Yen tokens (35x ¥100 / 10x ¥500 / 15x ¥1000)
- 1 - Auction bag
SETUP
1 Place the Mackerel Fish Market and Ships External Market boards face up on the table.
2 Separate the other Market boards into two piles: one for the Fish Markets and one for the External Markets. Turn each pile face down and shuffle them separately. Randomly select a number of additional Markets based on player count, as per the table on page 3, and place them face up in the center of the table with the Mackerel and Ships Markets, with all Market boards oriented the same way up.
Notes on Market selection:
- Spider Crab, Eel, and Red Snapper are good first Fish Markets for new players.
- The Tuna Fish Market is not recommended for new players, as it requires strategic timing.
- Do not use the Auction External Market with fewer than 3 players.
Player Count; Fish Markets (in addition to Mackerel); External Markets (in addition to Ships)
- 2; +3; +2
- 3; +4; +2
- 4; +4; +3
- 5; +5; +3
- 6; +5; +4
3 For each Fish Market board on the table, place on it the number of matching Fishing Licenses, Fish Barrel discs, and Fish tokens as indicated on the board itself, returning any surplus pieces to the box. Some quantities shown on the Markets depend on the number of players in the game, represented by P.
Example: For a 3-player setup of Eel, place all 13 Eel tokens, 6 Eel Barrels, 3 Eel Licenses, and the Value marker on the Eel Market board.
Notes on specific Fish Markets:
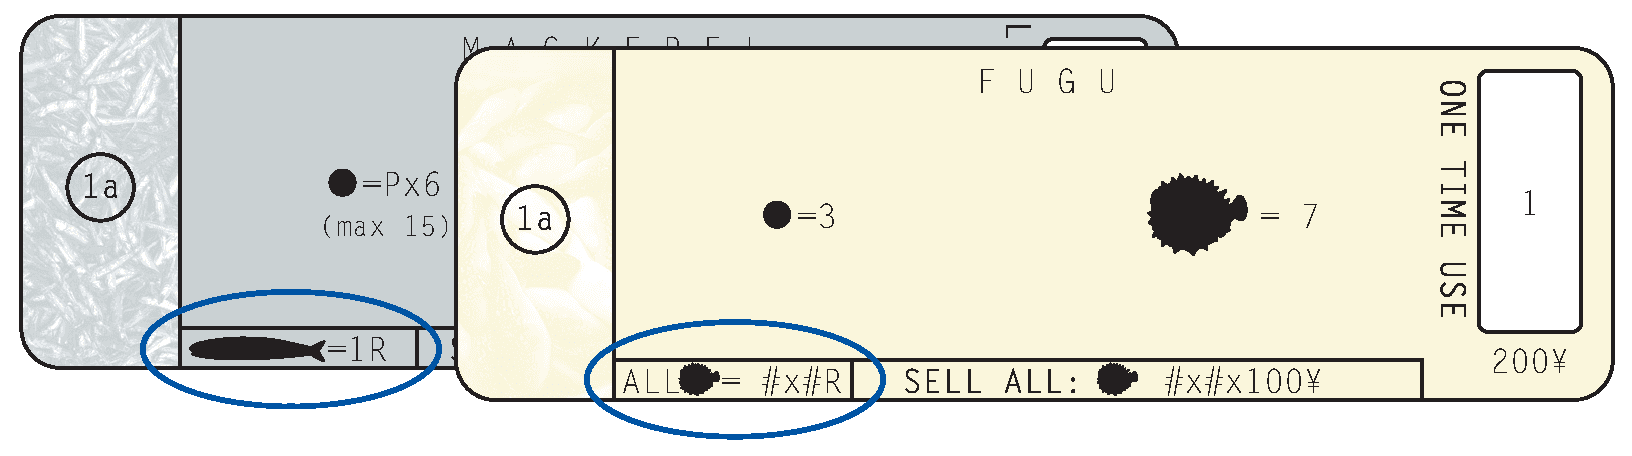
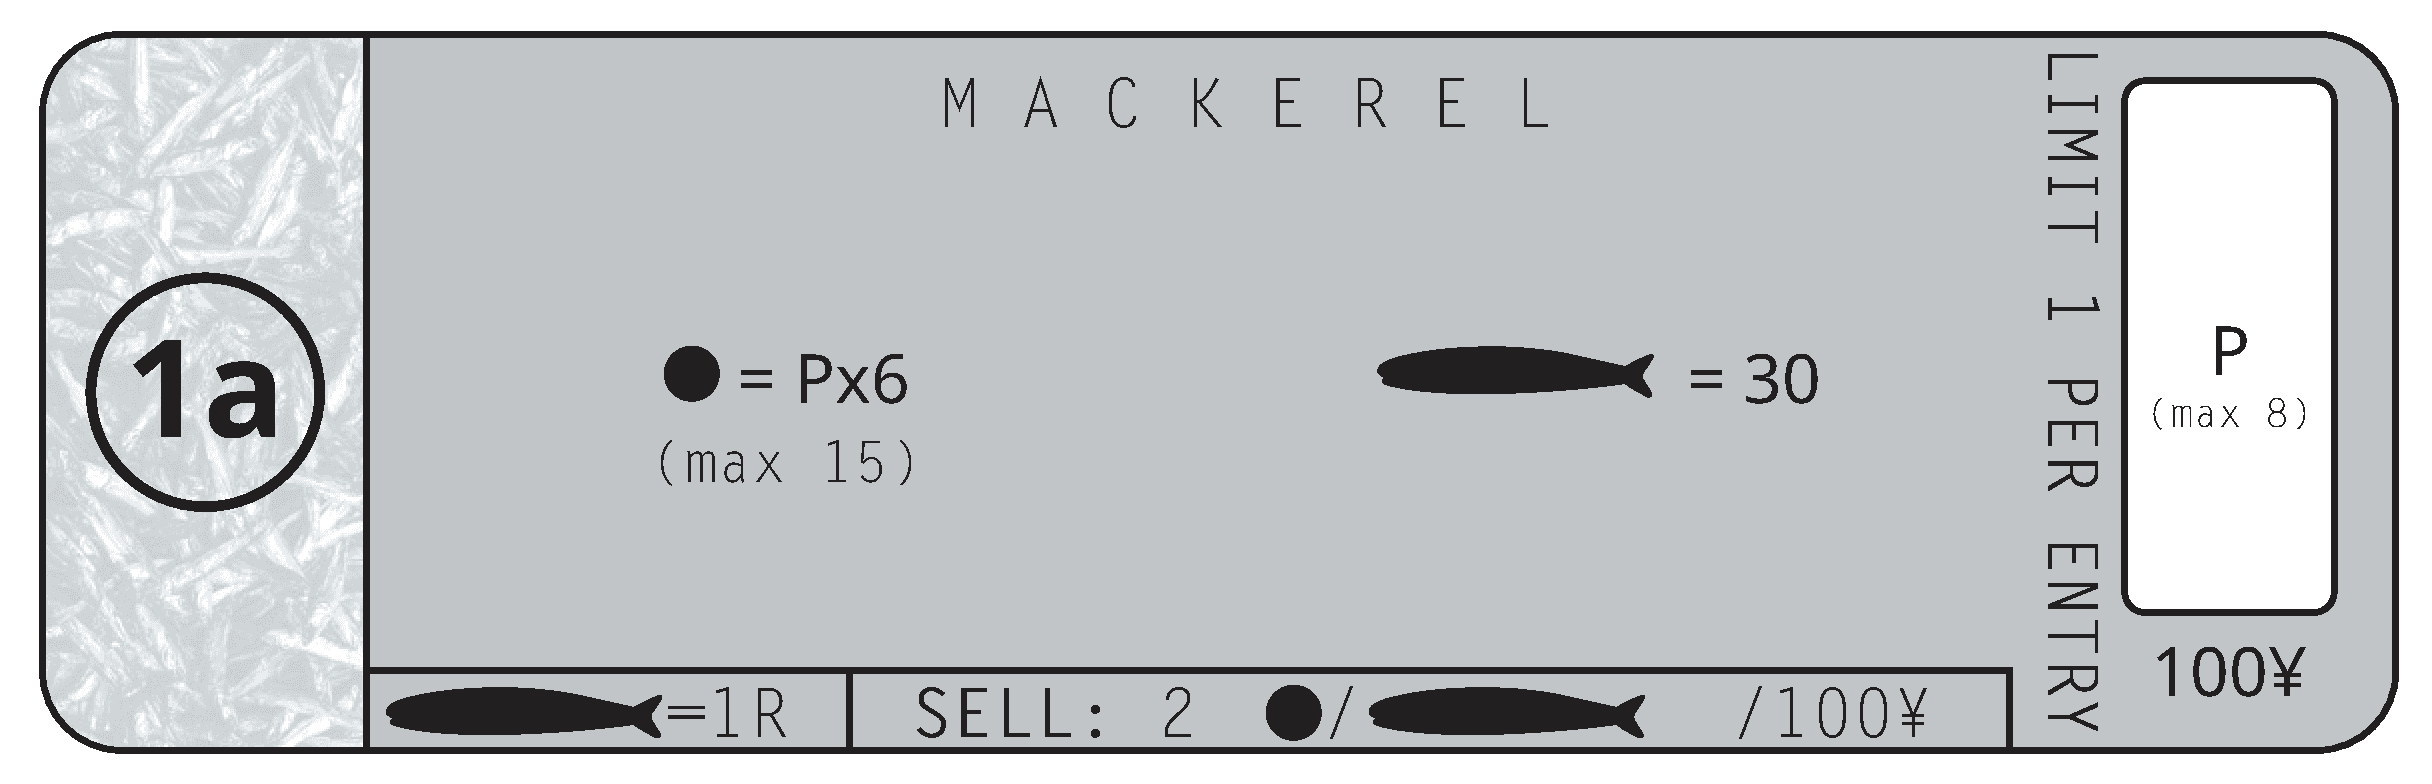
- Set aside a number of Mackerel Fishing Licenses equal to the number of players, before placing the required P Licenses on the Mackerel board from those remaining. Since there are at most 8 total Mackerel Licenses available in the game, in a game with 5 or 6 players there will only be 3 or 2 remaining Licenses available respectively to place on the Mackerel board.
- Place the Spider Crab and/or Tuna tokens in the Auction bag instead of their respective Market boards.
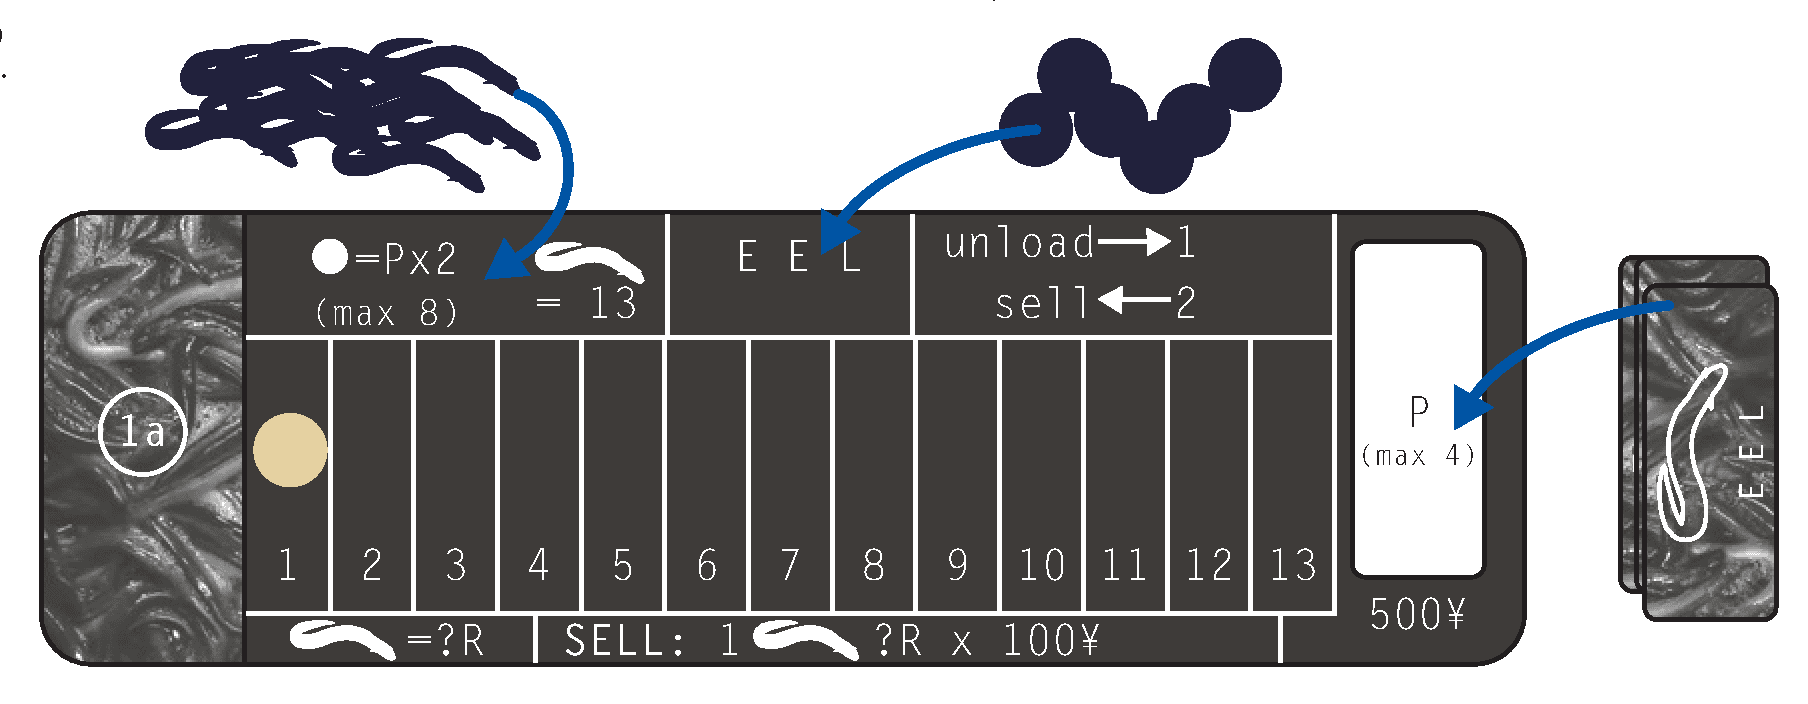
- Place a Value marker on the 1 space of the Value track on the Eel Market board.
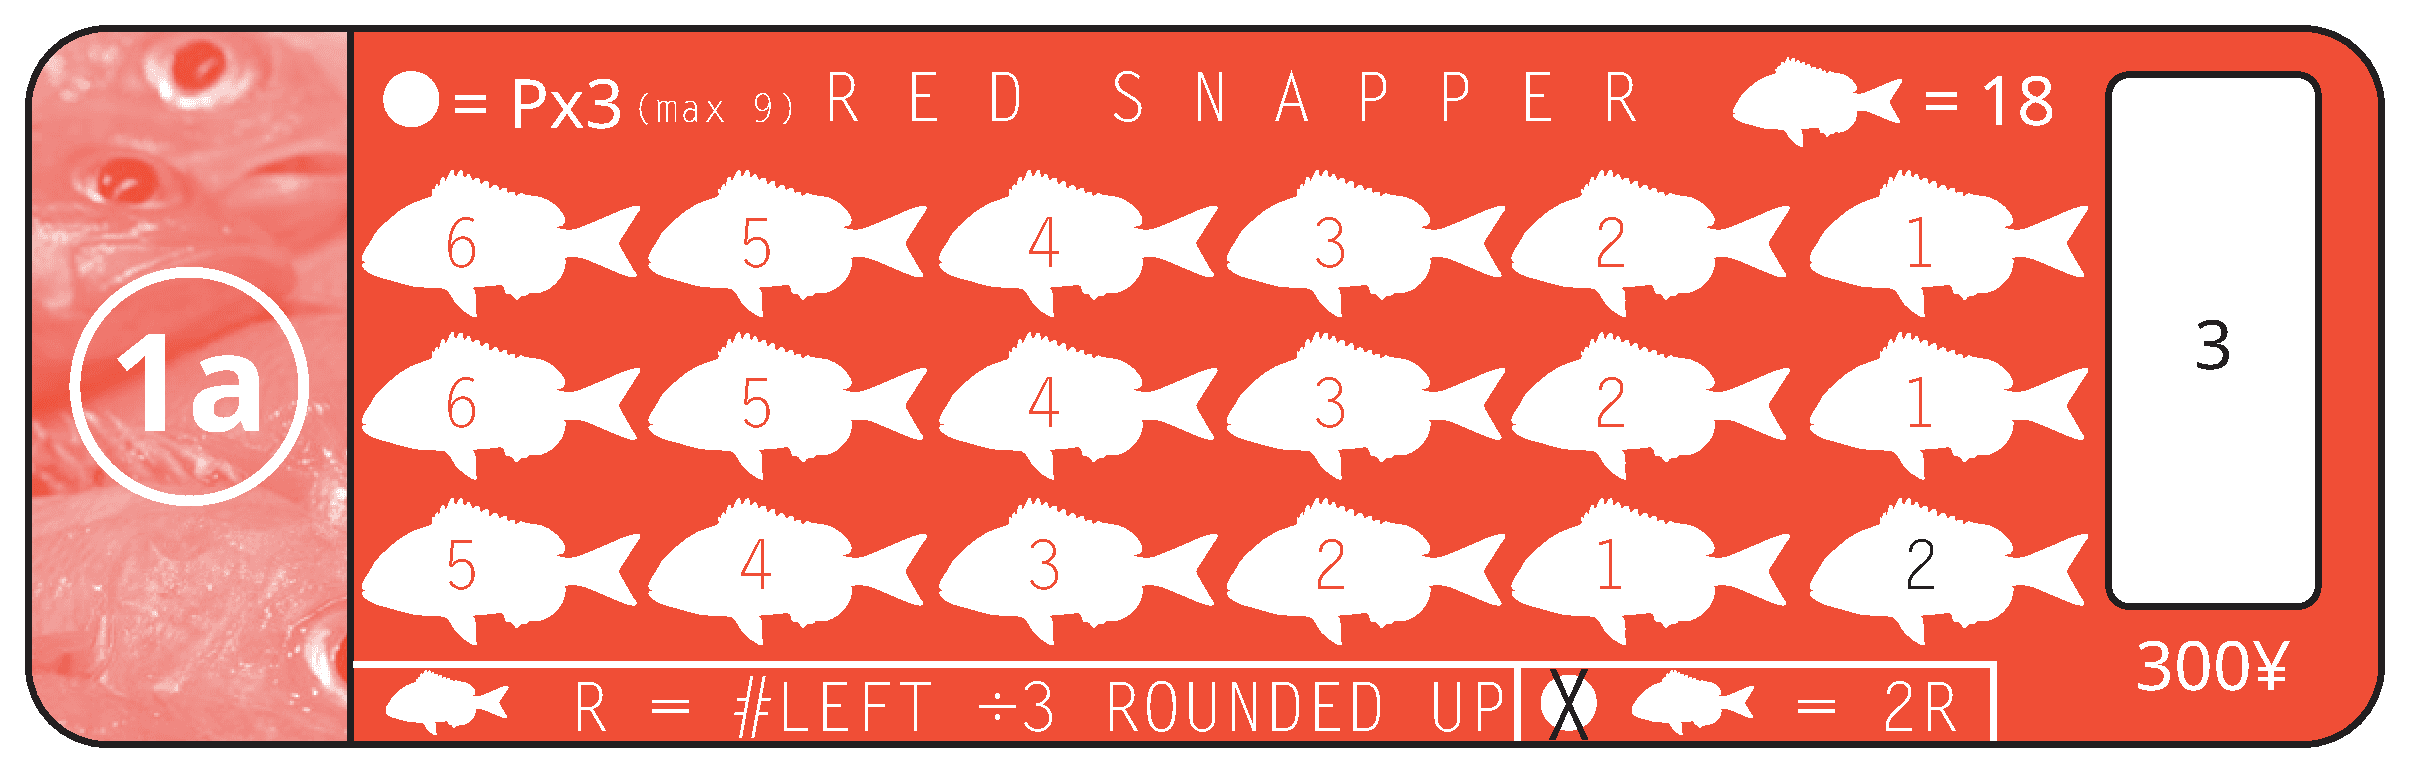
- Place a Red Snapper token on each of the outlined spots on the Red Snapper Market board.
- The Octopus Market comes with two different token types (Octopus and Takoyaki); place both, as depicted, on the Octopus board.
4 Set aside a number of One-slot Ships equal to the number of players. Place a number of the remaining Ships and the Barge on the Ships Market board, as indicated on the board itself (as for the Fish Markets, P represents the number of players in the game). If there are not enough of a given type of Ship remaining, place as many as are available. This means placing the following quantities of each type on the Ships Market for each player count:
Type; 2 players; 3 players; 4 players; 5 players; 6 players
- One-slot Ship; 1; 1; 1; 1; 0
- Two-slot Ship; 2; 3; 4; 4; 4
- Three-slot Ship; 1; 2; 3; 3; 3
- Four-slot Ship; 1; 1; 1; 1; 1
- Six-slot Barge; 1; 1; 1; 1; 1
5 If they are in play, some other External Markets have specific components placed on them as follows:
- The Bank board comes with the Share and Loan tokens.
- The Rentals board comes with the Freezer and Cart tokens.
6 Return all unused Market boards and their pieces to the box (including the Auction bag, if you are not playing with the Spider Crab or Tuna Fish Markets).
7 Each player takes 1 of the Mackerel Fishing Licenses set aside in step 3, 1 of the One-slot Ships set aside in step 4, ¥2,000, a Harbor board, 1 small Port Covering tile, and 1 large Port Covering tile. Each places their Ship in the leftmost Port space on their Harbor board, their small and large Port Covering tiles (with the numbers face up) over the central and rightmost Port spaces respectively, and their Mackerel License in one of the four License spaces on the right of their Harbor board. Return any unused Harbor boards and Port Covering tiles to the box.
8 Place all remaining Yen tokens in a general supply in reach of all players.
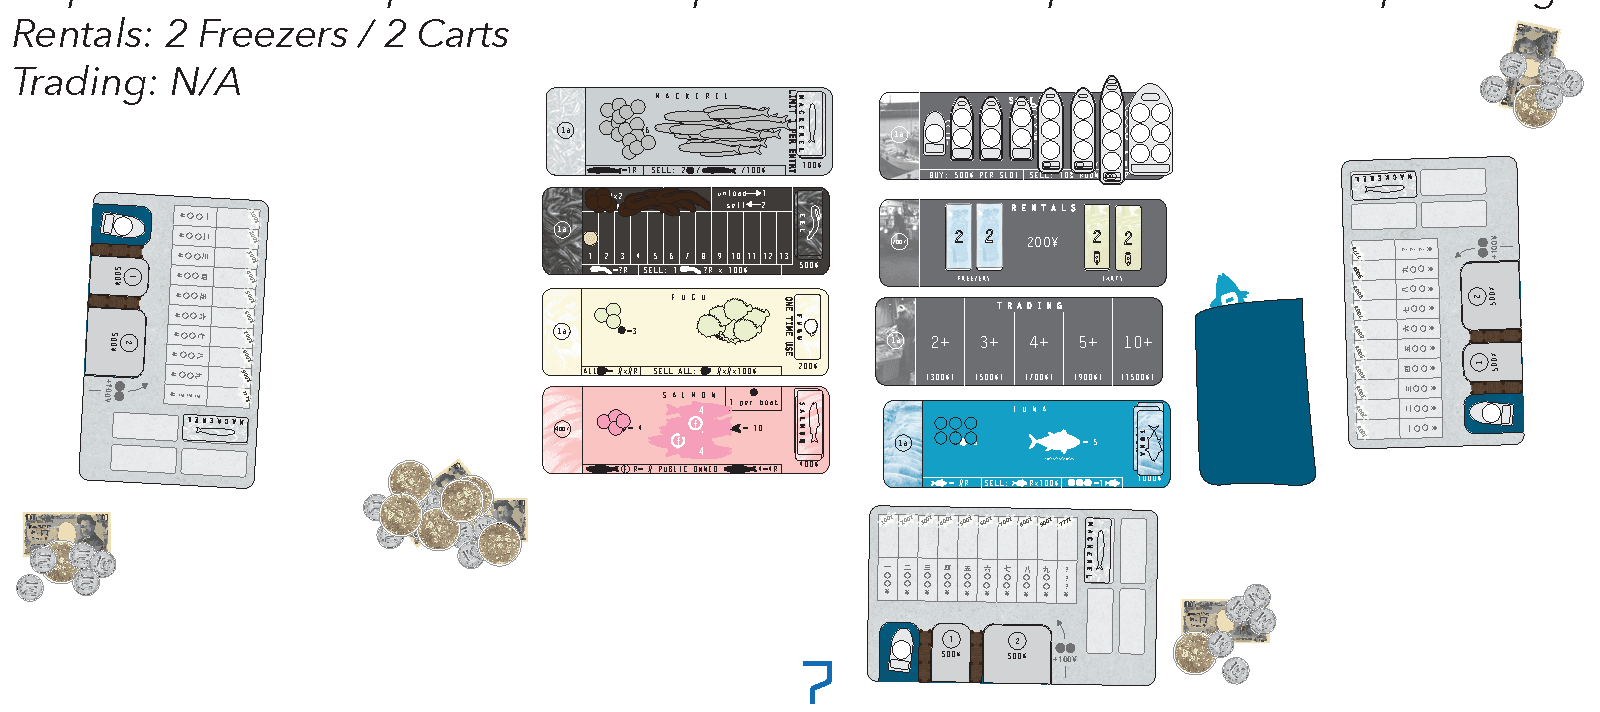
Example setup for a 3-player game:
Each player has ¥2,000, a Mackerel Fishing License, a Harbor with the two righthand Ports blocked by Port Coverings, and a single One-slot Ship in their open Port.
There are 5 Fish Markets (including the mandatory Mackerel Market) and 3 External Markets (including the mandatory Ships Market) in play. Because there are 3 players, the Markets are stocked as follows:
Mackerel: 15 Barrels / 30 Mackerel tokens / 3 Fishing Licenses
Eel: 6 Barrels / 13 Eel tokens / 3 Fishing Licenses / 1 Value marker on the 1 space
Fugu: 3 Barrels / 7 Fugu tokens / 1 Fishing License
Salmon: 4 Barrels / 10 Salmon tokens / 4 Fishing Licenses
Tuna: 6 Barrels / 5 Tuna tokens (in the Auction bag) / 3 Fishing Licenses
Ships: 1 One-slot Ship / 3 Two-slot Ships / 2 Three-slot Ships / 1 Four-slot Ship / 1 Barge
Rentals: 2 Freezers / 2 Carts
Trading: N/A
OBJECTIVE
To have the most Yen after endgame scoring. Your final score is a combination of your total Yen tokens and the value of your Fish tokens.
Note: Fish tokens are each worth a number of Resources, depending on the type of Fish token (see the Fish Markets section for details). The value of 1 Resource at the end of the game is ¥100.
GAMEPLAY
Before the game begins, all players must decide together whether to play with open money (where it is visible to all players) or closed money (where each player keeps theirs hidden).
The player who last drank water goes first. Beginning with the start player and continuing clockwise, players take turns, with each player performing a number of actions per turn. Play continues until the end of the game is triggered by either or both of the following conditions being met by a player at the start of their turn:
- The player has at least ¥5,000 and does not have the outright lowest total number of Resources of any player.
- The player has 50 or more Resources worth of Fish tokens and does not have the outright lowest amount of Yen of any player.
The player who triggered the end of the game takes their turn as usual, then all other players have one final turn before the game ends and scoring is calculated.
PLAYER TURNS
At the start of your turn, any Fish Barrels remaining on your Harbor board will degrade, after which you must perform a number of actions. How many actions you perform will depend on which actions you choose, and the cost of taking those actions.
There are three types of actions: Fishing, Purchasing, and Markets. Most actions cost 1 or 2 Action Points, and each turn you have 2 Action Points available to you, which you must spend. Some Markets actions require or permit you to spend Yen or Fish tokens instead of Action Points. You may perform actions in any combination among the three types of action, but note that after spending your last Action Point you cannot perform any further actions this turn. You must fully resolve one action before starting another.
FISH DEGRADATION
At the beginning of your turn, first remove all Fish Barrels from the lower selling row on your Harbor board, returning them to their corresponding Market boards. You will not receive any payment for these Barrels. Then move all Fish Barrels from the upper selling row down to the lower selling row, maintaining the column each Barrel is in; these Barrels are now “degraded”.
ACTIONS
Opening additional Ports
At any time on your turn, and in addition to your actions, you can open up a blocked Port in your Harbor by paying the ¥500 cost shown on its Port Covering tile. Additional Ports must be opened in order from left to right, as shown by the numbers 1 and 2 on the Port Coverings. The rightmost “2” Port can hold 2 Ships at the same time, or 1 Barge.
FISHING
Cost: 1 Action Point
When you perform this action, you may:
1 Activate all or part of your fleet; and/or
2 Adjust the prices of the Barrels on your Harbor board.
1 - Activate all or part of your fleet
You may activate one or more of your Ships and/or your Barge. Each activated Ship may perform 1 of the following activities: Undocking, Catching, or Docking. The Barge may only Undock or Dock (it cannot Catch).
You may activate your boats in any order, and they do not have to perform the same activity as each other.
Undocking: Move a Ship or Barge from a Port on your Harbor board and place it below your Harbor board, to indicate that it is now “at sea”.
Catching: A Ship performing this activity may Catch 1 Fishing Barrel. To do so, it must be at sea, and you must have a Fishing License available for it to use (one that has not yet been used to Catch Fish during this Fishing action). Take any Fish Barrels you Catch from the corresponding Fish Market boards; if none of a given type are available you cannot catch that Fish type for the rest of the game (see the Overfishing section).
- If the Ship is empty: With an empty Ship you may only Catch Fish of a type for which you hold more Licenses in total than you have Ships at sea holding the corresponding type of Fish Barrel (the Barge does not count for this purpose). Choose the type of Fish you want to Catch and add a single Barrel of that type to one of the Ship’s slots.
- If the Ship already has at least one Fish Barrel on it: With a partially loaded Ship (provided it has at least one empty slot), you may only Catch Fish of the same type as the Fish Barrel(s) already on the Ship, and for which you hold at least 1 corresponding License. Note: in this case, the number of Ships you have at sea holding the same type of Fish Barrel is irrelevant. Select a Ship that already holds at least one Barrel, and add one Barrel of the same type to it (exception: a Ship using a Salmon License can only hold 1 Salmon Barrel at a time; see special rules for Salmon).
Example: You have 1 Ship at sea with a Mackerel Barrel on it. In order to Catch a Mackerel Barrel with a second (currently empty) Ship while that first Ship remains at sea, you must hold at least 2 Mackerel Licenses. With only 1 Mackerel License, you must either Dock the first Ship or discard its Mackerel Barrel before you may use the second Ship to Catch Mackerel. However, 1 Mackerel License is sufficient to Catch another Mackerel Barrel with the first Ship, so long as it has at least 1 empty slot.
Docking: If your Ship or Barge is at sea, you may Dock it at an available space in one of your Ports (remember that only the rightmost “2” Port can hold a Barge). Immediately after Docking, unload any Fish Barrels that are on the Ship or Barge. For every 2 Barrels you unload at your Ports during the same Fishing action, take ¥100 from the general supply. Then, assign each unloaded Barrel a sale price by placing it in the upper selling row of a column of your choice on your Harbor board (exception: Spider Crab and Tuna Barrels are not placed on your Harbor board, and will instead trigger an auction; see the special rules for these boards in the Fish Markets section).
The “???” selling column on your Harbor board allows you to set any multiple of ¥100 you wish as a sale price for your Barrel/Takoyaki. The price you set must be declared when you place the Fish in that column (whether when first placing the Fish for sale, or when subsequently adjusting prices in a Fishing action).
Rules for Fishing Licenses:
- When used, a License permits 1 Ship to Catch 1 Barrel of the corresponding Fish type.
- Each Fishing License may be used at most once per Fishing action.
- A License is only required for the Catching activity. It is not required for Undocking or Docking.
- You can hold at most 4 Fishing Licenses (as shown by the 4 License spaces on your Harbor board). If you have 4 Licenses and wish to acquire another, you must first return one to its corresponding Market board. Returning a License is free, does not count as part of an action, and may be done at any time during your turn.
Tansferring Fish Barrels to the Barge: The Barge cannot perform the Catching activity. However, you may transfer any number of Fish Barrels from any number of Ships to the Barge at any time during your turn, as long as the Barge has sufficient empty slots, and both the Ship(s) and the Barge are at sea. This is free and does not count as part of an action. The Barge may hold any combination of Fish Barrel types (exception: at most 1 Salmon Barrel; see Salmon in the Fish Markets section). Barrels cannot be transferred from the Barge back to Ships.
Discarding Fish Barrels: In some instances, you may wish to discard Fish Barrels from your boats while they are at sea. Throwing your catch back into the sea like this is allowed, but only at the start of your turn, before you perform any actions. Place any discarded Barrels back on their Market boards.
2 - Adjust the prices of the Barrels on your Harbor board
When you perform a Fishing action, you may adjust the prices of Barrels (and/or Takoyaki, if you are playing with the Octopus Market) in both the upper and lower selling rows on your Harbor board (but not the row each one is in). You are allowed to perform a Fishing action solely to adjust these prices, and not perform activities with any of your fleet.
Example: Naomi performs a Fishing action for her first action this turn. She has two Ships, which may each perform one activity. Her Two-slot Ship is at sea, so she uses her Mackerel License to perform the Catching activity with it, adding a Mackerel Barrel to one of its slots. Her One-slot Ship is in a Port, so she decides to perform the Undocking activity, moving it below her Harbor board.
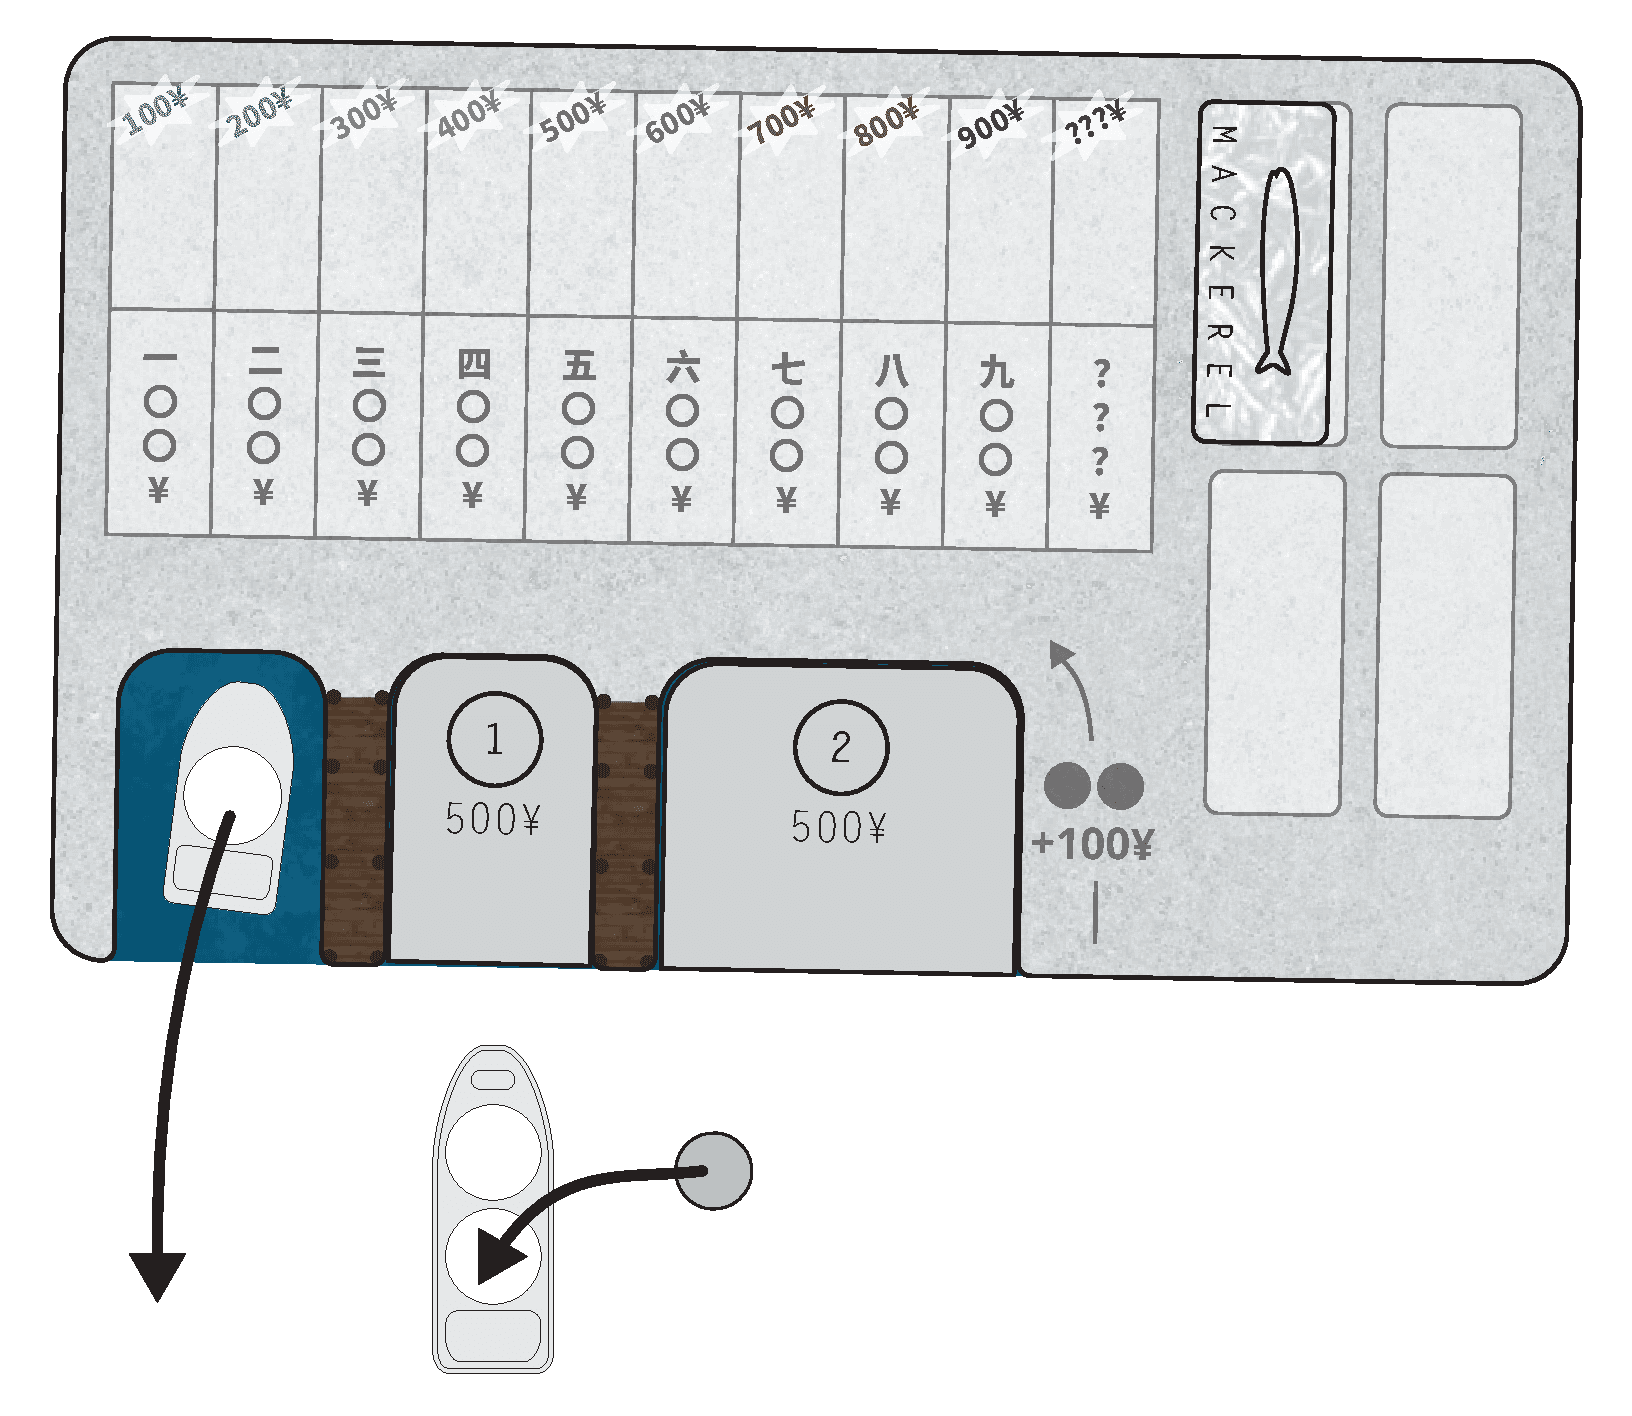
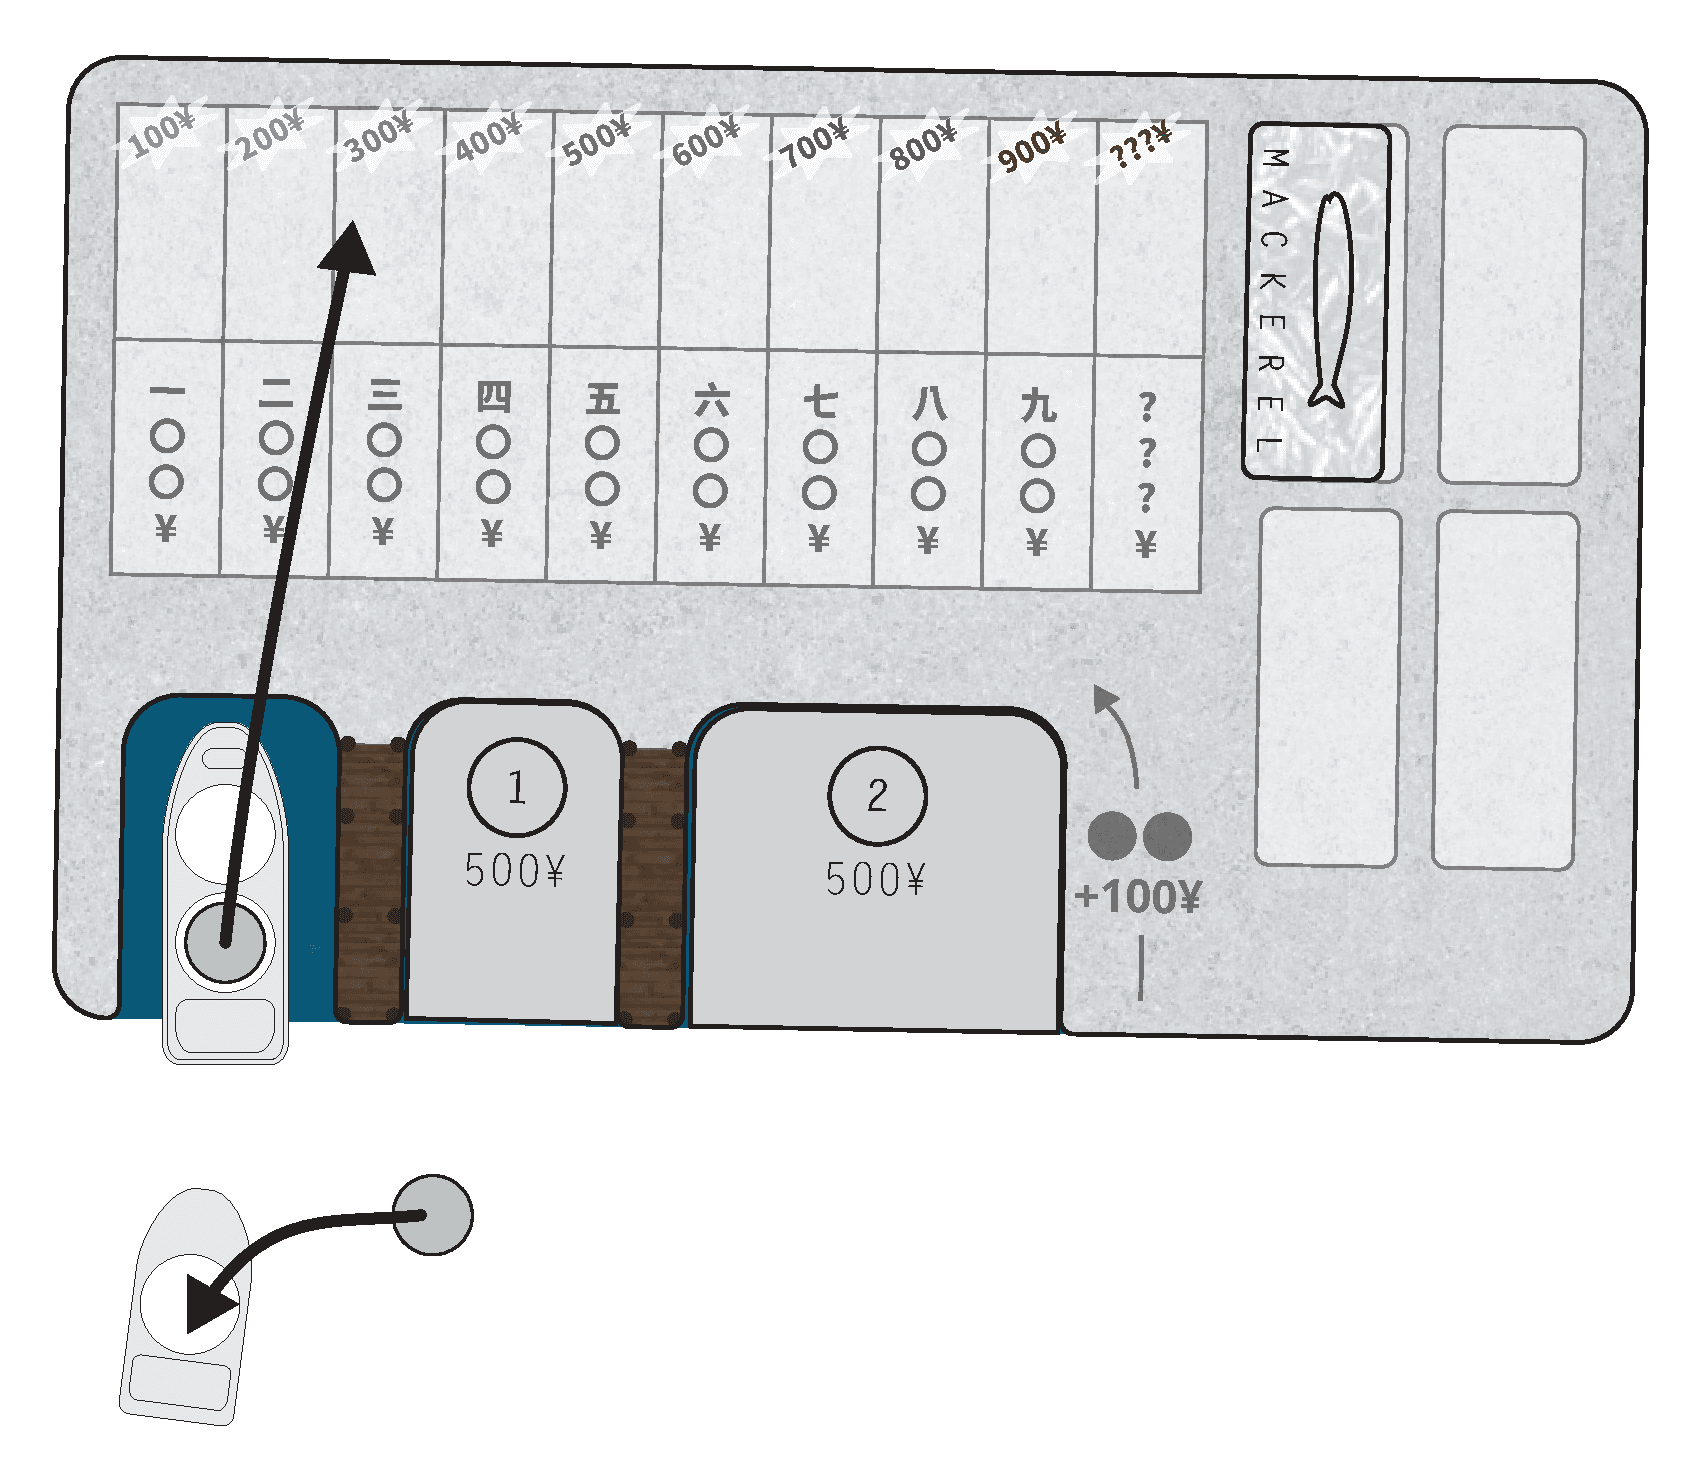
Naomi chooses to use her second action this turn for another Fishing action, and performs the Docking activity with her Two-slot Ship, placing it back in the open Port on her Harbor board. As soon as that Ship is docked, she removes the Mackerel Barrel and assigns it a sale price of ¥300 by placing it in the upper selling row of the third column on her Harbor board. She is now able to use her Mackerel License to perform Catching with the One-slot Ship, and does so, adding a Mackerel Barrel to it.
PURCHASING
Cost: 1 Action Point
When you perform this action, you may buy as many Fish Barrels from as many other players’ Harbor boards as you like. For each Barrel you buy, pay the owning player the amount that Barrel is listed for sale at, return it to its corresponding Market board, take 1 of the available Fish tokens from the same Market, and place it in front of you (see special rules for the purchase of Red Snapper and Salmon Barrels in the Fish Markets section). Each Fish token is worth a number of Resources, as indicated by its Market board.
If you are playing with the Octopus Fish Market, you may buy Takoyaki tokens from other players’ Harbor boards. For each Takoyaki token you buy, pay the owning player the amount it is listed for sale at and place the Takoyaki token in front of you.
Notes: With the exception of degraded Fugu (see special rules for Fugu in the Fish Markets section), you may never purchase Barrels from your own Harbor board. You cannot purchase Takoyaki tokens from your own Harbor board either, but they may be used to enter the Octopus Market (see special rules for Octopus in the Fish Markets section). Any Barrels or tokens remaining for sale on your Harbor board at the end of the game will be worth nothing.
MARKETS
Cost: Varies with different Markets
When you perform this action, choose one Fish or External Market to visit, paying the cost indicated on the left hand side of the Market board. Markets may require spending a number of one of the following to enter:
- Action Points (1 or 2 of the 2 you must use on your turn, denoted by or ).
- Fish tokens, returned to their Market board.
- Yen, paid to the general supply.
Some Markets offer more than one cost option; in these cases you choose one of them to pay. Some Markets have no entry cost shown: these cost nothing to enter but each such Market may only be entered once per turn.
If you have entered a Fish Market, once you have paid its entry cost (but before you interact with it any further), all players, including you, with at least one License from that Fish Market immediately take ¥100 from the general supply for each matching License they hold.
If you enter a Market, you must interact with that Market at least once, but unless otherwise stated, you may do so any number of times in as many ways as you like and are able to. Each Market board is unique, containing different abilities and information.
At Fish Markets, possible interactions are as follows:
- Buy Fish Licenses: You may purchase up to as many Licenses as there are available on the Market board (so long as you have space on your Harbor board for them), by paying Yen to the general supply. Place each License you purchase in an empty License space on your Harbor board. Exception: at the Mackerel Market you may buy at most 1 Mackerel License per entry.
- Sell Fish tokens: If there is a “SELL” price shown on the Market board, you may sell the corresponding Fish tokens back to the Market. Unless otherwise specified, move as many Fish tokens as you like from your supply to the Market board, and take the indicated amount of Yen from the general supply.
- Other interactions: Some Fish Markets have other special interactions available; see the Fish Markets section for details.
The External Markets all work differently, allowing you to sell or trade Fish tokens, buy or sell boats, and more. See the External Markets section for details on how to interact with each of them.
FISH MARKETS
- Eel
- Fugu
- Mackerel
- Octopus
- Red Snapper
- Salmon
- Spider Crab
- Squid
- Tuna
Eel
Markets action interactions:
- Buy Fish Licenses: You may purchase Eel Licenses for ¥500 each.
- Sell Fish tokens: You may sell Eel tokens to the Market for ¥100 × the combined Resource value of the tokens sold. After receiving this Yen, reduce the Resource value by 2 for each Eel token sold (see below).
Resource value: Each Eel token is worth the number of Resources indicated by the Value marker on the Value track in the middle of the Market board. Each time an Eel Barrel is unloaded and placed for sale (not simply Caught) on a player’s Harbor board, advance the Value marker one space on the track for each Barrel unloaded, thereby increasing the current Resource value of all Eels. After a player sells Eel tokens to the Eel Market, move the Value marker back 2 spaces on the track for each token sold. Ignore any movement that would move the Value marker above 13 or below 1 on the track.
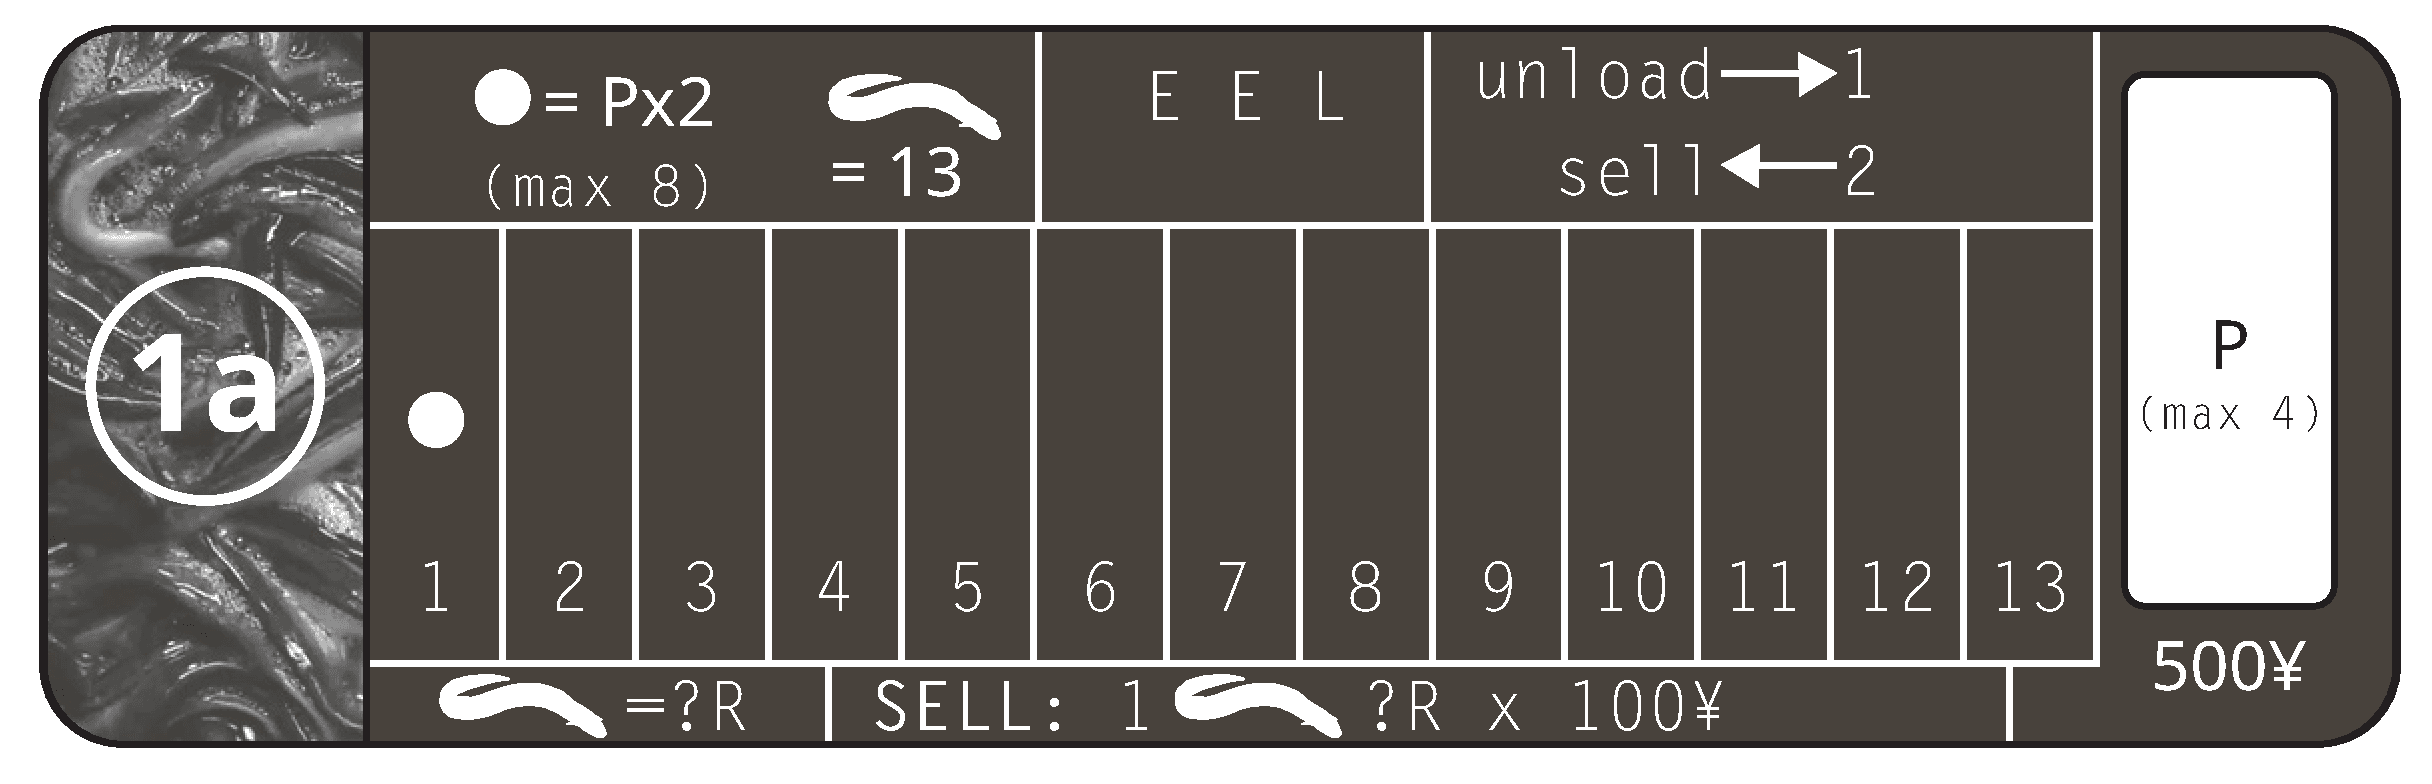
Example: The Value marker is at 6 when a player sells 2 Eel tokens to the Eel Market. They take ¥1,200 from the general supply, and move the Value marker from 6 to 2 on the Value track.
Fugu
Special rules for Fish Degradation: At the start of your turn, before removing degraded Barrels from the lower selling row on your Harbor board, if you have any degraded Fugu Barrels on that lower row, you may purchase them yourself by paying the Yen price listed to the general supply. This is the only time you can purchase any of your own Fish Barrels. Any degraded Fugu Barrels you do not purchase at the start of your turn will be removed and returned to their Market as usual. Note that if you use a Freezer (see Rentals in the External Markets section), the Fish Degradation step doesn’t happen and so you cannot purchase your own Fugu Barrels that turn; you can only purchase your own Fugu if it would otherwise degrade off your Harbor board that turn.
Special rules for Docking during a Fishing action: Whenever you unload a Fugu Barrel at one of your Ports (whether from a Ship or a Barge) and you hold the Fugu Fishing License, the License is returned to the Fugu Market immediately.
Markets action interactions:
- Buy Fish Licenses: You may take the Fugu License for free, if it is available.
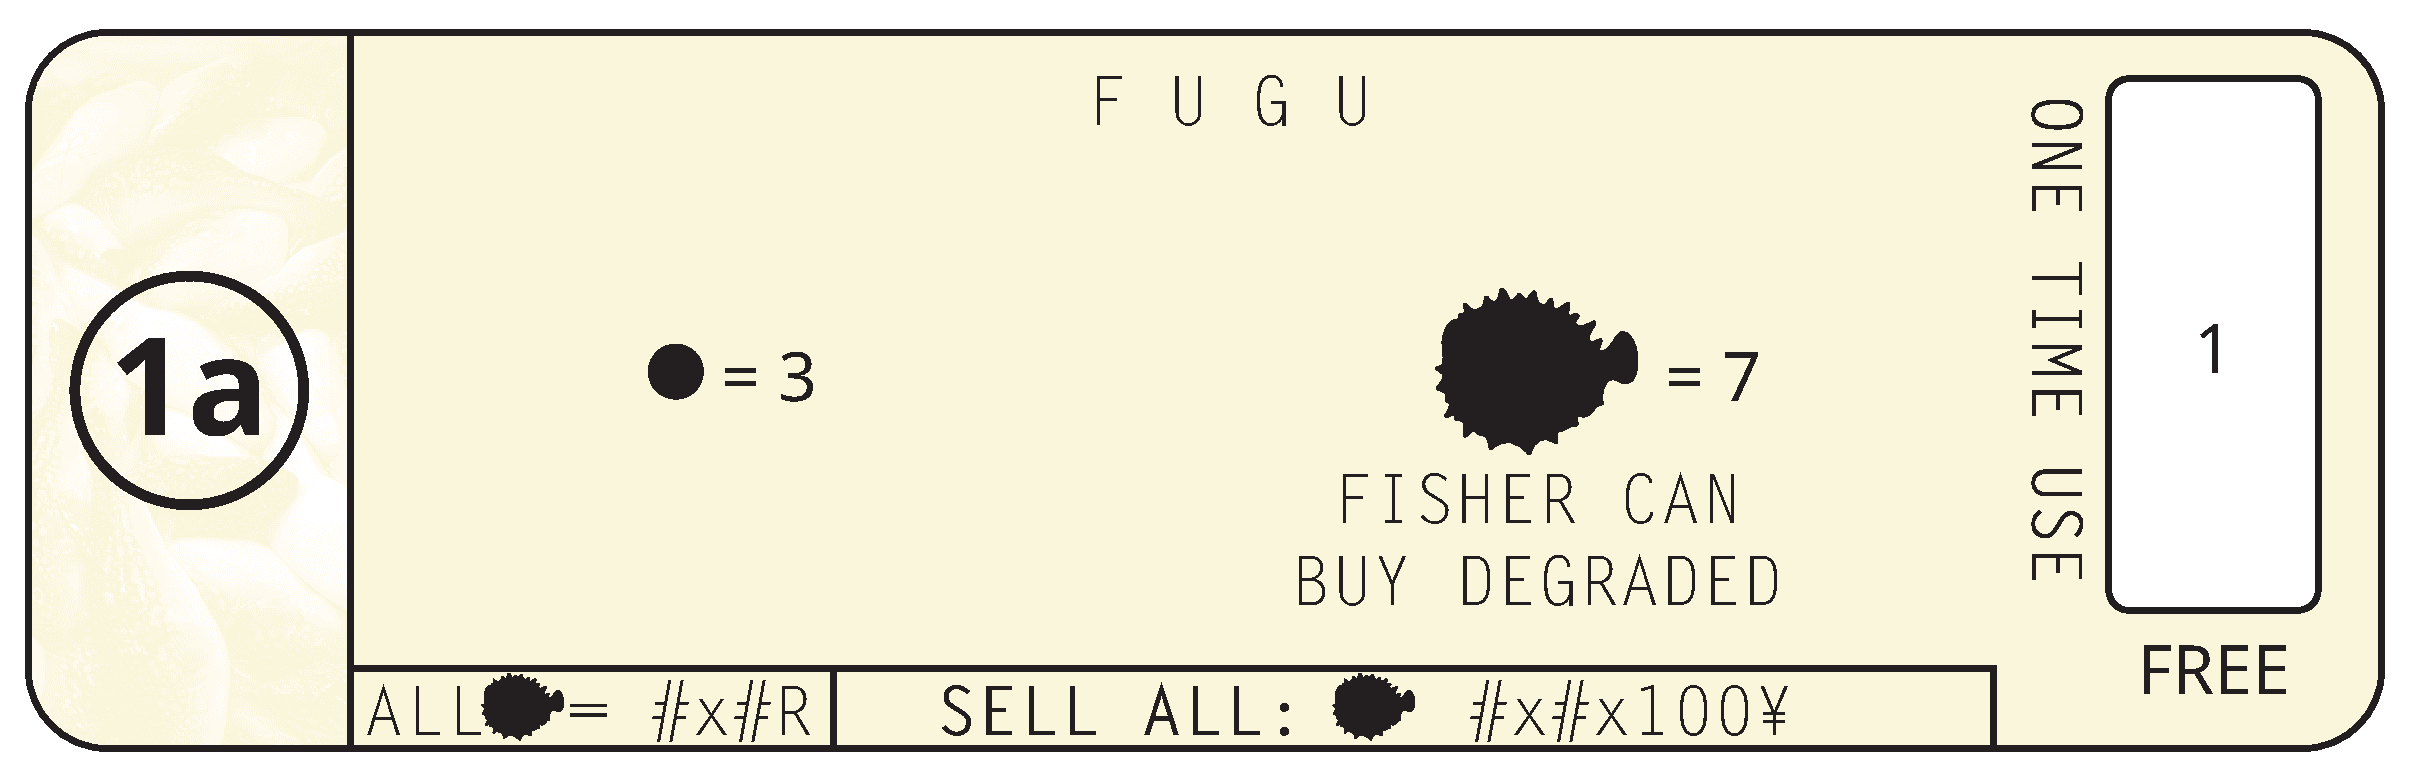
- Sell Fish tokens: You may sell Fugu tokens to the Market for ¥100 × the number of Fugu you are selling multiplied by itself. You do not have to sell all of your Fugu when doing this.
Resource value: The combined Resource value of all the Fugu tokens you own is the number of Fugu tokens you own multiplied by itself.
Example: A player sells a group of 4 Fugu tokens to the Market and takes ¥1,600 from the general supply.
Mackerel
Markets action interactions:
- Buy Fish Licenses: You may purchase a maximum of 1 Mackerel License for ¥100 each time you enter.
- Sell Fish tokens: As an exception to the normal rule that Fish Barrels can only be sold to other players when they perform a Purchasing action and buy them from you, you may sell Mackerel Barrels from your Harbor board as well as Mackerel tokens to the Market. Take ¥100 from the general supply for every 2 Mackerel Barrels and/or tokens (in any combination) which you return to the Mackerel board.
Resource value: Each Mackerel token is worth 1 Resource.
Octopus
Special rules for the Market’s visiting cost: If you choose to pay 1 Takoyaki token to enter the Octopus Market, you may use a Takoyaki token you have previously purchased from another player or one you have for sale on your Harbor board.
Markets action interactions:
- Buy Fish Licenses: You may purchase Octopus Licenses for ¥300 each.
- Sell Fish tokens: You cannot sell Octopus (or Takoyaki) tokens back to the Market.
- Trade Octopus tokens for Takoyaki: You may convert Octopus tokens into Takoyaki by taking 3 Takoyaki tokens for each Octopus token you return to the Market. Place any Takoyaki tokens you take in this way for sale on your Harbor board at a price of your choice. Note that Takoyaki never degrades, so it will remain on your Harbor board until purchased by another player during a Purchasing action. Any Takoyaki tokens that remain unsold by the end of the game will be worth nothing to you.
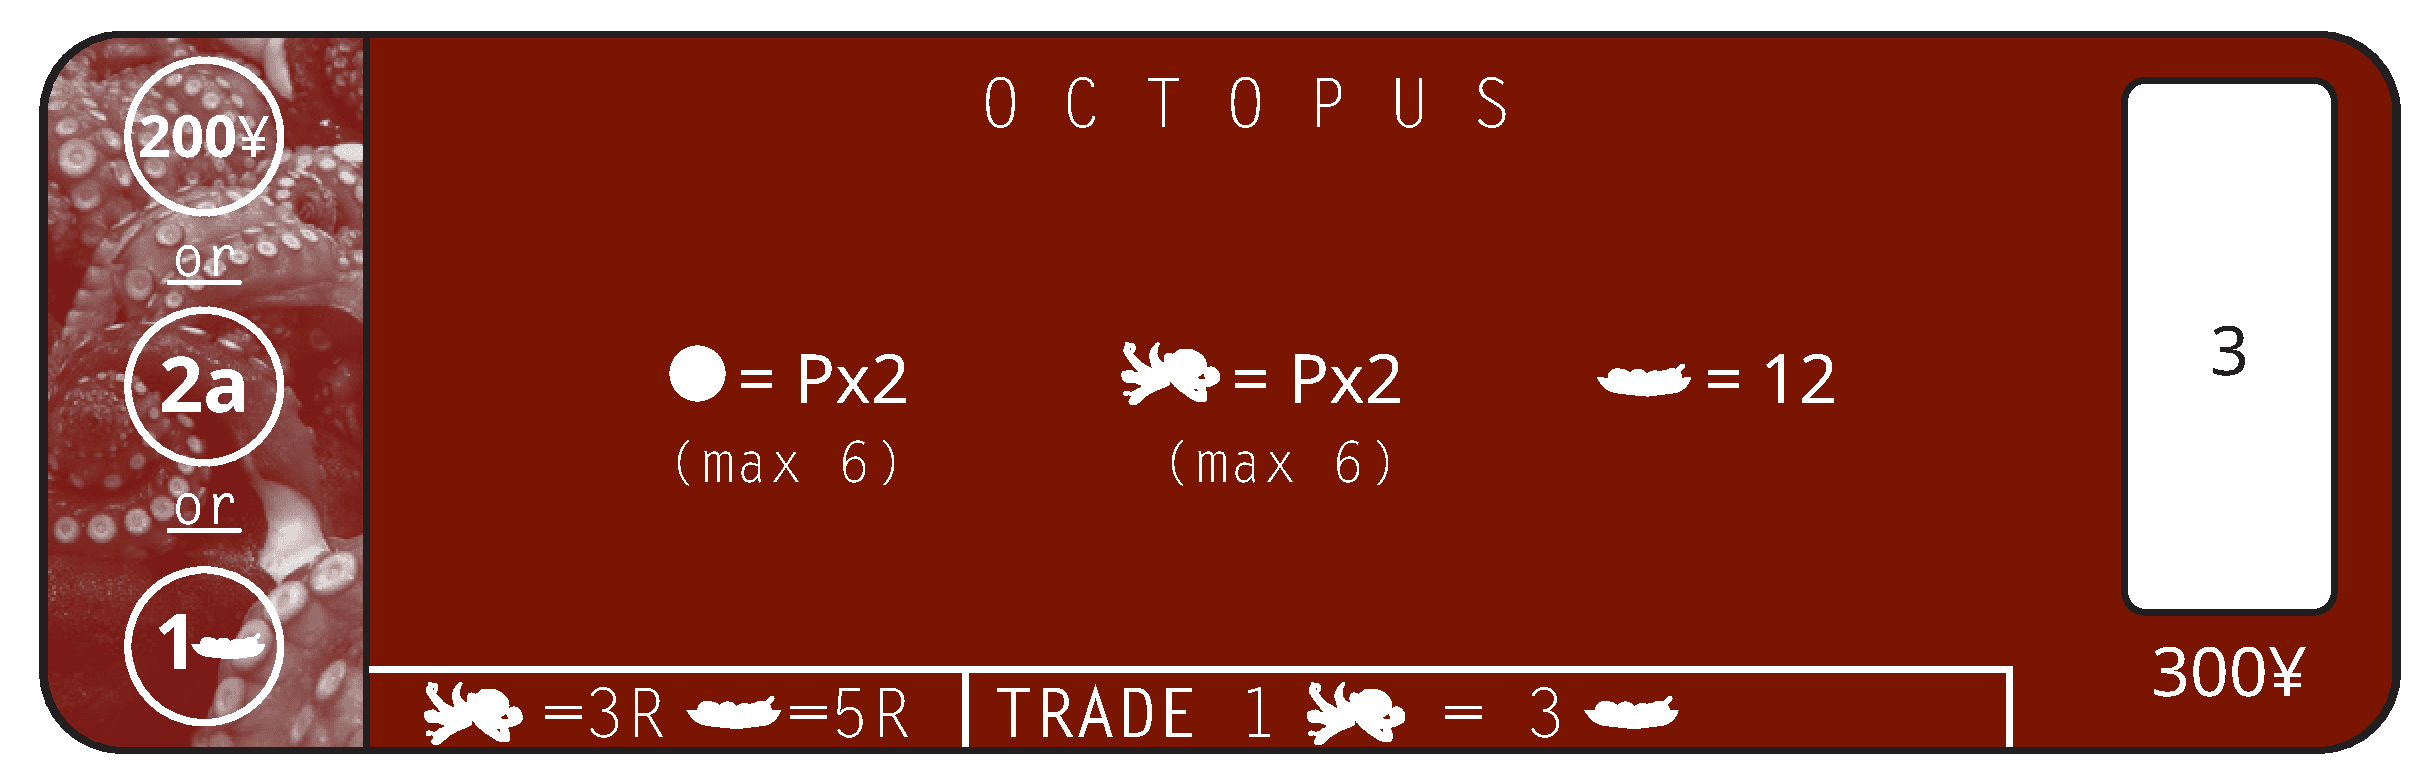
Resource value: Each Octopus token is worth 3 Resources. Each Takoyaki token is worth 5 Resources (unless still on your Harbor board, as above).
Red Snapper
Special rules for the Purchasing action: Whenever you purchase a Red Snapper Barrel from another player, return it to the Market and take the next available Red Snapper token, working from top to bottom in each column, in columns from left to right on the Market board. The lowest red number revealed represents the current Resource value of all Red Snapper tokens (see below).
Markets action interactions:
- Buy Fish Licenses: You may purchase Red Snapper Licenses for ¥300 each.
- Sell Fish tokens: You cannot sell Red Snapper tokens back to the Market.
Resource value: Each Red Snapper token is worth a number of Resources indicated by the lowest red number revealed inside the fish outlines on the Market board (this is equal to the number of Red Snapper tokens remaining in the Market divided by 3 and rounded up to the nearest whole number). Exception: if Red Snappers become Overfished (see Overfishing), they are worth a flat 2 Resources each, even if there are still Red Snapper tokens remaining on the Market board.
Salmon
Special rules for boats: Salmon Licenses only allow Ships to carry a single Salmon Barrel at a time, regardless of the number of slots on the Ships involved. This limit of 1 Salmon Barrel per boat also applies to the Barge.
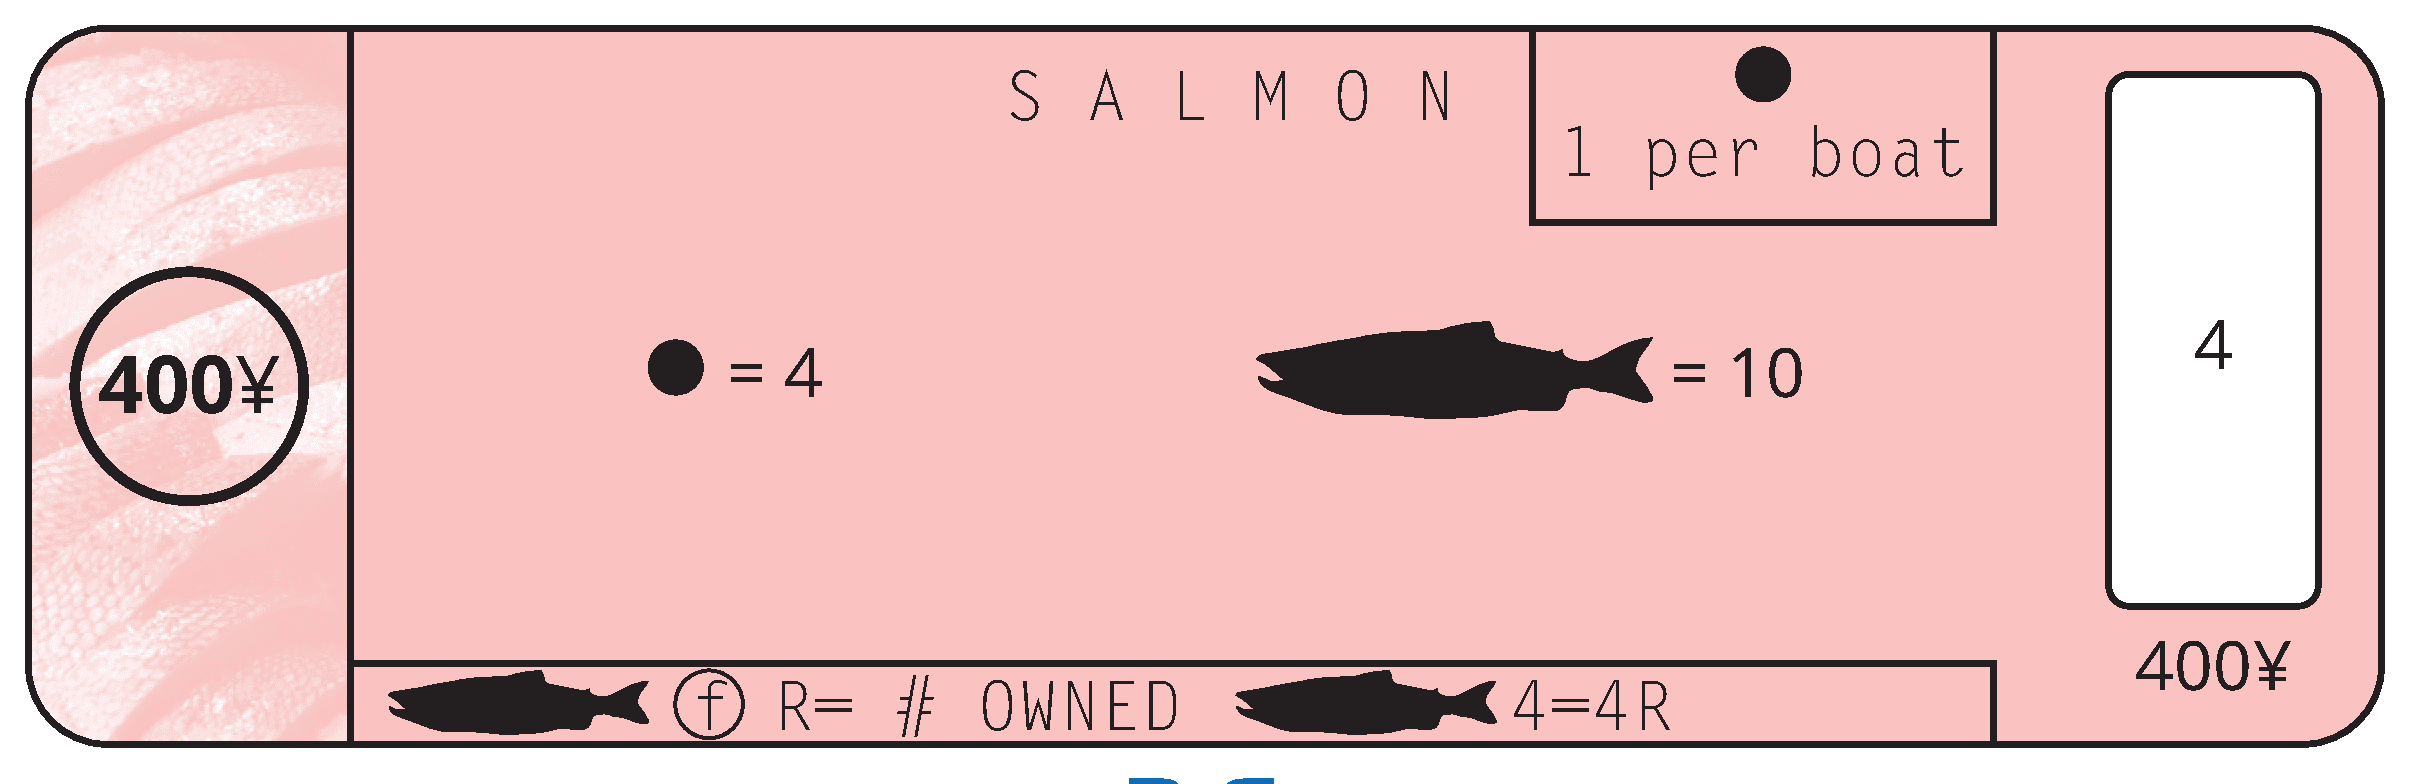
Special rules for Purchasing action: Whenever you purchase a Salmon Barrel from another player, return it to the Market and take a Salmon token as usual. Place this Salmon token in front of you with the side face up if you bought the Salmon Barrel from the upper selling row of the other player’s Harbor board (when the fish was fresh), and with the “4” side face up if you bought it from the lower selling row (indicating that the fish was degraded when you bought it). Which way up a Salmon token is placed determines its Resource value (see below).
Markets action interactions:
- Buy Fish Licenses: You may purchase Salmon Licenses for ¥400 each.
- Sell Fish tokens: You cannot sell Salmon tokens back to the Market.
Resource value: Each Salmon token with the “degraded” “4” side face up is worth a fixed 4 Resources. Each Salmon token with the “fresh” side face up is worth a number of Resources equal to the total number of player-owned Salmon (both fresh and degraded) currently in the game.
Spider Crab
Special rules for Docking during a Fishing action: When a Ship or Barge holding Spider Crab Barrels Docks in one of your Ports, do not place the unloaded Barrels for sale on your Harbor board. Instead, for every 2 Spider Crab Barrels you unload during the same Fishing action, a Spider crab auction takes place immediately. If this happens before you have completed your Fishing action, perform the auction first and then return to finish your Fishing action afterwards, stopping for another auction for every further 2 Barrels you unload.
When an auction happens, return the 2 Spider Crab Barrels that triggered it to the Market board, and draw 1 random Spider Crab token out of the Auction bag. All players (including you) participate in a blind bid to receive this Spider Crab, secretly placing an amount of Yen in a closed fist and revealing all bids simultaneously. ¥0 is a valid bid. The highest bidder wins the auction and takes the Spider Crab token. If there is a tie for the highest bidder, you decide the winner among the tied players. If you win the auction, pay your bid to the general supply. If another player wins, they pay their bid to you.
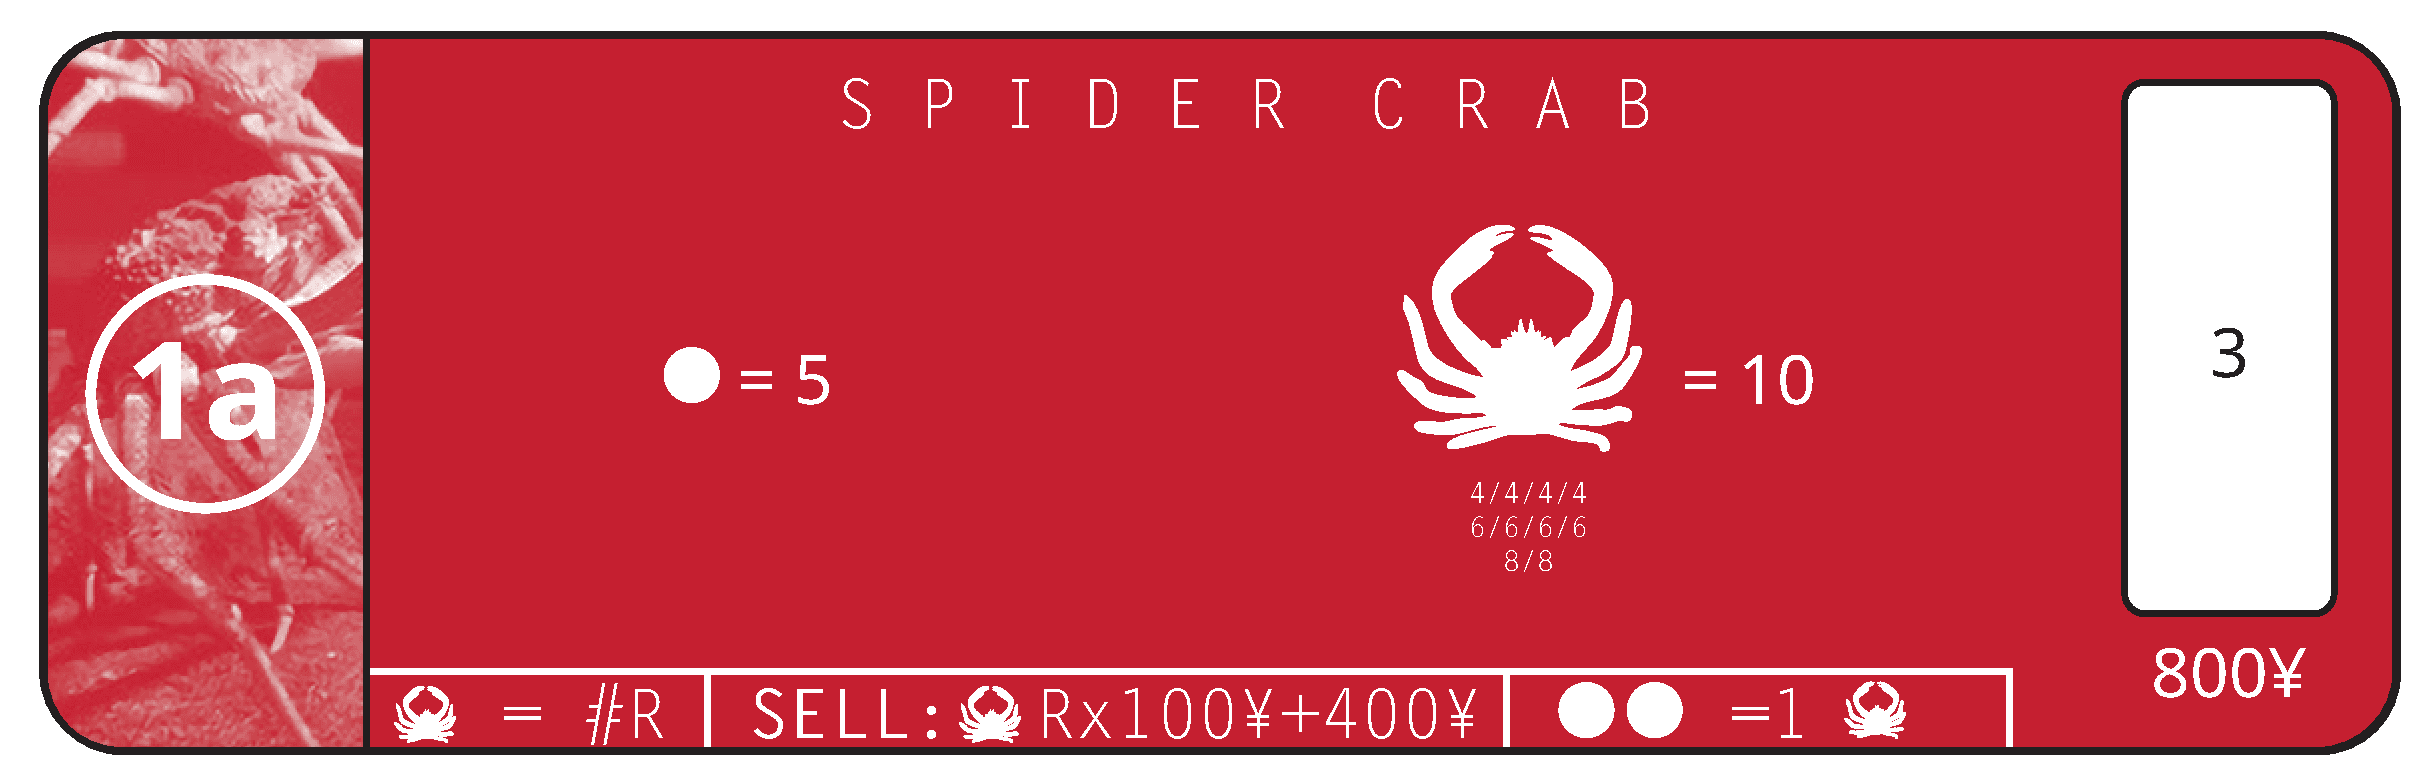
At the end of your Fishing action if there is a single unloaded Spider Crab Barrel remaining, return it to the Market board without compensation.
Markets action interactions:
- Buy Fish Licenses: You may purchase Spider Crab Licenses for ¥800 each.
- Sell Fish tokens: You may sell Spider Crab tokens to the Market for ¥100 × the Resource value plus ¥400 for each token sold. Return any Spider Crab tokens you sell to the Auction bag.
Resource value: Each Spider Crab token is worth the number of Resources printed on it (4, 6, or 8).
Squid
Markets action interactions:
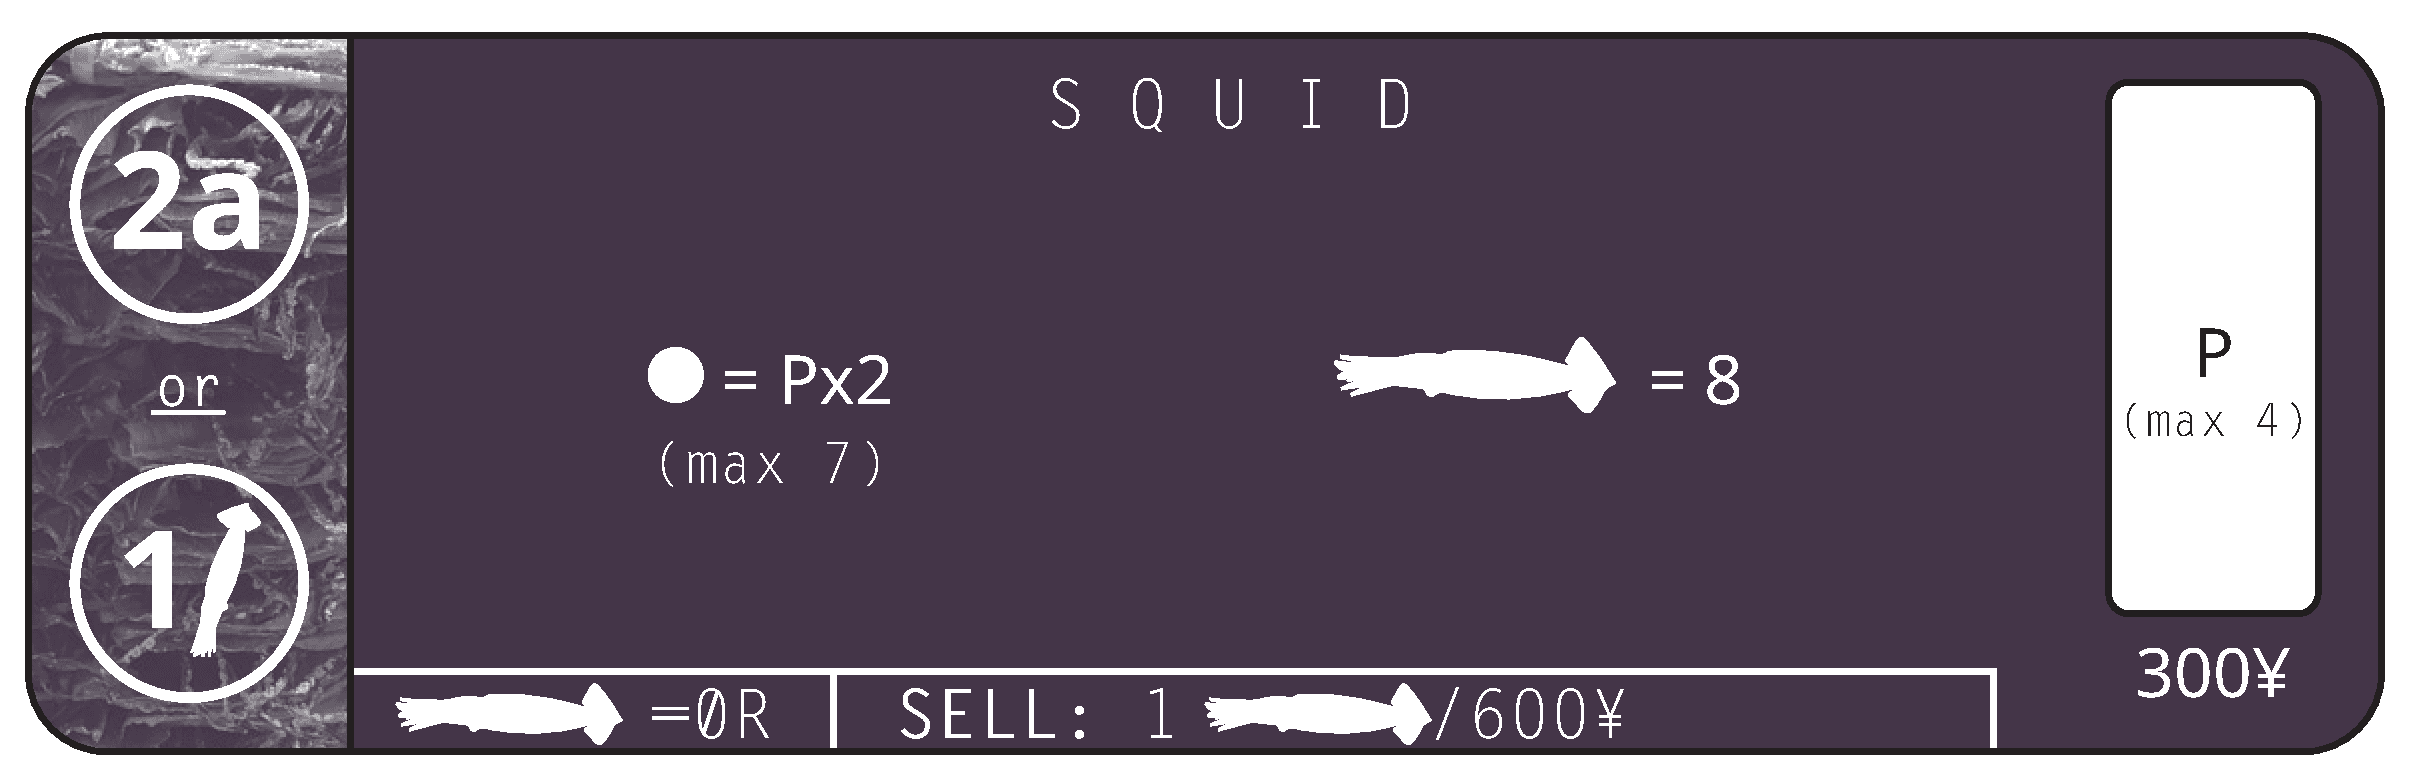
- Buy Fish Licenses: You may purchase Squid Licenses for ¥300 each.
- Sell Fish tokens: You may sell Squid tokens to the Market for ¥600 each.
Resource value: Each Squid token is worth 0 Resources.
Tuna
Special rules for Docking during a Fishing action: When a Ship or Barge holding Tuna Barrels Docks in one of your Ports, do not place the unloaded Barrels for sale on your Harbor board. Instead, for every 3 Tuna Barrels you unload during the same Fishing action, a Tuna auction takes place immediately. If this happens before you have completed your Fishing action, perform the auction first and then return to finish your Fishing action afterwards, stopping for another auction for every further 3 Barrels you unload.
When an auction happens, return the 3 Tuna Barrels that triggered it to the Market board, and draw 1 random Tuna token out of the Auction bag. All players (including you) participate in a blind bid to receive this Tuna, secretly placing an amount of Yen in a closed fist and revealing all bids simultaneously. ¥0 is a valid bid. The highest bidder wins the auction and takes the Tuna token. If there is a tie for the highest bidder, you decide the winner among the tied players. If you win the auction, pay your bid to the general supply. If another player wins, they pay their bid to you.
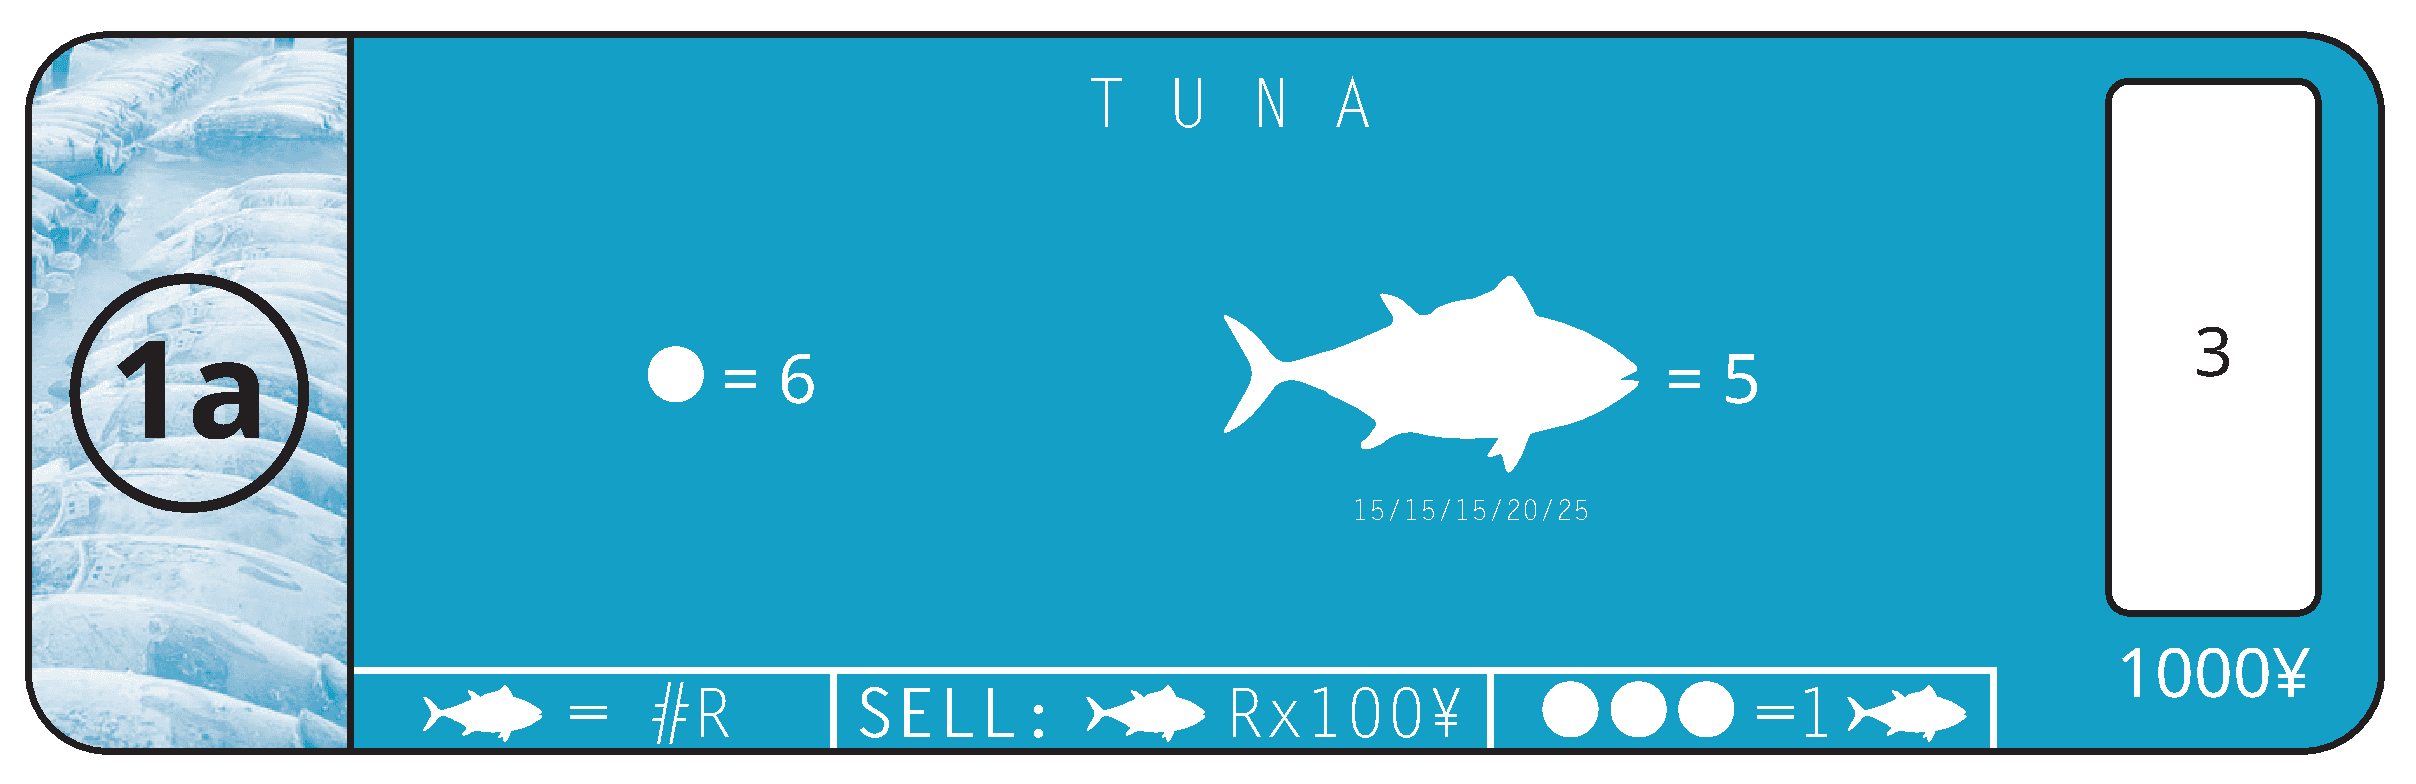
At the end of your Fishing action if there are 1 or 2 unloaded Tuna Barrels remaining, return them to the Market board without compensation.
Markets action interactions:
- Buy Fish Licenses: You may purchase Tuna Licenses for ¥1,000 each.
- Sell Fish tokens: You may sell Tuna tokens to the Market for ¥100 × the combined Resource value of the tokens sold. Return any Tuna tokens you sell to the Auction bag.
Resource value: Each Tuna token is worth the number of Resources printed on it (15, 20, or 25).
EXTERNAL MARKETS
- Aquarium
- Auction
- Bank
- Barter
- Government
- Rentals
- Ships
- Trading
- Used Ships
Aquarium
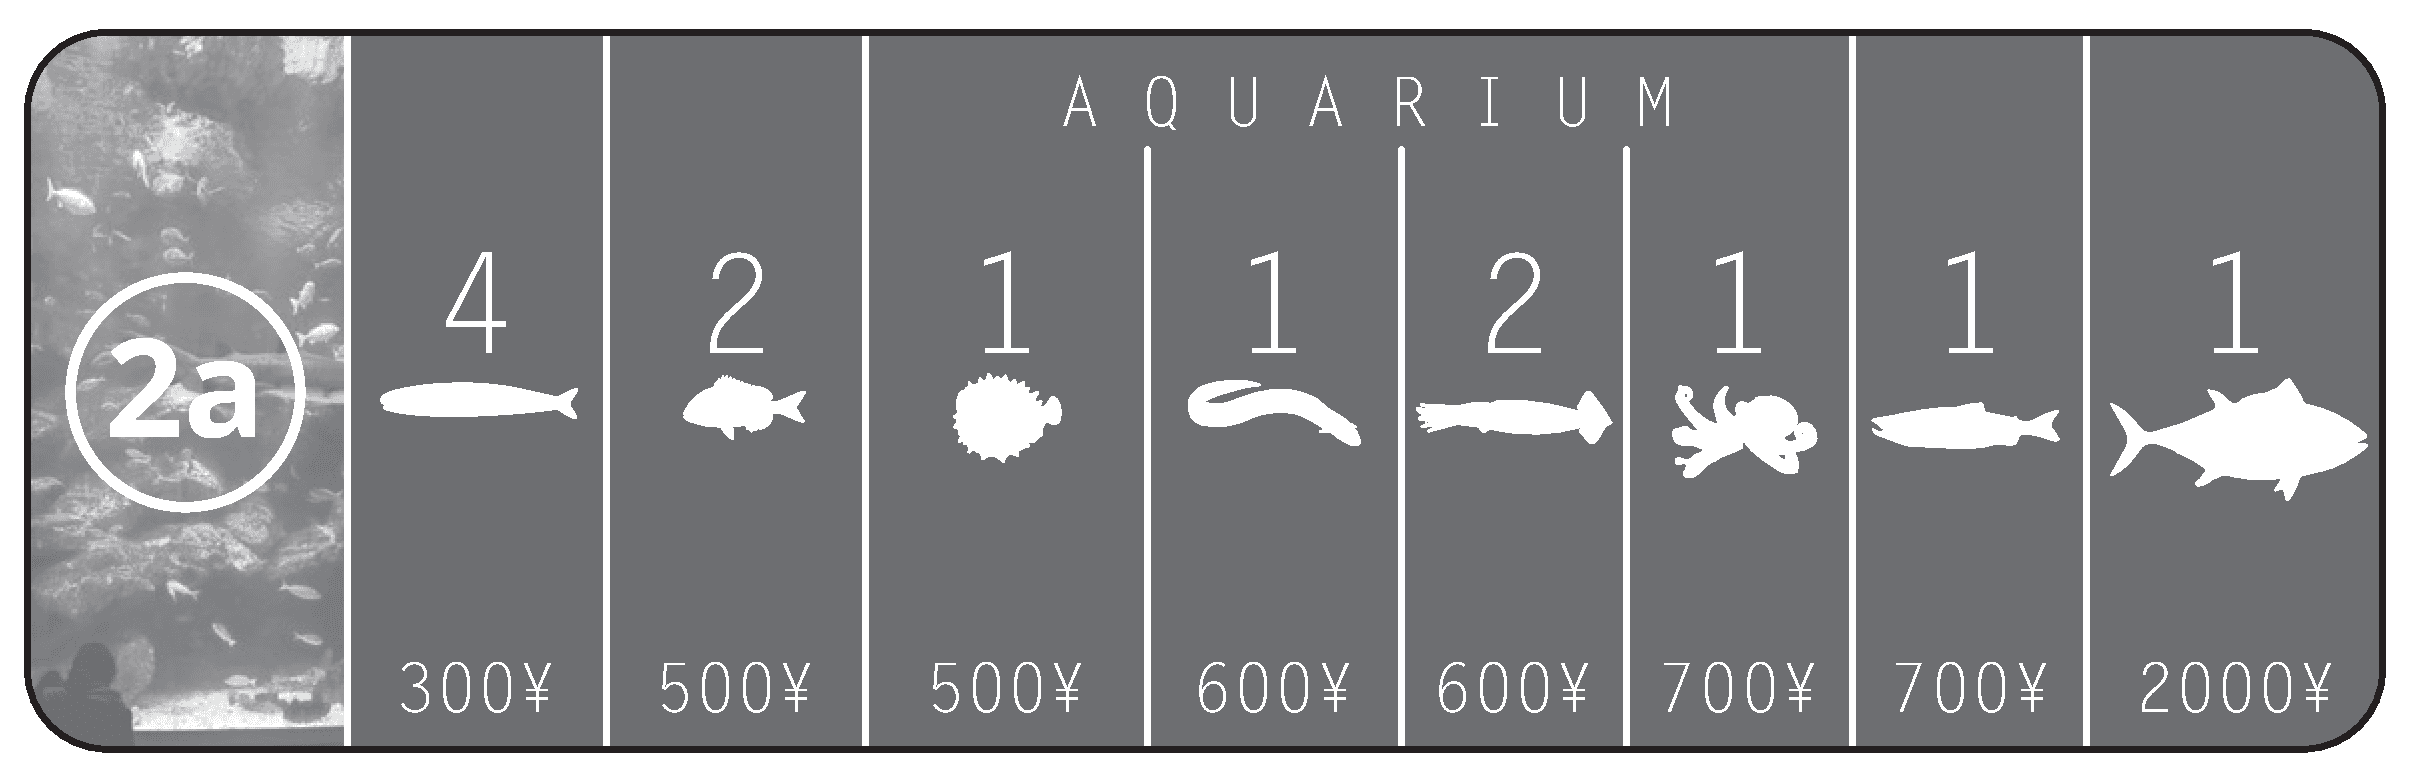
When interacting with this Market, you may sell any number of Fish tokens to it for the prices shown, provided there is still demand in the Aquarium for the tokens you are selling. A type of Fish token is in demand as long as there are fewer matching Fish tokens on the Aquarium than the number shown in the corresponding space. When you sell a Fish token, place it on its space on the Aquarium board and take the amount of Yen shown from the general supply. All Fish sold to the Aquarium stays there for the rest of the game, and once the total number of Fish tokens for a given type matches the corresponding number in that type’s space, no more of that type of Fish may be sold.
Auction
When you interact with this Market, you may hold an auction. You may only do this once each time you enter the Auction Market. To hold an auction, select any number of Fish tokens to offer up for auction as one lot, place them on the rightmost space of the Auction board which corresponds to their combined worth in Resources, and pay the fee shown to the general supply (you must pay this fee before the auction starts). All other players participate in a blind bid to buy this lot from you, secretly placing an amount of Yen in a closed fist and revealing all bids simultaneously. ¥0 is a valid bid. You must accept the highest bid, which is also matched by the Market: the highest bidder pays you the amount of Yen they bid, and you take the same amount again from the general supply.
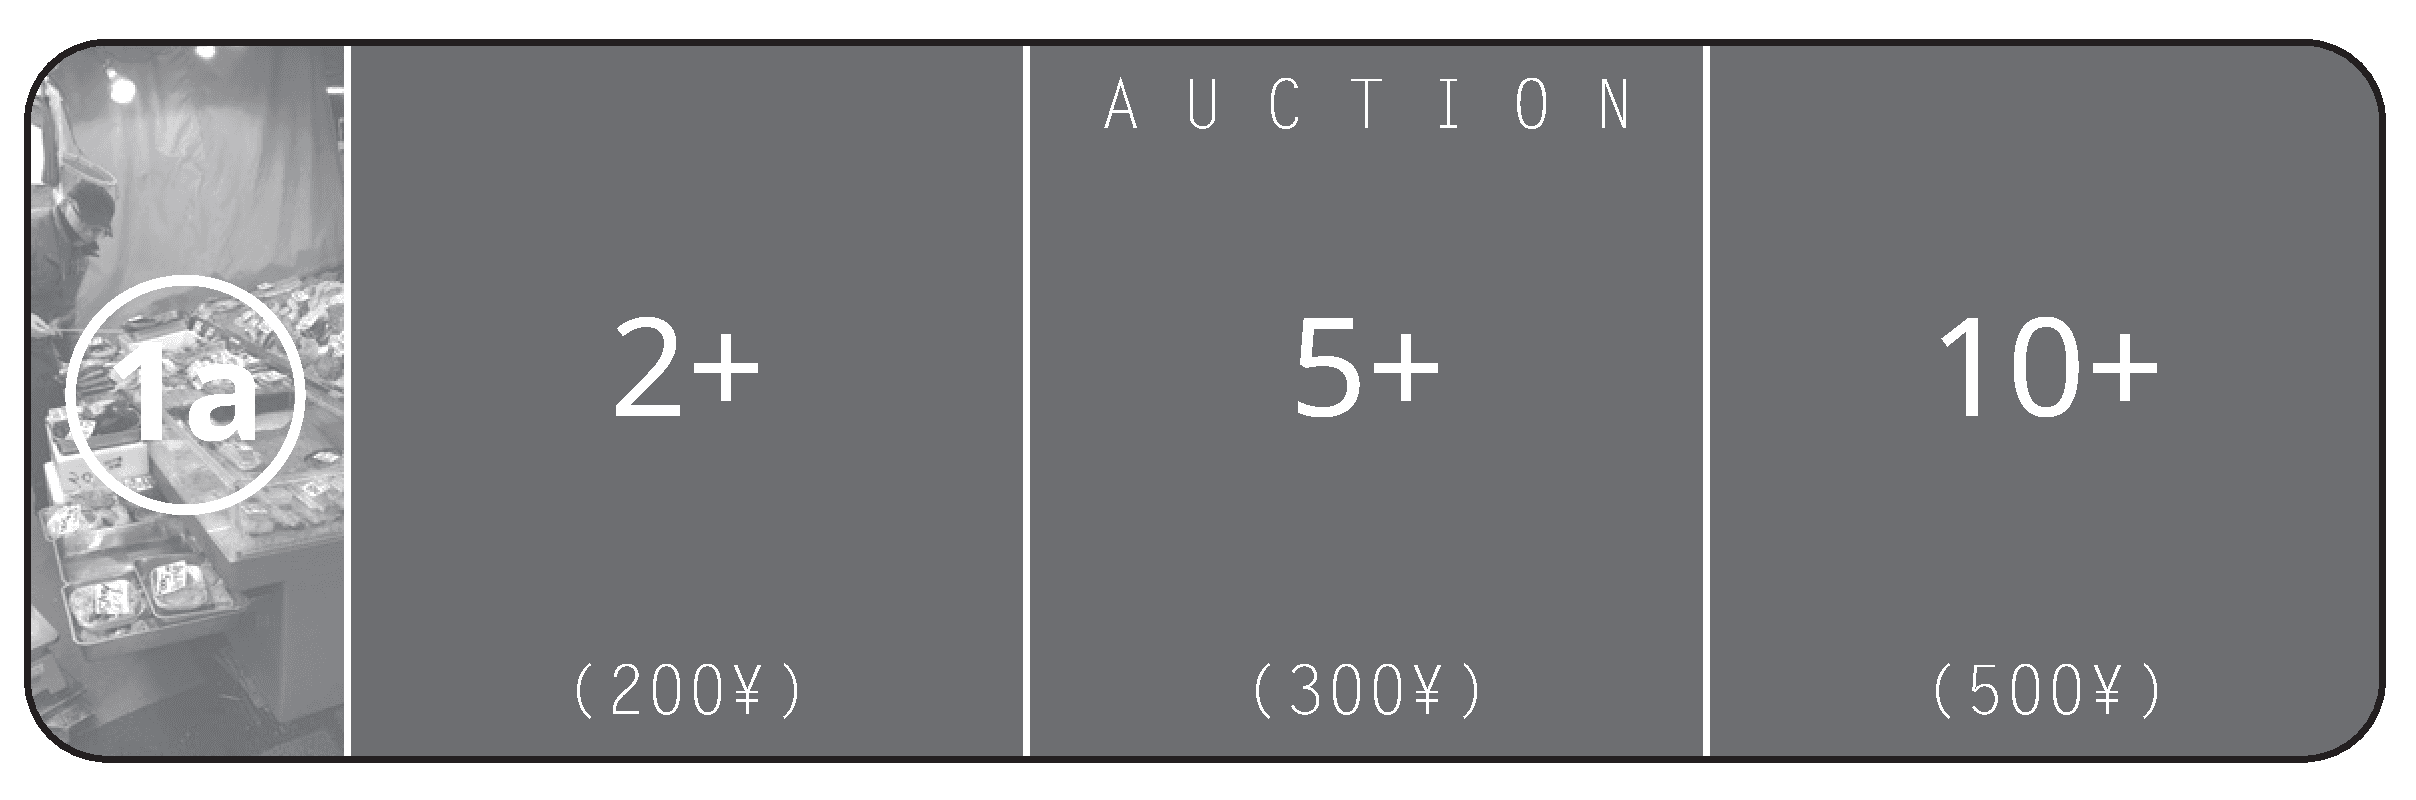
Example: if the highest bid is ¥300, the general supply also pays ¥300, for total proceeds of ¥600.
Bank
When interacting with this Market, you may take a Loan or buy a Share. No player can do both: if you have previously taken a Loan you cannot buy a Share, and vice versa.
Take a Loan: Take a Loan token from the Bank and ¥500 from the general supply. You may take more than one Loan in the same action, if they are available on the Bank Market board.
Buy a Share: Pay ¥300 to the general supply to take a Share token from the Bank. You may buy both Shares at the same time, if they are available.
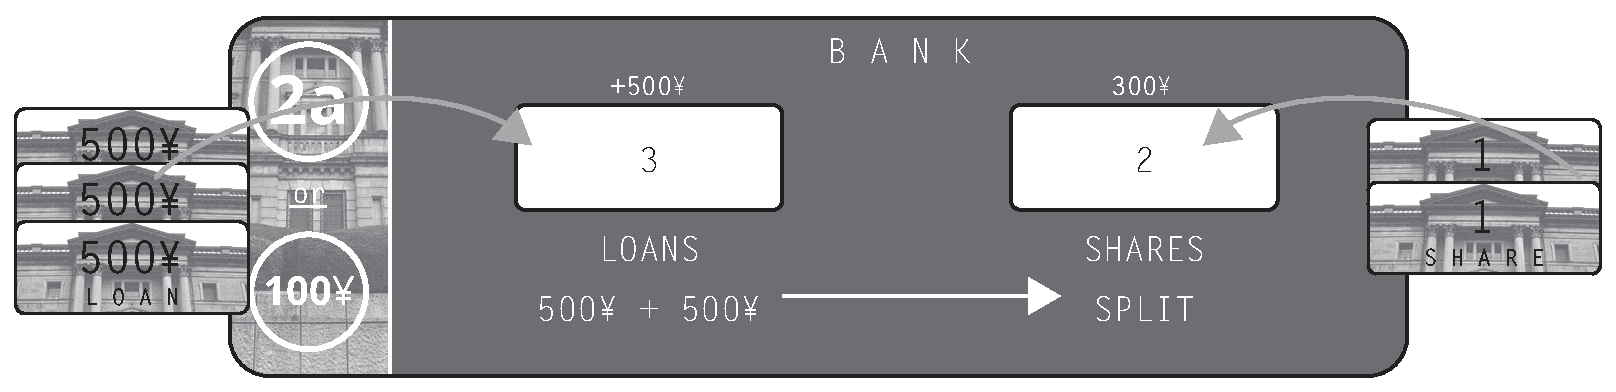
Neither Loans nor Shares take up License spaces on your Harbor board; keep any you take beside the board in your player area.
Repaying a Loan: At the end of the game (and not before), Loans must be repaid in full, plus interest of ¥500 per Loan, with total interest paid being divided equally among any players owning Shares, rounding up to the nearest ¥100 (with any additional Yen from rounding being taken from the general supply). If no players have bought Shares, the interest is paid to the general supply instead. If no players have taken Loans, then any players owning Shares receive nothing.
Note: It is possible for players to have a negative amount of Yen after repayment of Loans and interest. In such cases, players owning shares still receive interest as normal, with any shortfall in interest Yen being taken from the general supply.
Example: During the game, player A took 2 Loans and player B took 1 Loan. Players C and D bought one Share each. At the end of the game, the Loans are repaid, with players A and B paying ¥1,000 and ¥500 respectively to the general supply. They must also pay interest: player A pays a further ¥1,000 and player B a further ¥500 for total interest of ¥1,500. This is divided (rounding up to the nearest ¥100) between players C and D, who take ¥800 each (with the additional ¥100 required for this taken from the general supply).
Barter
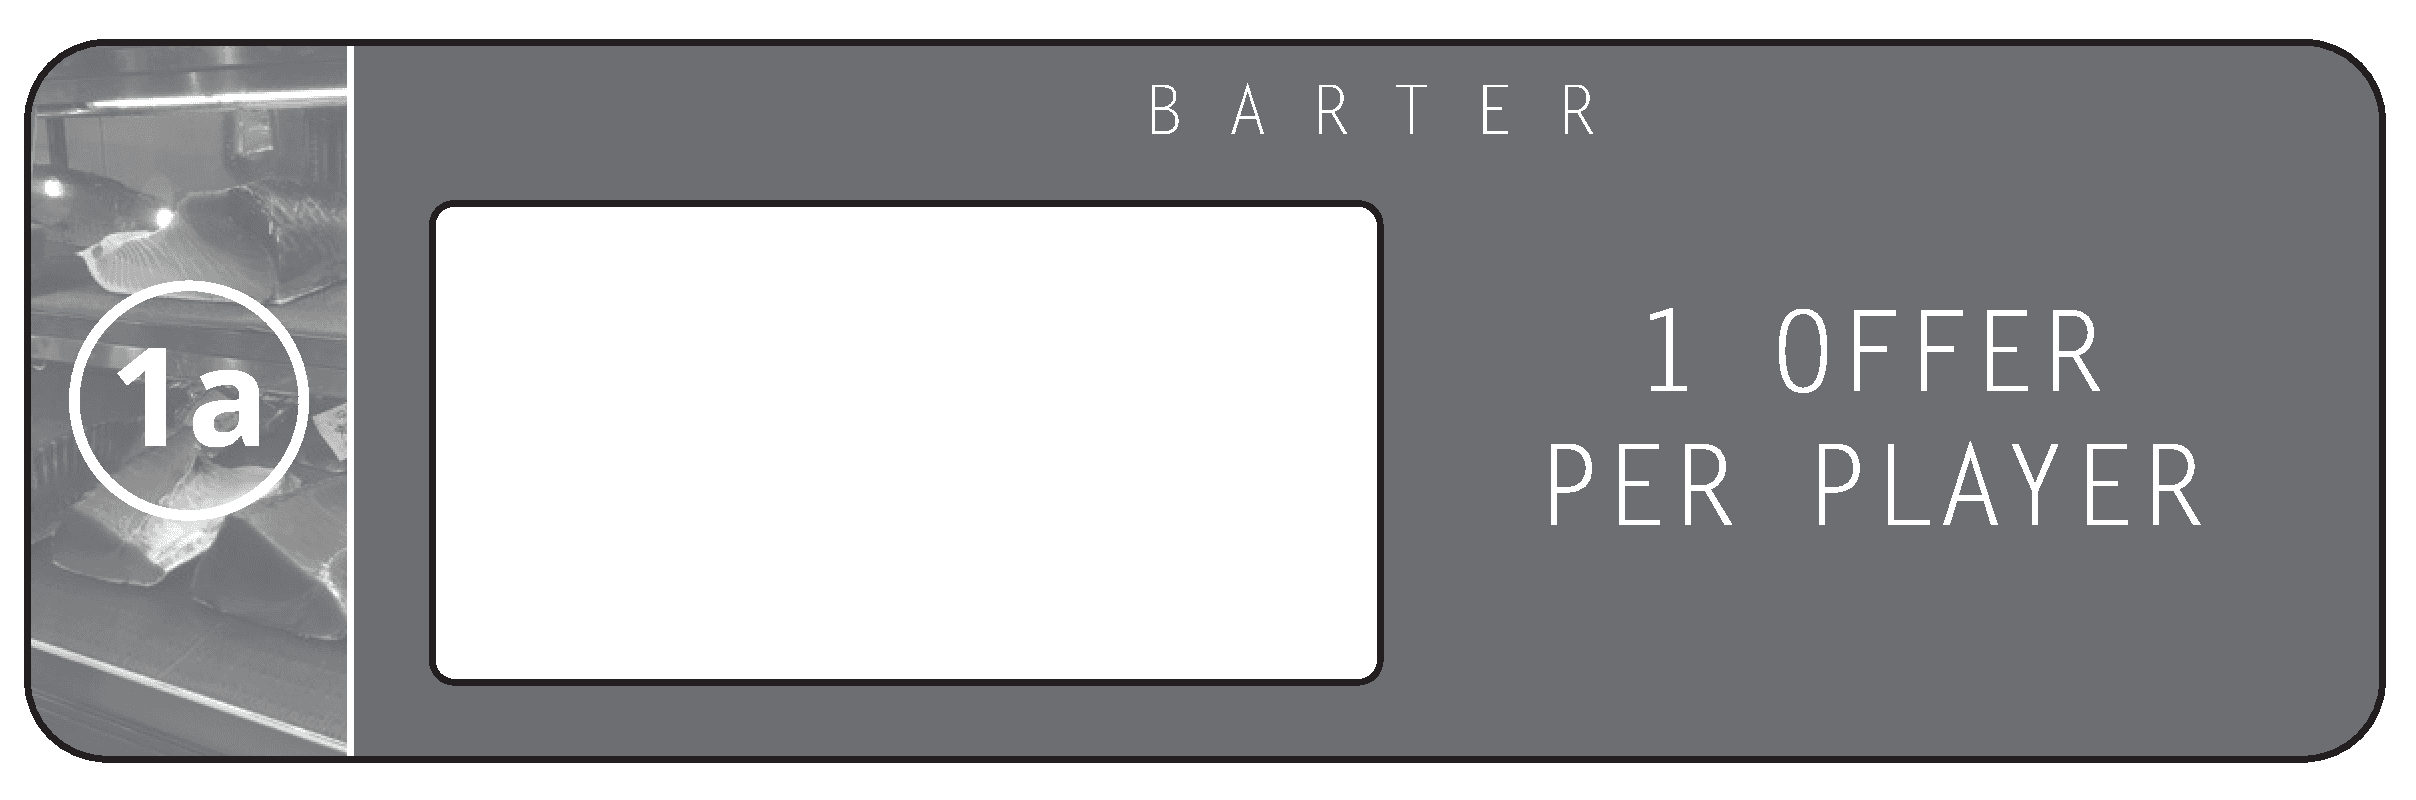
When you interact with this Market, you may offer a group of Fish tokens for sale. You may only do this once each time you enter the Barter Market. To make an offering, select any number of Fish tokens you wish to offer for sale as one group, and place them on the Barter board. All other players participate in a blind bid to buy this lot from you, secretly placing the amount of Yen they would offer (which may be ¥0) in a closed fist and revealing all offers simultaneously. You may then accept an offer of your choice (you do not have to accept the highest one), or decline all offers made. If you accept an offer, the corresponding player pays you the amount of Yen they offered and takes the Fish tokens from the Barter board. Otherwise, place the Fish tokens back in front of you.
Government
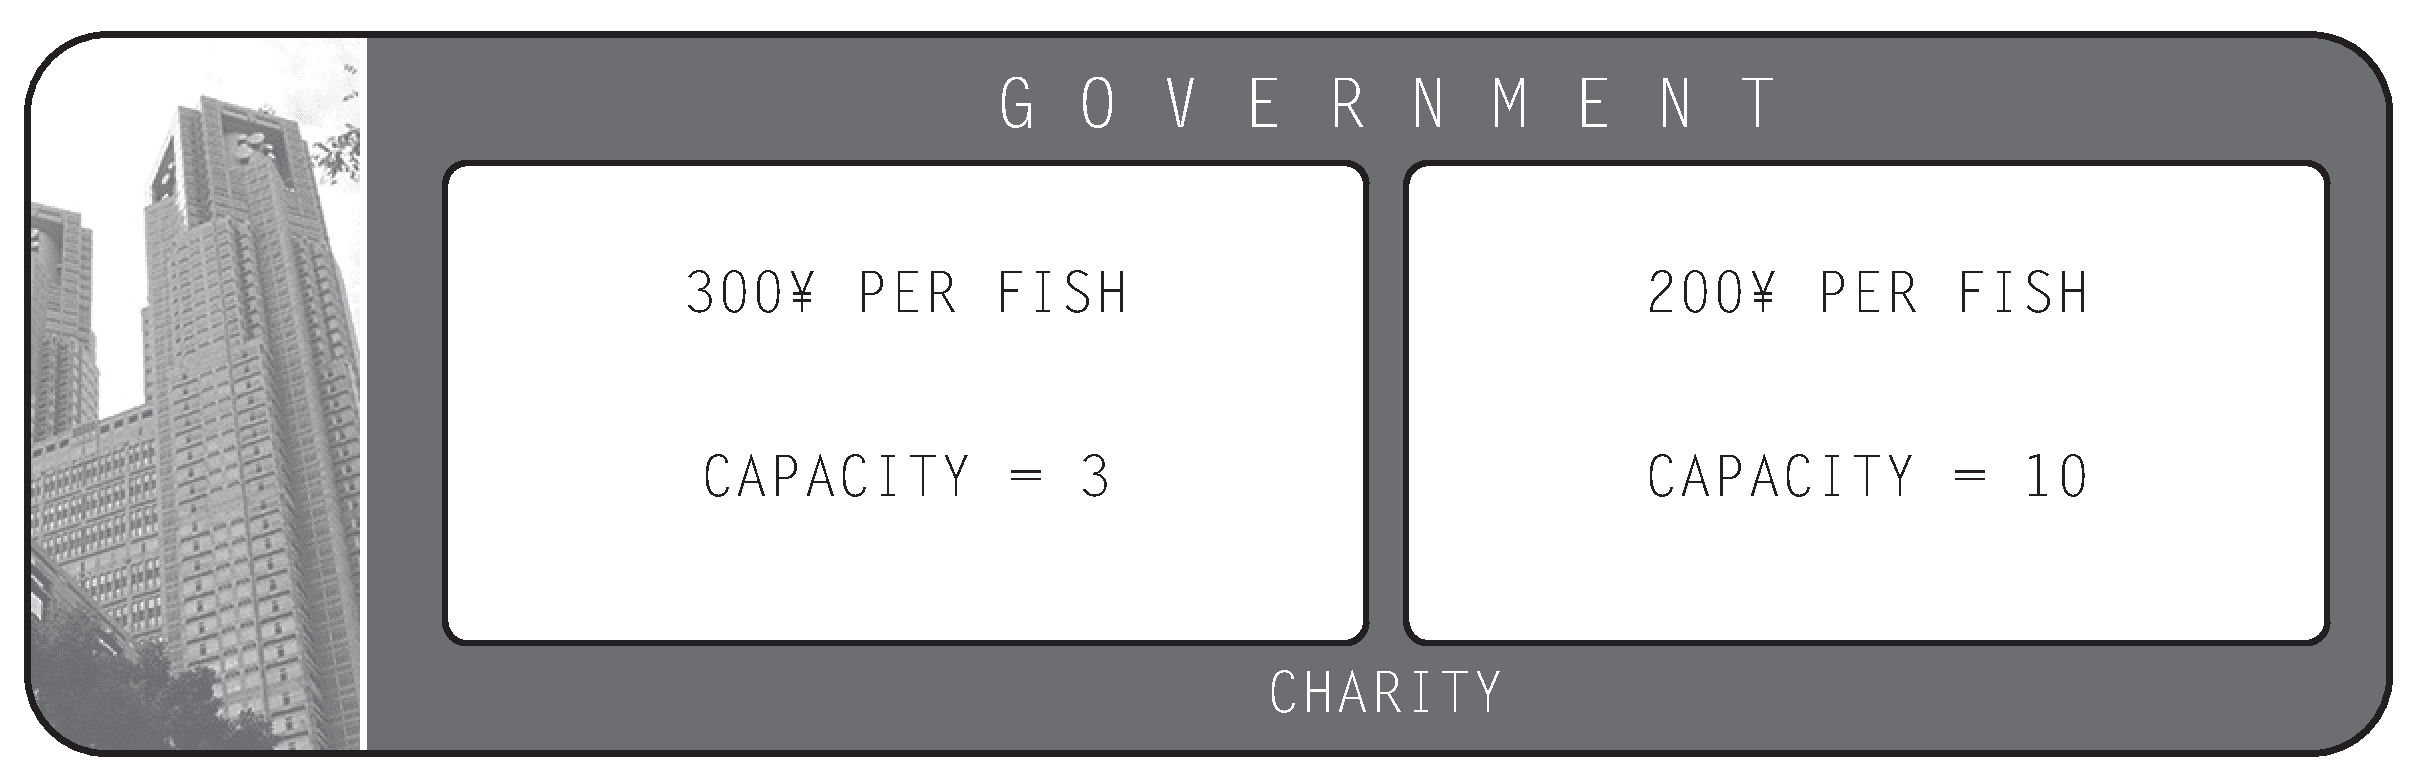
You may only enter this Market once per turn. When interacting with this Market, you may give Fish tokens to charity by placing them in the spaces on the board, and taking the amount of Yen shown for each token placed (regardless of the Resource value of the tokens themselves). You may give multiple Fish tokens to one or both spaces at the same time, provided they have space for them: the left hand space can contain a total of up to 3 Fish tokens, and the right hand space can contain a total of up to 10 Fish tokens. All tokens placed on these spaces will stay there for the rest of the game. It is not possible to interact with this Market if both spaces are full.
Rentals
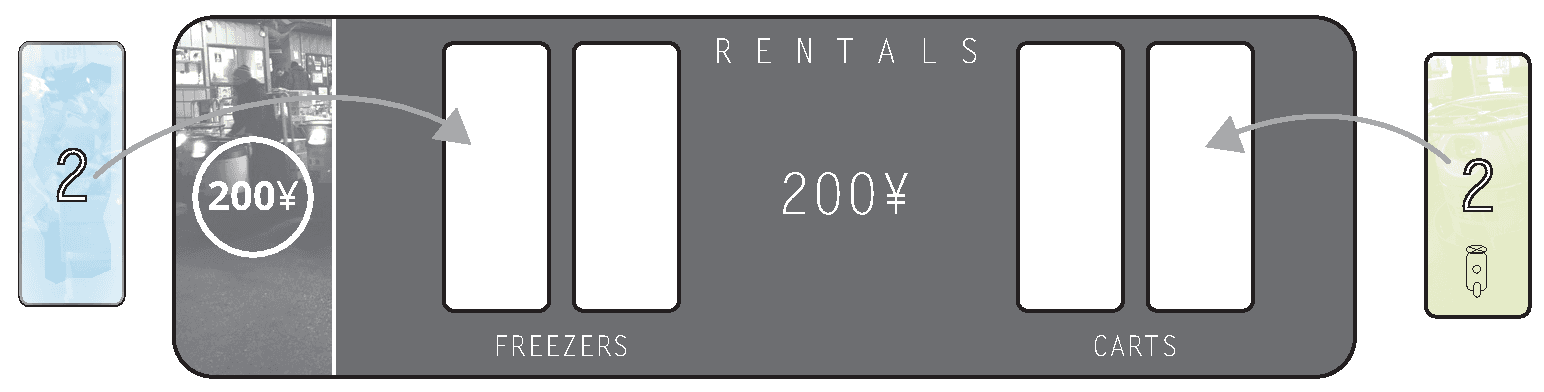
When interacting with this Market, you may rent as many Freezers and Carts as you like for ¥200 each, paid to the general supply. Each Freezer or Cart takes up a License space on your Harbor board while you have it, so you must have an empty space in order to rent one. Each Freezer or Cart can be used twice; place one with the “2” side face up when you rent it, flip it to the “1” side when using it for the first time, and return it to the Market when using it for the second time. You may use a Freezer at the start of your turn to skip the Fish Degradation step for that turn. You may use a Cart during your turn to receive 1 additional Action Point to spend entering Markets that turn. Carts cannot be used for Fishing or Purchasing actions. You may use more than one Cart and/or the same Cart twice in the same turn to gain more than 1 additional Action Point for entering Markets.
Ships
When interacting with this Market you may buy or sell as many boats as you wish and are able to.
Buy boats: In order to purchase a Ship or Barge, you must have space in one of your Ports for it to be placed at the point of purchase (it does not matter how many boats you have at sea when you do this). Remember that the rightmost “2” Port can hold 2 Ships at the same time, or 1 Barge, and that only the “2” Port can hold a Barge. To purchase a boat, take a Ship or Barge of your choice, pay its cost to the general supply, and place it in an available space in one of your Ports. Each Ship costs ¥500 for each slot it has. The Barge costs ¥1,000.
Sell boats: You may sell a boat for 10% of its purchase price at the Ships Market, rounded up to the nearest ¥100. In order to sell a Ship or Barge, it must be in one of your Ports. Return it to the Ships Market and take its sale value from the general supply.
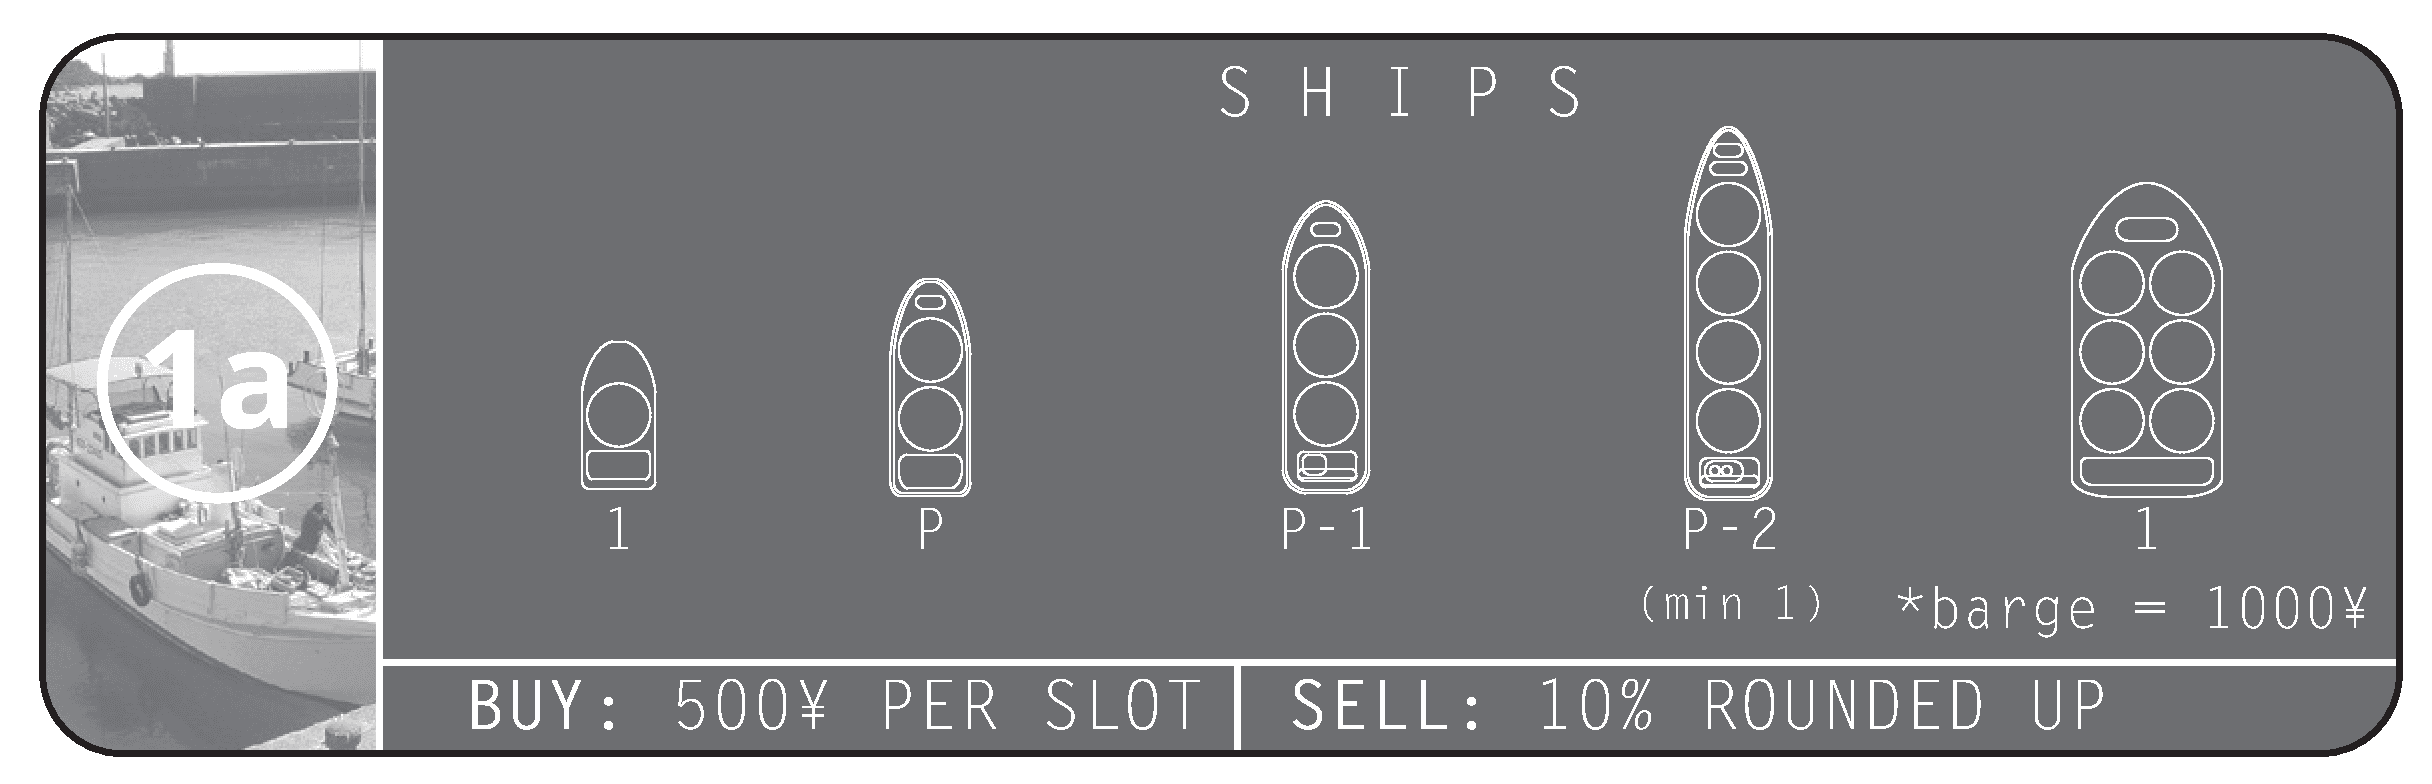
Example: A Three-slot Ship costs ¥1,500 to purchase. You could sell it back to the Ships Market for ¥200.
Trading
When you interact with this Market you may trade Fish tokens, for Yen or other Fish tokens, any number of times.
Trade Fish tokens for Yen: This is only available if there is at least one empty space on the Trading Market board. Choose an empty space, place on it any combination of Fish tokens with a current combined worth of at least the number of Resources shown, and take the corresponding amount of Yen shown from the general supply. Leave the Fish tokens you have traded in that space on the Market board.
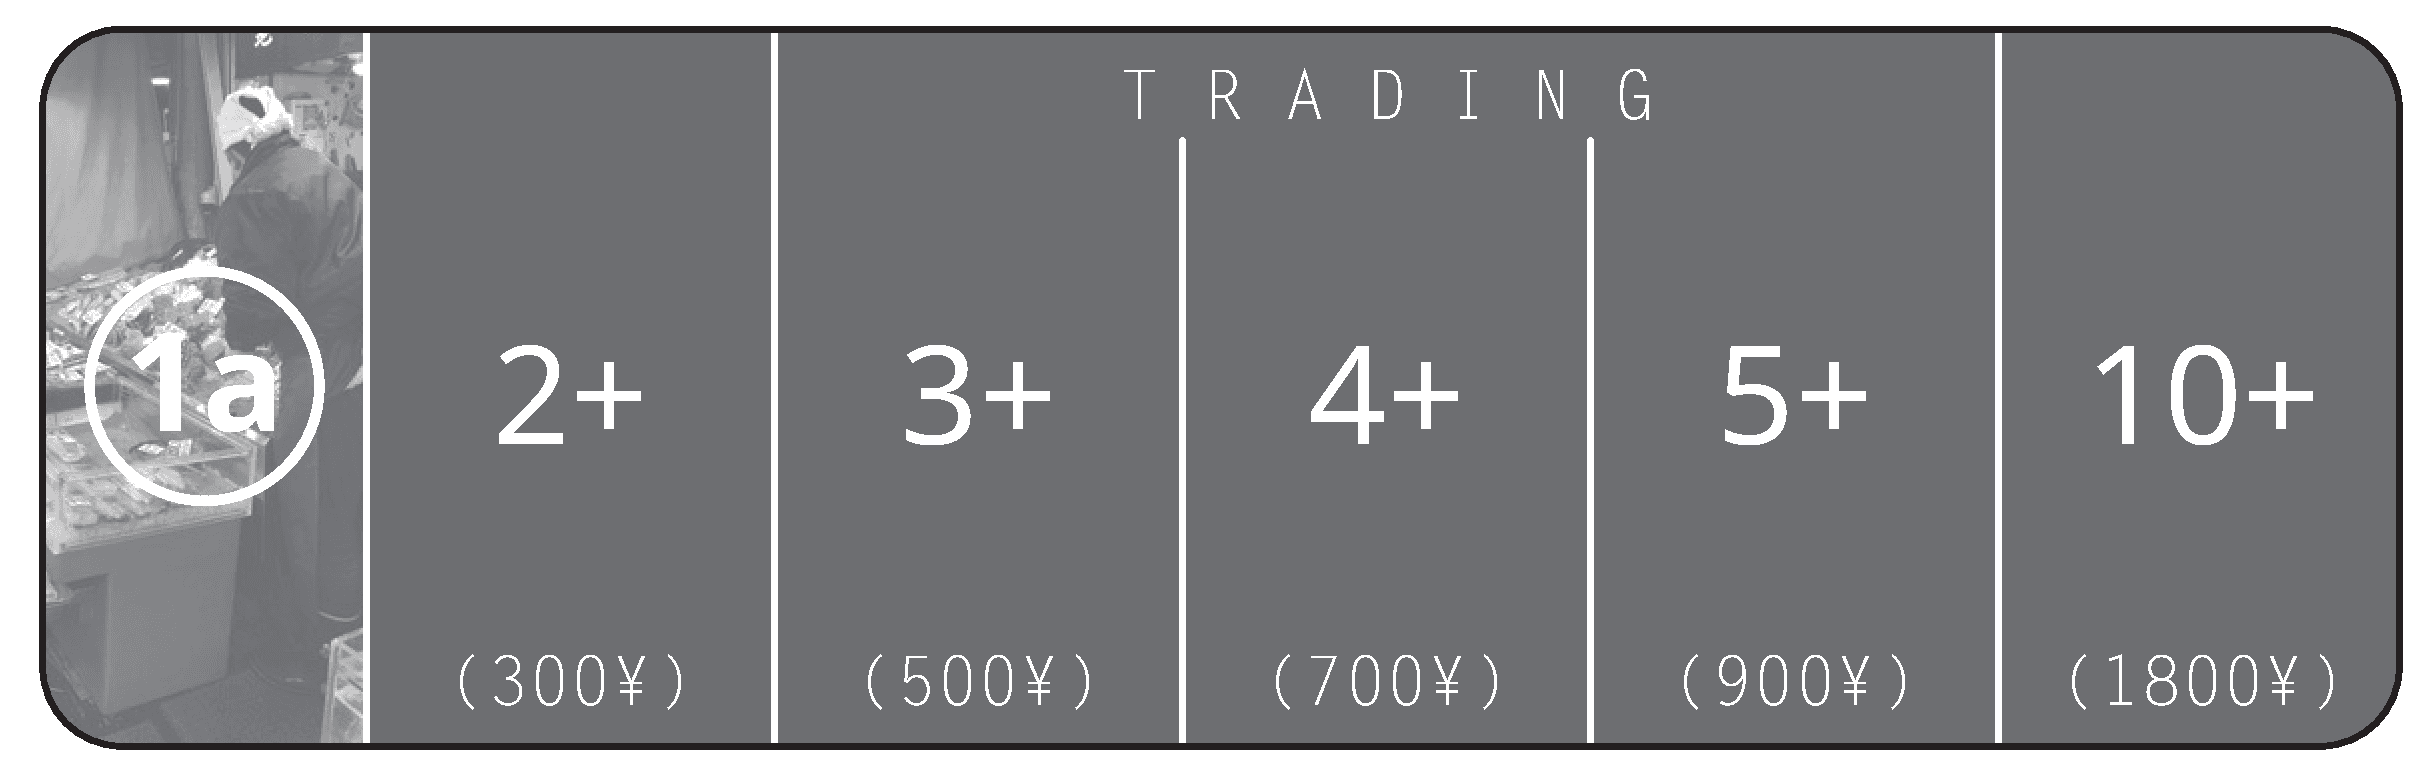
Trade Fish tokens for other Fish tokens: This is only available if Fish tokens have been traded for Yen at least once during the game. Choose a space with Fish tokens on it, and exchange those tokens for any combination of your own Fish tokens with a combined worth of at least the number of Resources printed in that space. Leave the Fish tokens you spent on that space.
Used Ships
When interacting with this Market you may sell or buy as many boats as you wish and are able to. You cannot use this market on your last turn (i.e. once the end of the game has been triggered).
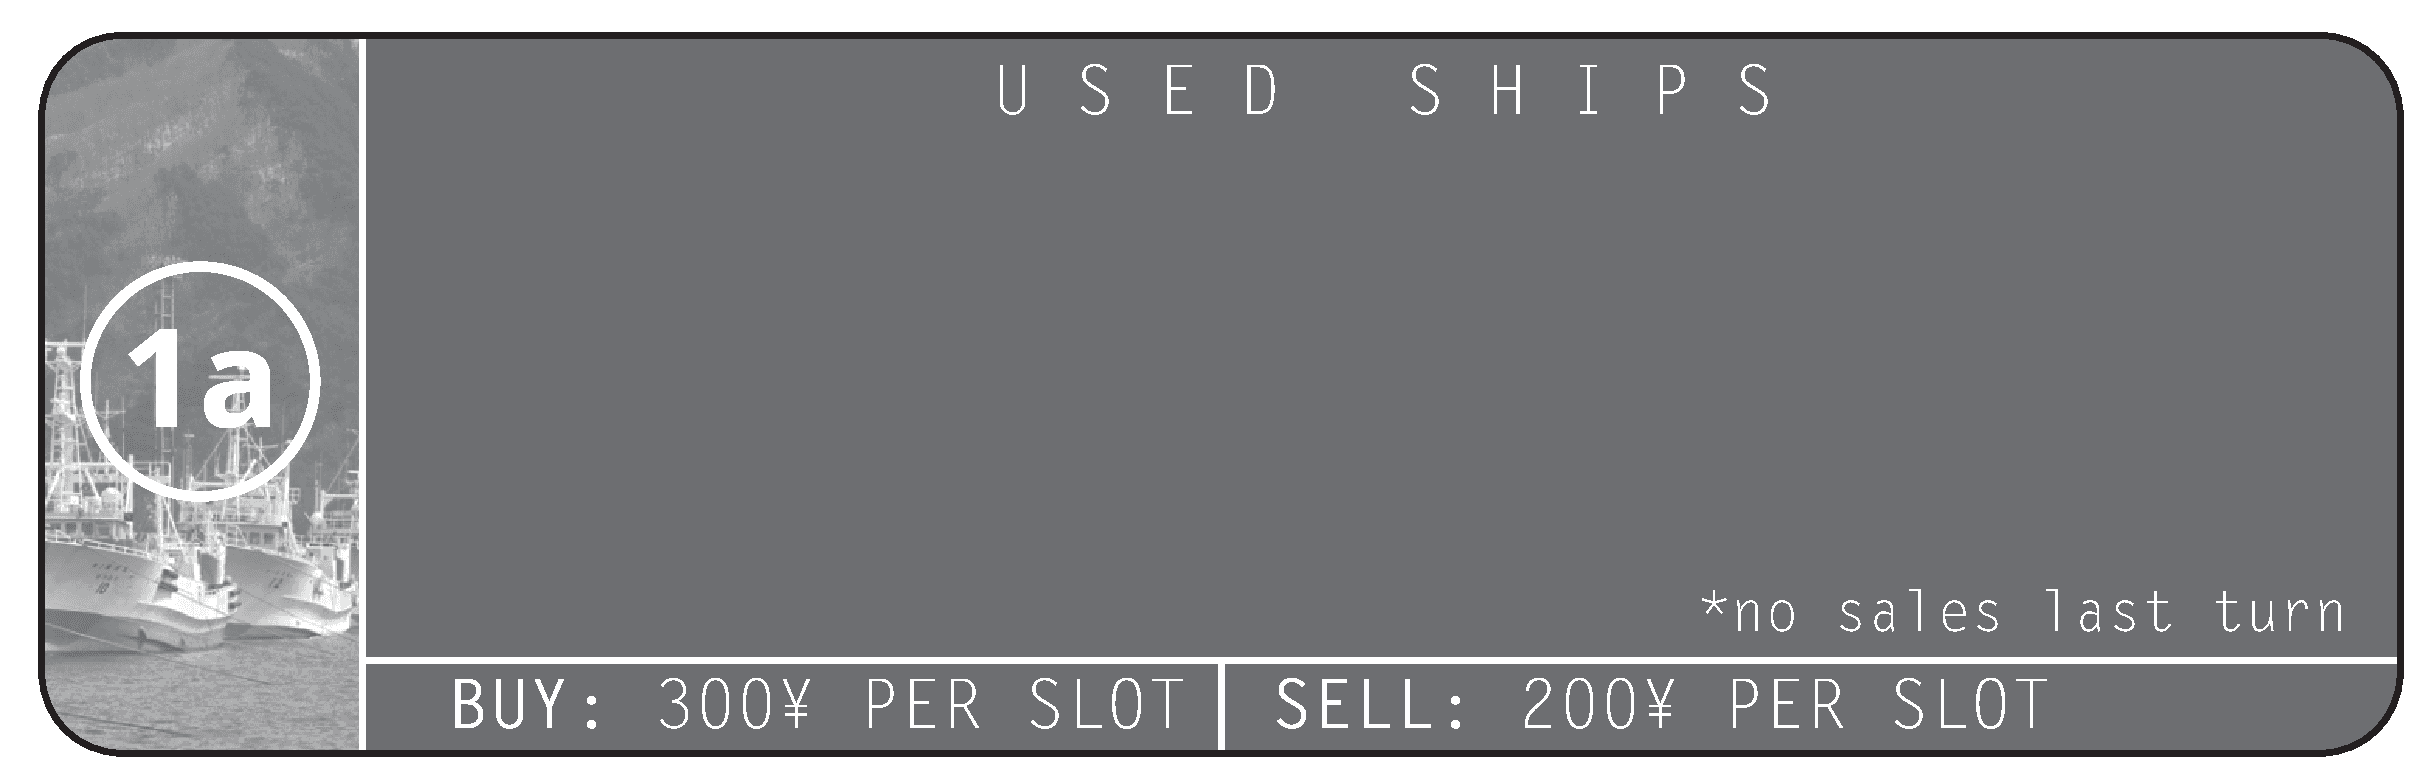
Sell boats: You may sell a Ship or Barge, provided it is in one of your Ports when you sell it. When selling a Ship, take ¥200 for each slot on it from the general supply, and when selling a Barge, take ¥400 (in total, not per slot). In each case move the boat you are selling from your Harbor board to the Used Ships board.
Buy boats: In order to purchase a Ship or Barge, you must have space in one of your Ports for it to be placed at the point of purchase. When buying a Ship, pay ¥300 for each slot on it to the general supply, and when buying a Barge, pay ¥600 (in total, not per slot). In each case take the boat you have bought from the Used Ships board and place it in an available space in one of your Ports.
OVERFISHING
If at any point all of a Fish Market’s Barrels or Fish tokens have been removed from that Market (or the Auction bag) for any reason, that Fish is now considered to be Overfished and not sustainable (for the Octopus Market, ignore Takoyaki tokens for this purpose).
When a Market becomes Overfished, immediately remove any remaining Barrels from that Market and place them back in the box. Leave the Market board and any corresponding Fish tokens on it (or in the Auction bag), as well as any of its Fish Licenses, in play; an Overfished Market can still be visited (for its usual entry cost) and interacted with, and players still take ¥100 Yen from the general supply for each matching License they own when it is visited. Any Barrels of an Overfished type that would normally be returned to their Market during play will now be returned to the box instead.
In addition, when a Market becomes Overfished, immediately draw a random Fish Market board from those in the box, set it up as usual as if it were the start of the game, and continue playing with it in play.
Note: You may wish to try and prevent a Market becoming Overfished by discarding corresponding Fish Barrels from your boats while they are at sea. Throwing your catch back into the sea like this is allowed, but if you do so you may only discard Barrels (placing them back on their Market boards) at the start of your turn, before you perform any actions.
game end
At the beginning of each player’s turn, make a check to see if they meet either of the following conditions:
- They have at least ¥5,000 and do not have the outright lowest total number of Resources of any player.
- They have 50 or more Resources worth of Fish tokens and do not have the outright lowest amount of Yen of any player.
If they meet either (or both) of these conditions, the end of the game is triggered. The player who triggered the end of the game takes their turn as usual, and all other players have one final turn before the game ends.
Note: If you are playing with closed money, and you have at least ¥5,000 and/or 50 Resources at the start of your turn, declare this, and check if you have met either of the above conditions (if you have at least 50 Resources, all players must now reveal how much Yen they have in order to perform this check). If neither of the conditions is met, the end of the game is not triggered, and play continues as normal.
After all players have taken their final turn, compare all players’ total Resource values. The player with the highest Resource value takes an additional ¥1,000 from the general supply. The player with the lowest Resource value must pay ¥500 to the general supply. In the case of ties for the highest or lowest Resource values, each tied player takes ¥500 or pays ¥300, respectively.
If the Bank External Market was in play, any Loans taken by players must now be repaid with interest, with the interest being shared among players owning Shares (see Bank in the External Markets section for details).
Finally, convert your Fish tokens to Yen, at a rate of ¥100 for every 1 Resource they are worth, and add this to your total amount of Yen. The player with the most Yen wins. In the case of a tie, settle it over fish and chips with a game of TURIN MARKET!
special thank you
- To all of the backers that brought this game to life!
- To Andrew Marks, Joe Wiggins, Cole Wehrle, Jeffrey Erikson, Gregory Jones, Scott Marks, Pascal Clarkson, Thomas Looi, Andrew Browne, K Kyhe (Joshua), Andrew Rivett, Ana Dukakis, Freddie Watkins, Craig and Lindsay Taylor, and everyone else who gave play testing feedback and helped with development!
- To all the fish that have to put up with our species.
overfishing issues
I want to seriously convey that while this game has a relatable theme and nostalgic connection to the Tokyo Tsukiji Fish Market, the oceans cannot sustain our current level of fishing and it is becoming a serious problem. At the time of this printing, 29% of the world’s fish stocks are overfished, and 61% of the world’s fish stocks are fully fished. (1)
I highly recommend watching the film ‘Mission Blue’, a feature documentary about legendary oceanographer, marine biologist, environmentalist and National Geographic Explorer-in-Residence Sylvia Earle, and her campaign to create a global network of protected marine sanctuaries. (2)
I encourage all of us to research the fish we are eating, to ensure they are taken sustainably. According to some estimates, the oceans will collapse completely of fishable food sources by as early as 2048. Japan has a particularly terrible contribution to this issue.(3)
On a final positive note, thank you to the amazing community that encourages me every day! This game is for you.
TOKYO TSUKIJI EXPANSION
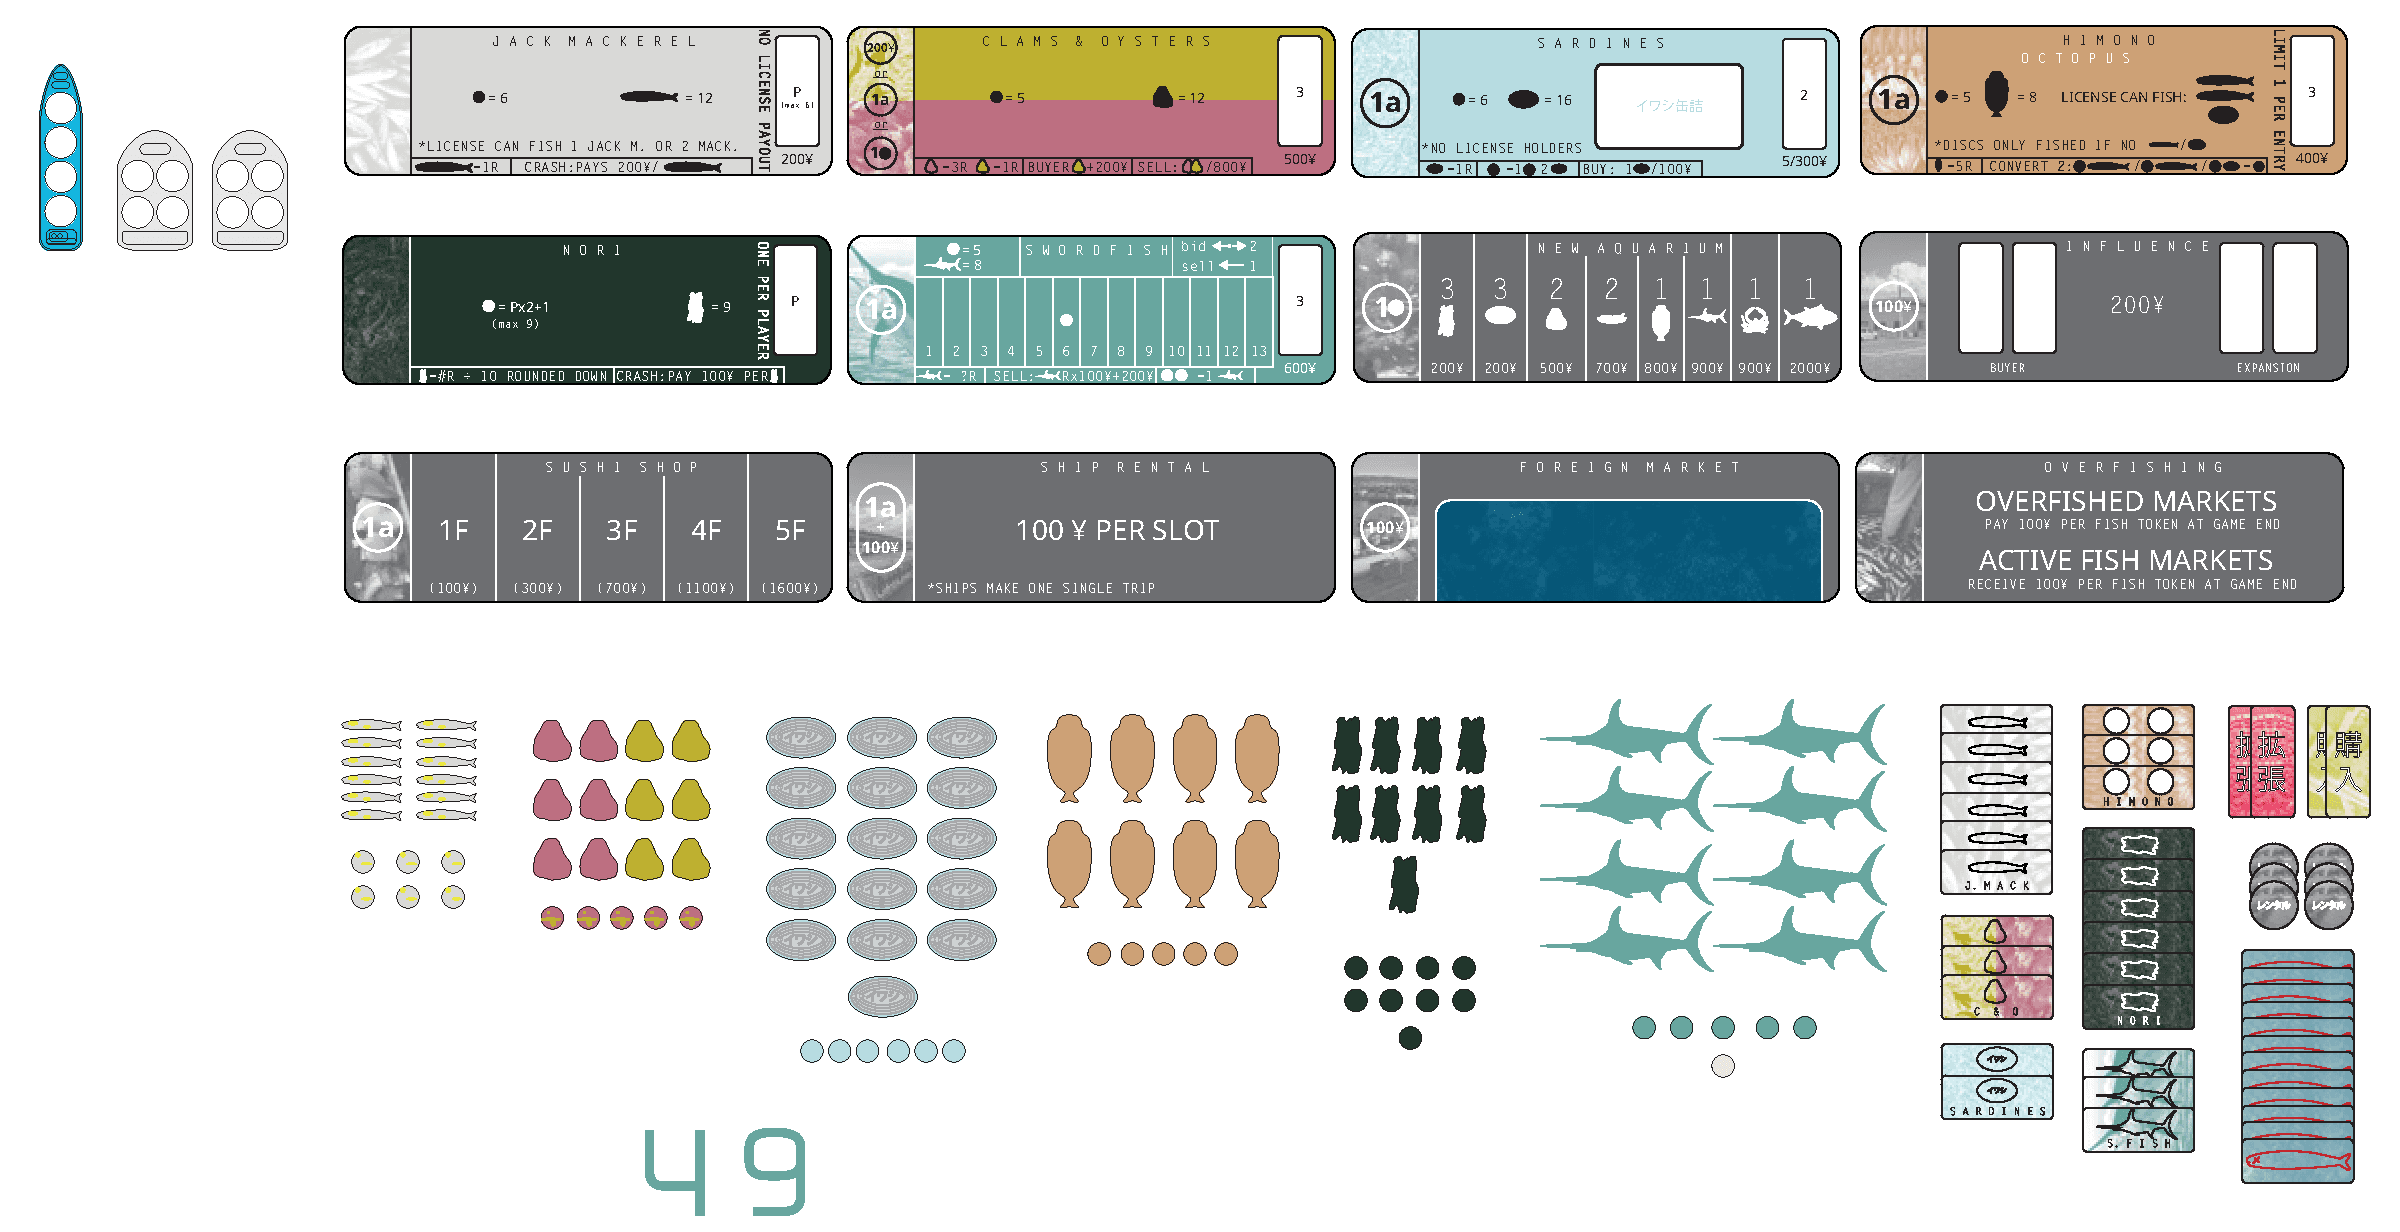
This expansion builds on the base game, with new fish markets, external markets, and fishing boats to add variability. It also brings a new variant in which external markets can crash, adding new opportunities to this open economic Tokyo fish market simulator!
expansion contents
- 3 - Fishing Boats (1x Blue Four-slot Ship / 2x Four-slot Barges)
- 12 - Market boards (6x Fish / 6x External)
- 36 - Fish Barrel discs (In 6 Fish types)
- 1 - Value marker (1x Natural-colored disc)
- 65 - Fish tokens (In 6 Fish types)
- 23 - Fishing Licenses (In 6 Fish types)
- 10 - Other tokens (2x Buyer / 2x Expansion / 6x Ship Rental)
- 12 - Crash tokens (Used in the Crashing External Markets variant)
EXPANSION SETUP
Use the expansion components in addition to those from the base game. Set up as for a normal game of TOKYO TSUKIJI MARKET, with the following changes to the setup steps:
1 Choose either the normal Mackerel Market from the base game or the new Jack Mackerel Market board to be placed on the table with the Ships Market.
2 Combine the new Market boards with those from the base game (including the Mackerel board you did not choose in step 1) before selecting additional Markets. The number of Markets to add based on player count as well as the notes on Market selection from the normal setup instructions still apply, and you should only use Markets from this expansion once you are familiar with the game.
Note: If, after selecting additional External Markets, the selection includes either the Aquarium or the New Aquarium, add the other one to the center of the table as an additional Market. If both were already selected, draw an extra External Market at random. (That is, if either board is included in setup then the other must be too, and in such instances select 1 additional External Market than the number listed based on player count in the normal setup instructions.)
3 Additional notes on setting up specific Fish Markets:
- If the Jack Mackerel Market is in play (irrespective of whether it was selected as part of step 1 or 2), do not set aside any Mackerel Fishing Licenses. Players do not start the game with any Licenses if Jack Mackerel is in play from the beginning of the game.
- Place Clams & Oysters tokens in the Auction bag instead of the Clams & Oysters Market board.
- When placing Sardines tokens on the Sardines Market board, ensure that they are not placed in the large white “Iwashi” Canned Sardines space in the middle.
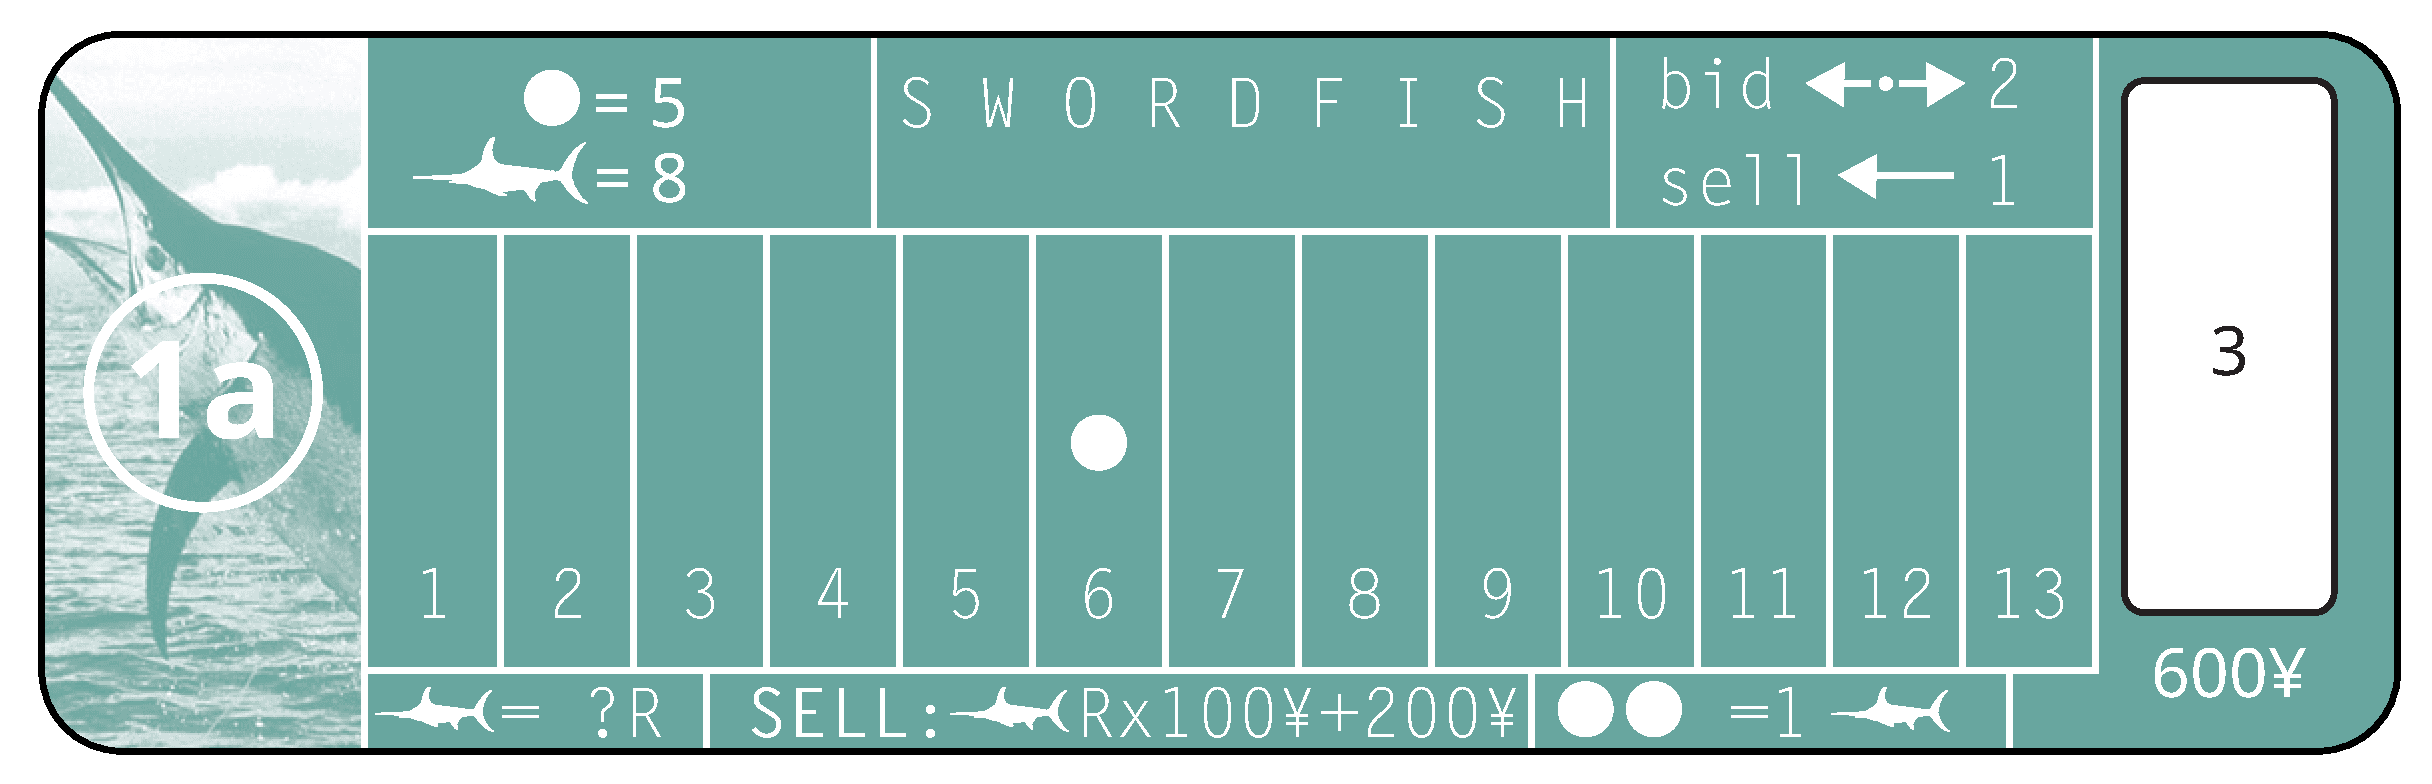
- Place a Value marker on the 6 space of the Value track on the Swordfish Market board.
4 Set up the Ships from the base game as per the normal instructions. In addition:
- Decide whether to play with the Blue Four-slot Ship. If so, add it to the Ships Market board in addition to the standard Four-slot Ship from the base game.
- Choose either the 2 Four-slot Barges or the single Six-slot Barge from the base game to place on the Market board. Return whichever you do not choose to the box.
5 Additional notes on setting up specific External Markets:
- The Influence board comes with the Buyer and Expansion tokens.
- The Ship Rental board comes with the Ship Rental tokens.
7 If you are playing with the Jack Mackerel Market from the start of the game, players do not start the game with any Licenses on their Harbor boards. Otherwise, player setup remains the same as per the normal instructions.
EXPANSION GAMEPLAY
Use all of the regular rules of TOKYO TSUKIJI MARKET, with the following changes:
EXPANSION FISH DEGRADATION
Himono Barrels never degrade; leave any on your Harbor board where they are when performing this step at the start of your turn.
EXPANSION ACTIONS
Markets
Fish Barrels, taken from those for sale on your Harbor board, are now a possible cost of entry for some Markets. Return Barrels spent in this way to their corresponding Market boards.
new boats
The 2 Four-slot Barges
These are an optional replacement for the single Six-slot Barge during setup. The Four-slot Barges work in the same way as the Six-slot Barge from the base game, and have the same value when being bought or sold at the Ships and Used Ships Markets (i.e. ¥1,000 to buy from the Ships Market; and ¥400 to sell to and ¥600 to buy from the Used Ships Market). It is allowed for a player to hold both Four-slot Barges.
The Blue Ship
The Blue Four-slot Ship is an optional addition to the 1 normal Four-slot Ship from the base game. Purchasing the Blue Ship from the Ships Market costs the same as the normal Four-slot Ship (i.e. ¥2,000), but in addition you must also trade in another Ship you own, placing it on the Ships Market (or, if it is in play, the Used Ships Market instead). The Ship you trade in must be taken from one of your Ports, and you will not receive payment for it.
You may sell the Blue Ship to the Ships or Used Ships Markets for the same price as the normal Four-slot Ship. If it is sold to the Used Ships Market, it will be available for purchase again from that Market, at the normal Four-slot Ship price, but in order to purchase it you must also trade in another Ship (taken from one of your Ports and without receiving payment for it), placing it on the Used Ships Market board.
The Blue Ship is a special Ship in that it may use 2 Fishing Licenses at once, so when performing the Catching activity as part of a Fishing action it may Catch 1 Barrel with each License (or up to 2 normal Mackerel Barrels for each Jack Mackerel License it is using; see special rules for Jack Mackerel in the Fish Markets section). Consequently, it can hold up to 2 types of Fish Barrels at any one time, in any combination permitted by the Licenses it is using.
EXPANSION FISH MARKETS
- Clams & Oysters
- Himono
- Jack Mackerel
- Nori
- Sardines
- Swordfish
Clams & Oysters
Special rules for the Market’s visiting cost: The Fish Barrel cost to enter this Market is 1 Clams & Oysters Barrel, taken from those you have for sale on your Harbor board.
Special rules for the Purchasing action: Whenever you purchase a Clams & Oysters Barrel from another player, return it to the Market and draw a Clam or Oyster token at random from those in the bag, placing it in front of you. In addition, if it is an Oyster take ¥200 from the general supply (but Oysters are worth fewer Resources than Clams; see below). You may draw the token from the bag (and take the ¥200 if applicable) before deciding whether to make more purchases in the same Purchasing action.
Markets action interactions:
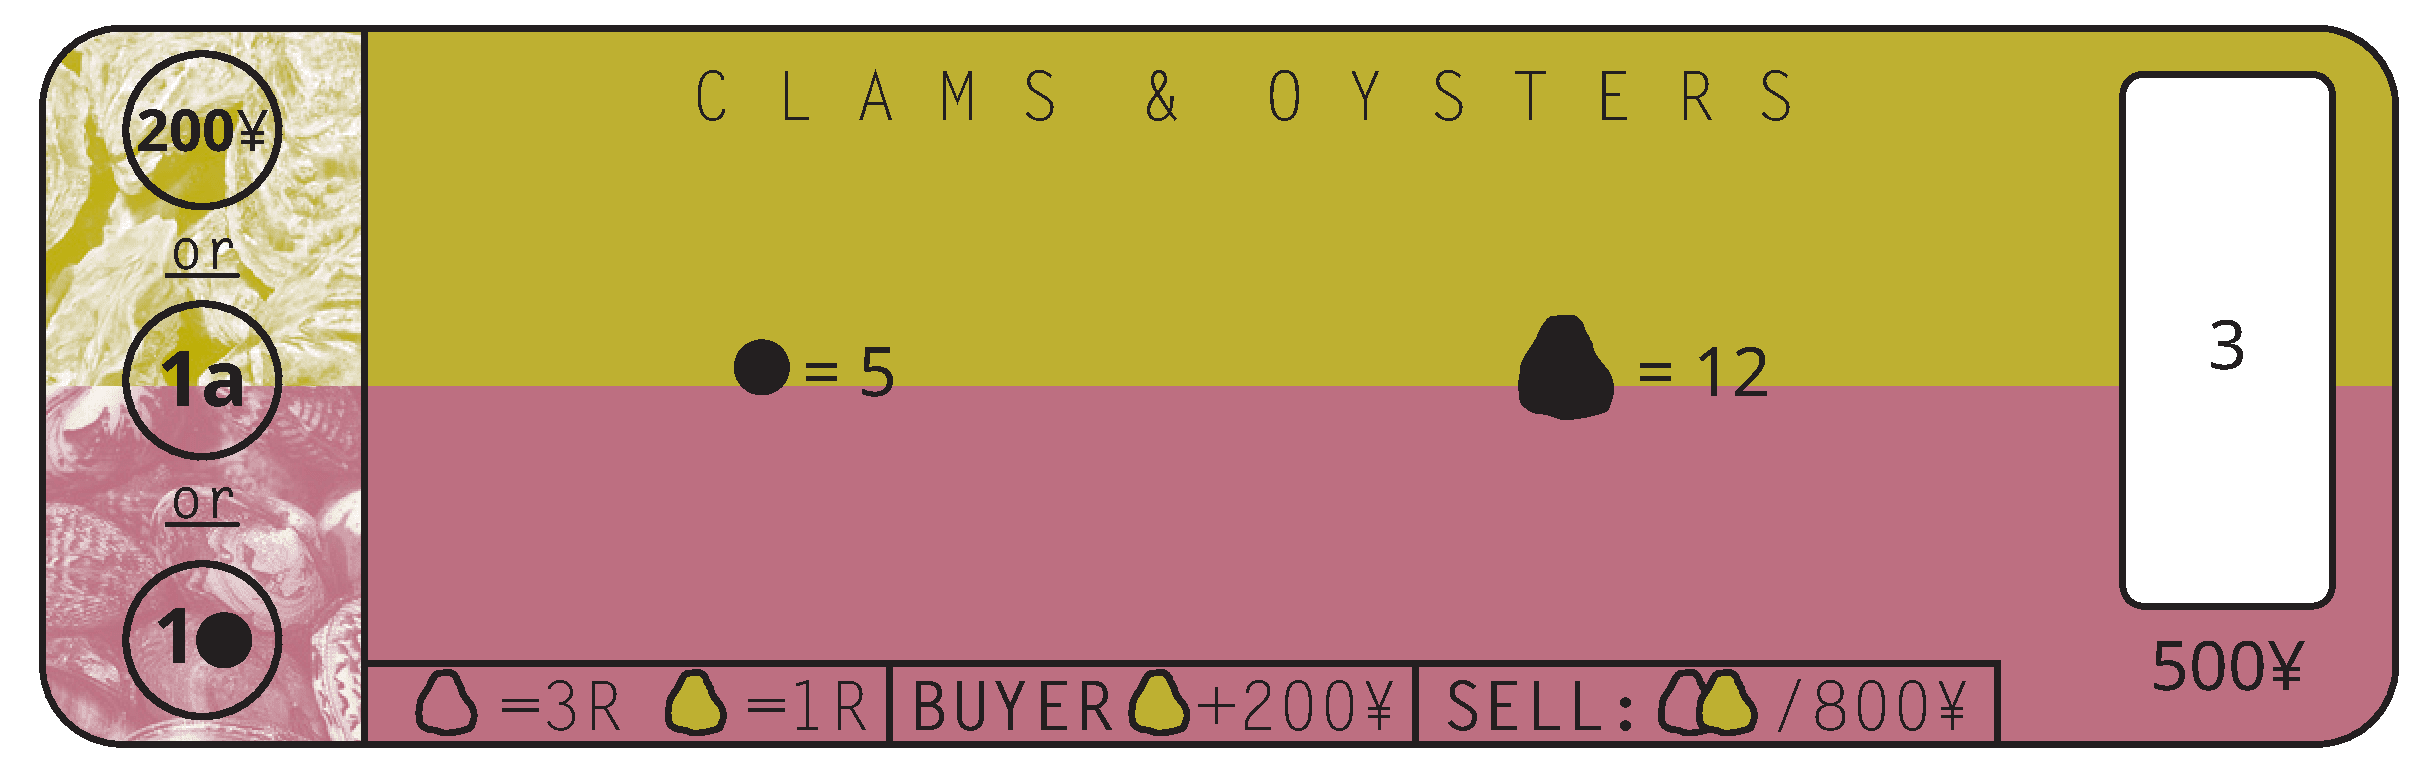
- Buy Fish Licenses: You may purchase Clams & Oysters Licenses for ¥500 each.
- Sell Fish tokens: You may sell 1 Clam token and 1 Oyster token to the Market for ¥800 for both tokens as a set together. You may only sell them as a set, but you may sell multiple sets in the same visit to this Market. Return any Clam and Oyster tokens you sell to the bag.
Resource value: Each Clam token is worth 3 Resources; each Oyster token is worth 1 Resource.
Himono
Special rules for Catching during a Fishing action: You may use a Himono License to Catch Mackerel, Jack Mackerel or Sardines Barrels (where those Markets are in play and not Overfished). You cannot Catch Himono Barrels unless no Mackerel, Jack Mackerel, or Sardines are available (either because the corresponding Markets are not in play, or are Overfished). A Ship using a Himono License cannot hold Barrels of different types at the same time.
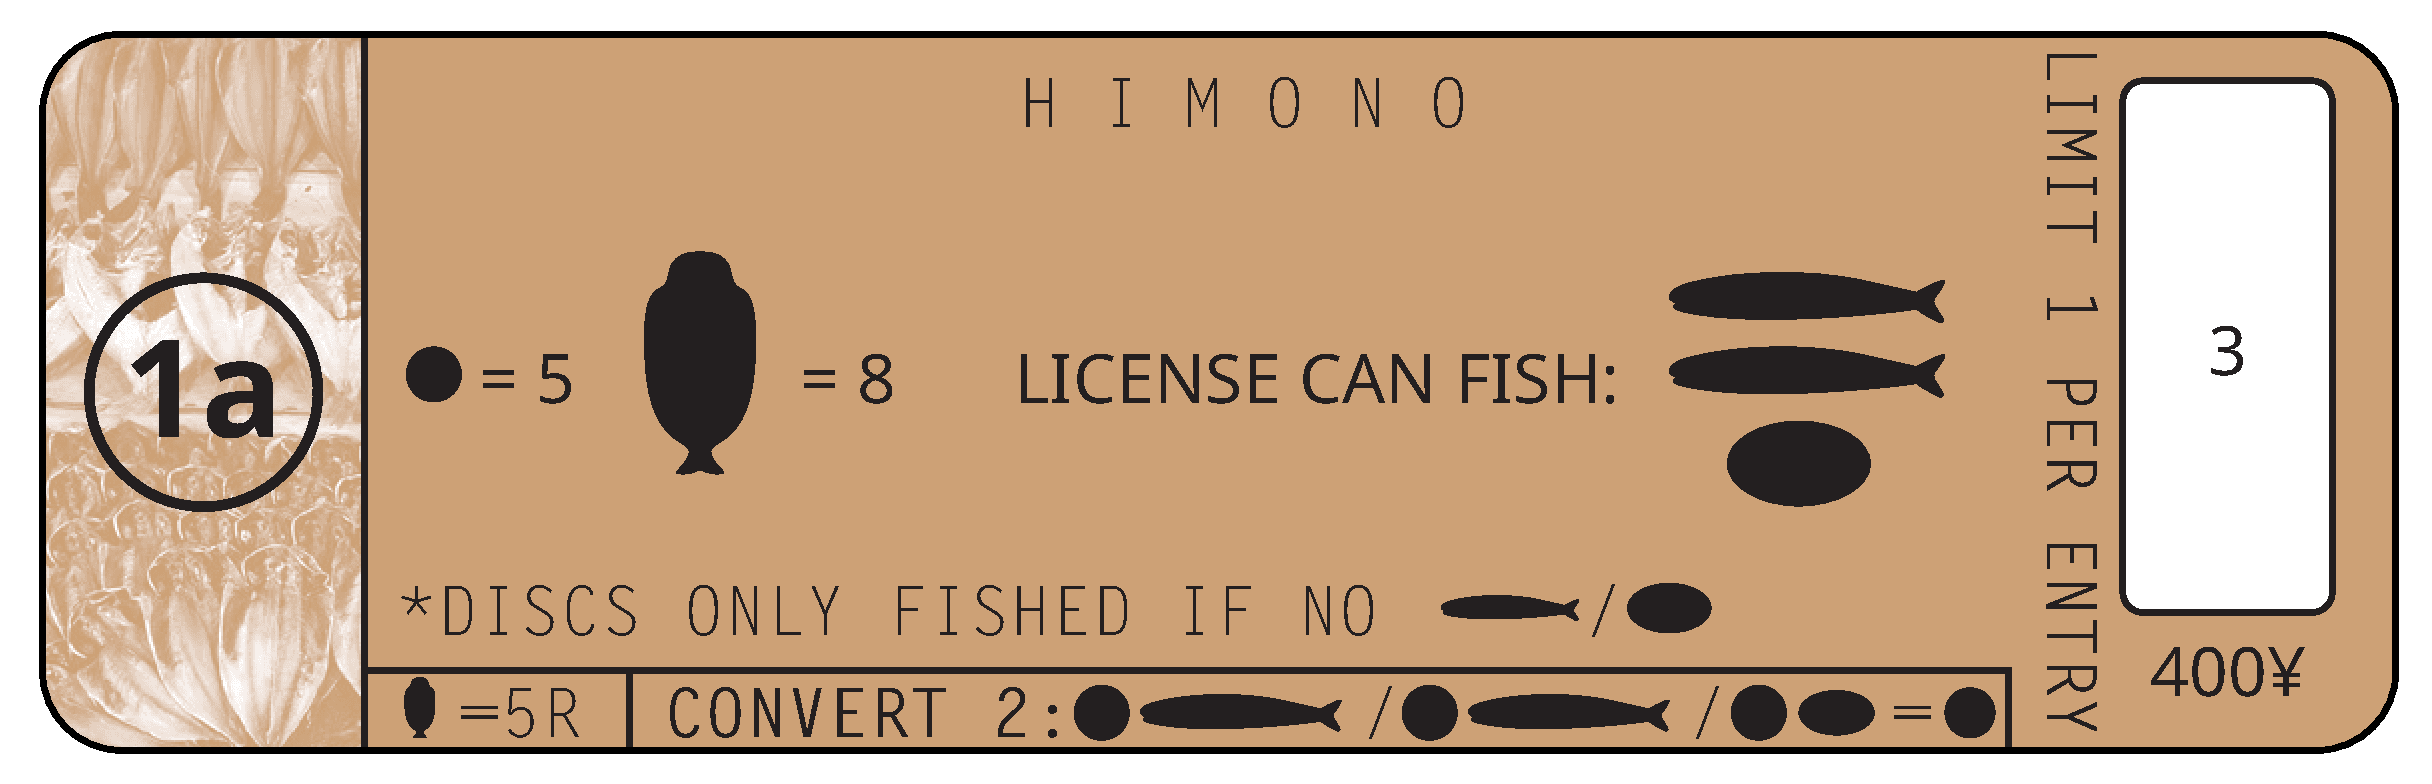
In addition, you can never have more than 2 Barrels Caught using the same Himono Fishing License at sea; once you have 2 (even if they are on a Barge), flip the Himono License face down (to the side showing the red cross) as a reminder that you must Dock and unload or discard at least 1 of them before you can Catch any more Fish with the same Himono License (flip the License face up again when you Dock and unload or discard the corresponding Barrels).
Special rules for Docking during a Fishing action: When a Ship or Barge holding Mackerel, Jack Mackerel, Sardines, or Himono Barrels Caught with a Himono License Docks in one of your Ports, do not place the unloaded Barrels for sale on your Harbor board. Instead, place them onto one of your Himono Licenses, to the extent it has space to hold them (see below); return any excess back to their corresponding Market(s).
Converting Fish to Himono: At any time during your turn, you may place Mackerel, Jack Mackerel, or Sardines Barrels or tokens (taken from your Harbor board or your personal supply, respectively) onto one of your Himono Licenses, if there is space for them. This is free and does not count as an action. Each Himono License can hold up to 2 Barrels or tokens (including any placed when Docking; see above), in any combination.
At the start of your turn, if there are two Barrels and/or tokens on one of your Himono Licenses, return them to their corresponding Markets. Then take a Himono Barrel from the Himono Market and place it for sale on your Harbor board at a price of your choice. Note that Himono never degrades, so it will remain on your Harbor board until purchased by another player during a Purchasing action. Any Himono Barrels that remain unsold by the end of the game will be worth nothing to you.
If you discard your Himono License for whatever reason, return any Barrels or tokens on it to their corresponding Markets without compensation. At the end of the game, any Barrels or tokens remaining on your License are worth nothing.
Markets action interactions:
- Buy Fish Licenses: You may purchase a maximum of 1 Himono License for ¥400 each time you enter. Himono Licenses are double-sided; when you purchase one, place it face up on your Harbor board.
- Sell Fish tokens: You cannot sell Himono tokens back to the Market.
Resource value: Each Himono token is worth 5 Resources.
Jack Mackerel
Special rules for visiting this Market: Owners of Jack Mackerel Licenses do not take the usual ¥100 per License from the general supply whenever a player enters this Market. You may only enter this Market once per turn.
Special rules for the Fishing action: If the normal Mackerel Market is also in play, you can use a Jack Mackerel License to Catch 1 or 2 normal Mackerel Barrels instead of 1 Jack Mackerel Barrel with a single Catching activity. Both Mackerel Barrels must be Caught by and placed on the same Ship, and the ship cannot hold both Mackerel and Jack Mackerel Barrels at the same time.
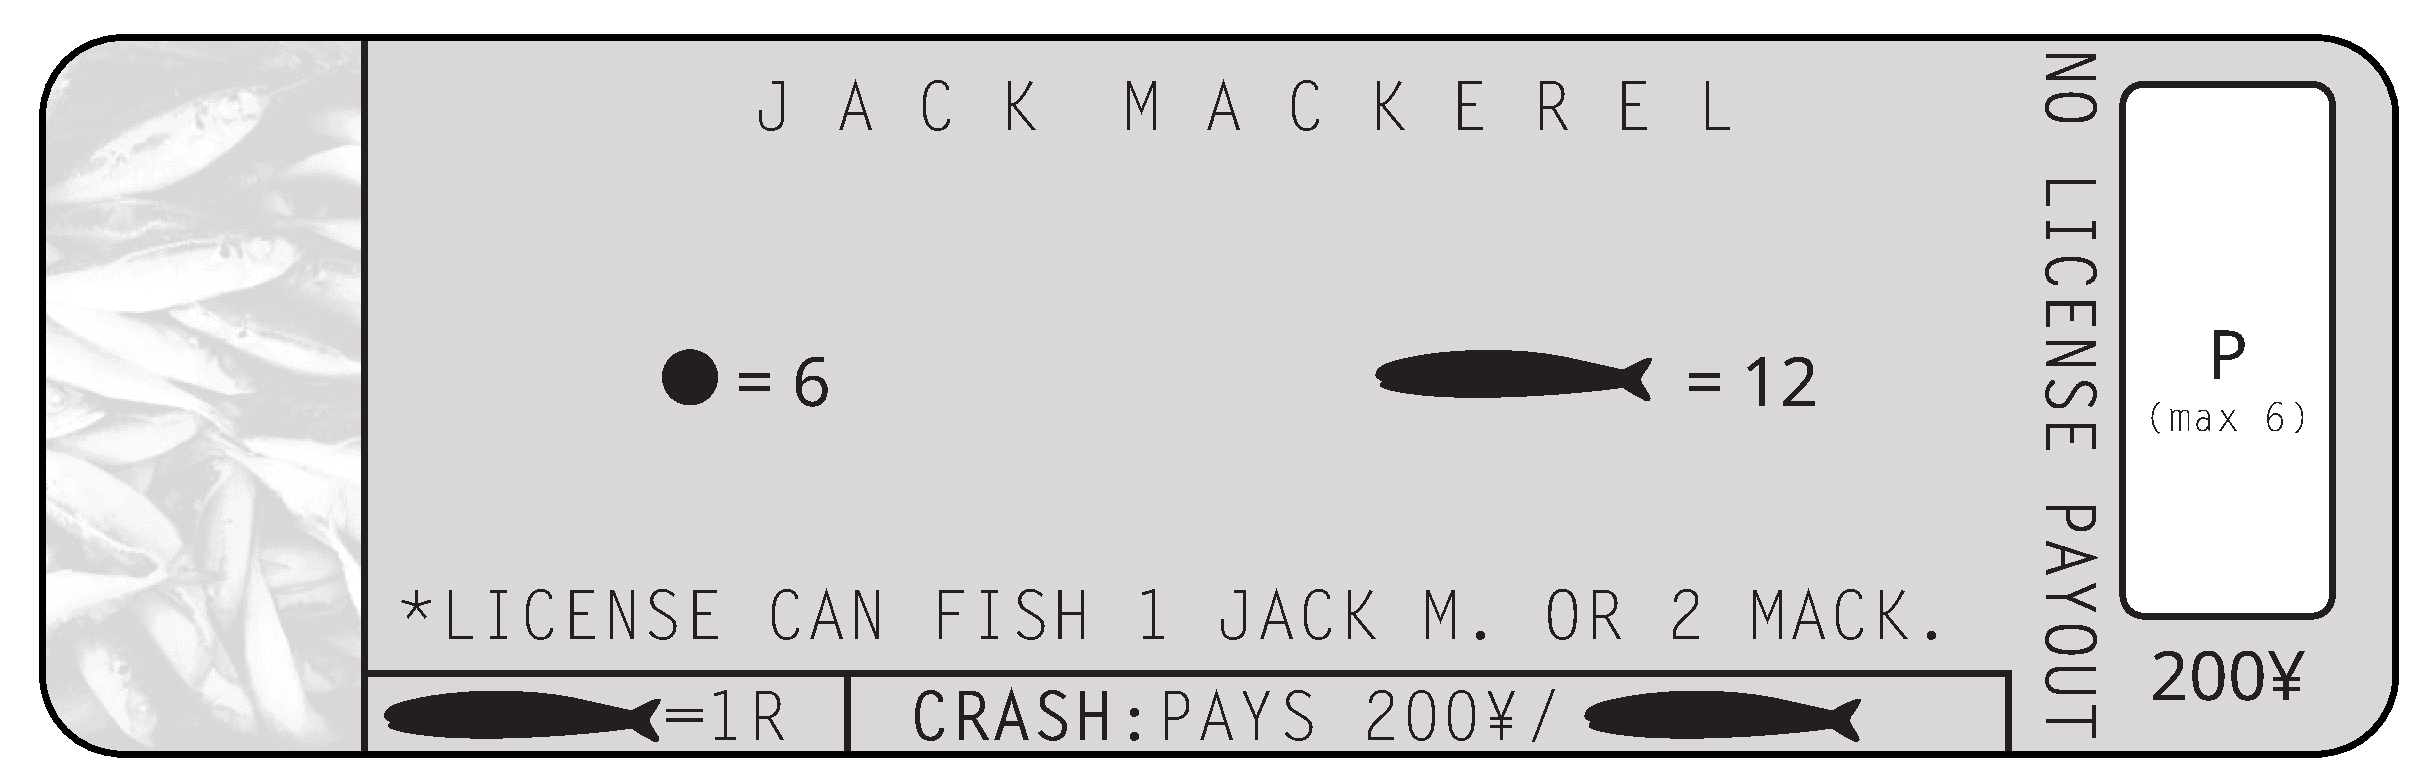
Special rules for Fish tokens: Jack Mackerel tokens may be sold to the same space in the Aquarium as normal Mackerel tokens (since they are the same shape).
Special rules for Overfishing: If the Jack Mackerel Market becomes Overfished, all players take ¥200 from the general supply for each Jack Mackerel token they have (they still keep the tokens and each is still worth 1 Resource). If the Market becomes Overfished during a Purchasing action, complete that Purchasing action before any player takes Yen for their Jack Mackerel tokens. Then, if it is not already in play, set up the Mackerel Market before (but in addition to) drawing a new Fish Market board following the Overfishing rules.
Markets action interactions:
- Buy Fish Licenses: You may purchase Jack Mackerel Licenses for ¥200 each.
- Sell Fish tokens: You cannot sell Jack Mackerel tokens back to the Market.
Resource value: Each Jack Mackerel token is worth 1 Resource.
Nori
Special rules for visiting this Market: You may only enter this Market to take a single Fishing License (since there are no other actions available, and you cannot own more than 1 Nori License). You may only enter this Market once per turn.
Special rules for Overfishing: If the Nori Market becomes Overfished, all players pay ¥100 to the general supply for each Nori token they have (they still keep the tokens and each is still worth Resources as described below). If the Market becomes Overfished during a Purchasing action, complete that Purchasing action before any player pays Yen for their Nori tokens. If a player does not have enough Yen to cover all of their Nori tokens, they pay what they can.
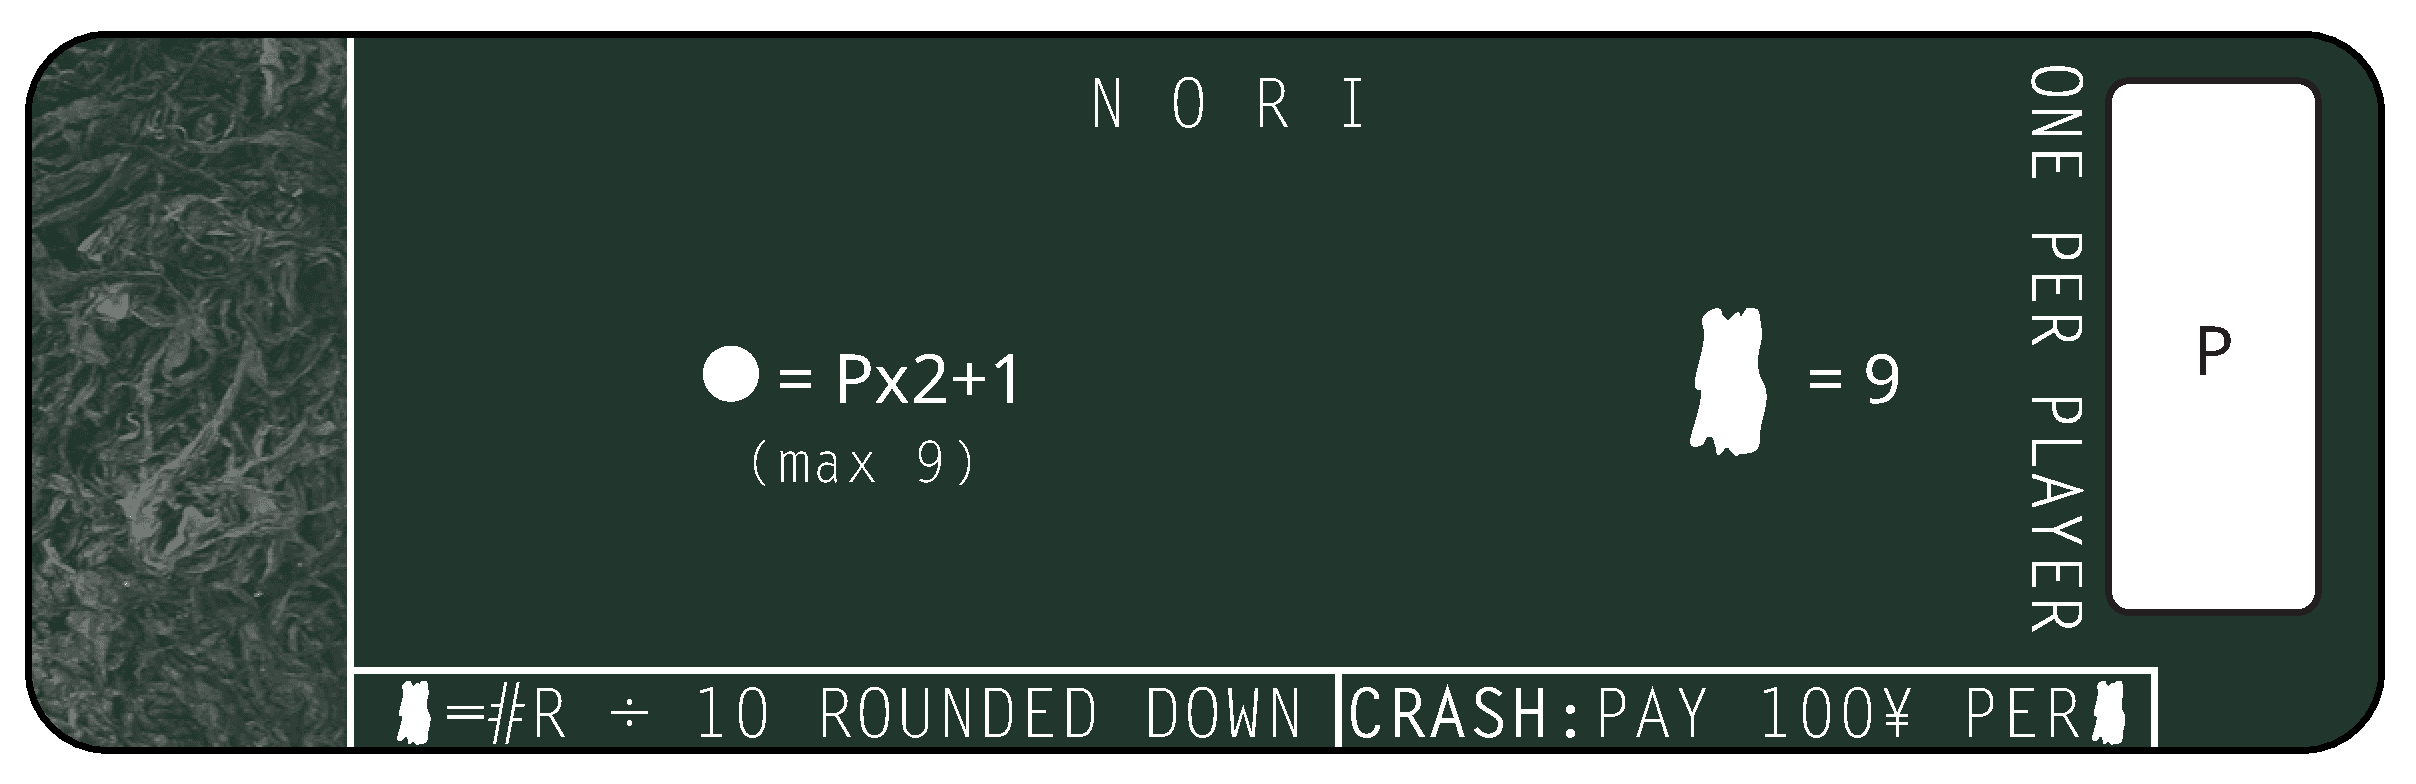
Markets action interactions:
- Buy Fish Licenses: You may only take a Nori License if you do not already have one. There is no cost to take one.
- Sell Fish tokens: You cannot sell Nori tokens back to the Market.
Resource value: Each Nori token is worth a number of Resources equal to the total Resource worth of all of your other (non-Nori) Fish tokens divided by 10 and rounded down to the nearest whole number.
Example: If your non-Nori Fish tokens are worth 38 Resources collectively, each of your Nori tokens is worth 3 Resources.
Sardines
Special rules for visiting this Market: You cannot enter this Market if you hold a Sardines License. However, you may discard your License (subject to the usual restrictions; see Rules for Fishing Licenses in the base game rules) and then enter the Market.
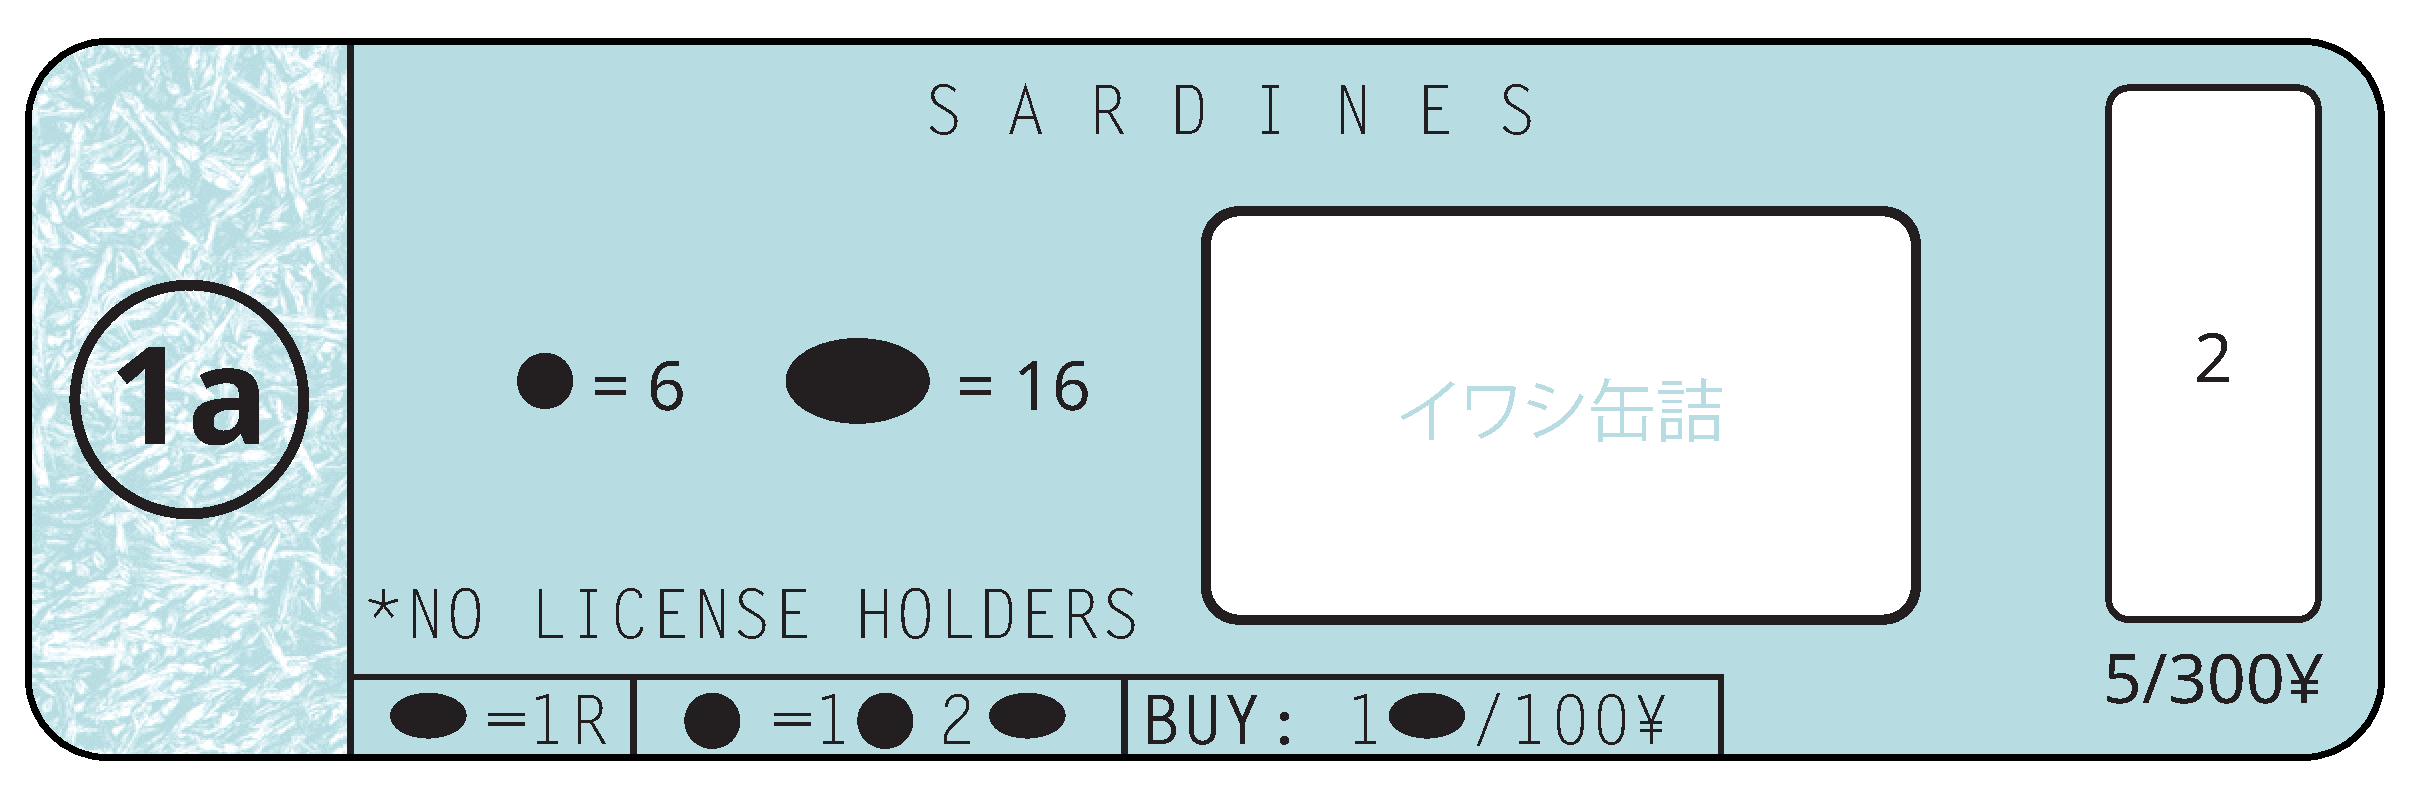
Special rules for Docking during a Fishing action: Whenever you unload a Sardines Barrel at one of your Ports (whether from a Ship or a Barge), place it for sale on your Harbor board as usual, and in addition: take 2 Sardines tokens (if available) from the Market’s supply (not from the central white “Iwashi” space), place 1 in front of you and place the other 1 on the white “Iwashi” area in the centre of the Market board. If there is only 1 Sardines token available, place it in front of you.
Markets action interactions:
- Buy Fish Licenses: If both Sardines Licenses are available on the Market board, then it costs ¥500 to buy 1, while the second (if there is only one on the Market) costs ¥300. If they are available, you may buy both in the same visit, for ¥800.
- Sell Fish tokens: You cannot sell Sardines tokens back to the Market.
- Buy Canned Sardines (“Iwashi”): If there are any Sardines tokens on the white area in the center of the Sardines Market, you may buy as many of them as you like, paying ¥100 to the general supply for each one you take.
Resource value: Each Sardines token is worth 1 Resource.
Swordfish
Special rules for Docking during a Fishing action: When a Ship or Barge holding Swordfish Barrels Docks in one of your Ports, do not place the unloaded Barrels for sale on your Harbor board. Instead, for every 2 Swordfish Barrels you unload during the same Fishing action, a Swordfish auction takes place immediately. If this happens before you have completed your Fishing action, perform the auction first and then return to finish your Fishing action afterwards, stopping for another auction for every further 2 Barrels you unload.
When an auction happens, return the 2 Swordfish Barrels that triggered it to the Market board, and take 1 Swordfish token from the Market. All players (including you) participate in a blind bid to receive this Swordfish, secretly placing an amount of Yen in a closed fist and revealing all bids simultaneously. ¥0 is a valid bid. The highest bidder wins the auction and takes the Swordfish token. If there is a tie for the highest bidder, you decide the winner among the tied players. If you win the auction, pay your bid to the general supply. If another player wins, they pay their bid to you. Adjust the Value marker according to the highest bid (see Resource value below).
At the end of your Fishing action if there is a single unloaded Swordfish Barrel remaining, return it to the Market board without compensation.
Markets action interactions:
- Buy Fish Licenses: You may purchase Swordfish Licenses for ¥600 each.
- Sell Fish tokens: You may sell Swordfish tokens to the Market for ¥100 × the combined Resource value of the tokens sold. If you sell at least 1 Swordfish token during a visit to the Swordfish Market, take an additional ¥200 from the general supply. Sold Swordfish tokens are placed back in the box. After a sale, move the Value marker down 1 space for each token sold.
Resource value: Each Swordfish token is worth the number of Resources indicated by the Value marker on the Value track in the middle of the Market board. Each time a Swordfish is auctioned, the Value is adjusted as follows. Compare the winning bid to the current Resource value × ¥100: if the winning bid is the larger figure, move the Value marker up 2 spaces; if the winning bid is the smaller figure, move the Value marker down 2 spaces; and if the two figures are the same, leave the Value marker where it is. In addition, after a player sells Swordfish tokens to the Swordfish Market, move the Value marker down 1 space for each token sold. Ignore any movement that would move the Value marker above 13 or below 1 on the track.
EXPANSION EXTERNAL MARKETS
- Foreign Market
- Influence
- New Aquarium
- Overfishing
- Ship Rental
- Sushi Shop
Foreign Market
This Market can only be visited when Docking a boat as part of the Fishing action. Pay ¥100 to the general supply to Dock one or more Ships or Barges here instead of in your Ports, then auction any Barrels on all of these boats together, as one lot. All players (including you) participate in a blind bid to receive this lot, secretly placing an amount of Yen in a closed fist and revealing all bids simultaneously. ¥0 is a valid bid. The highest bidder wins the auction and takes the lot, returning any Barrels to their corresponding Markets and taking a matching Fish token for each one. If there is a tie for the highest bidder, you decide the winner among the tied players. If you win the auction, pay your bid to the general supply. If another player wins, they pay their bid to you.
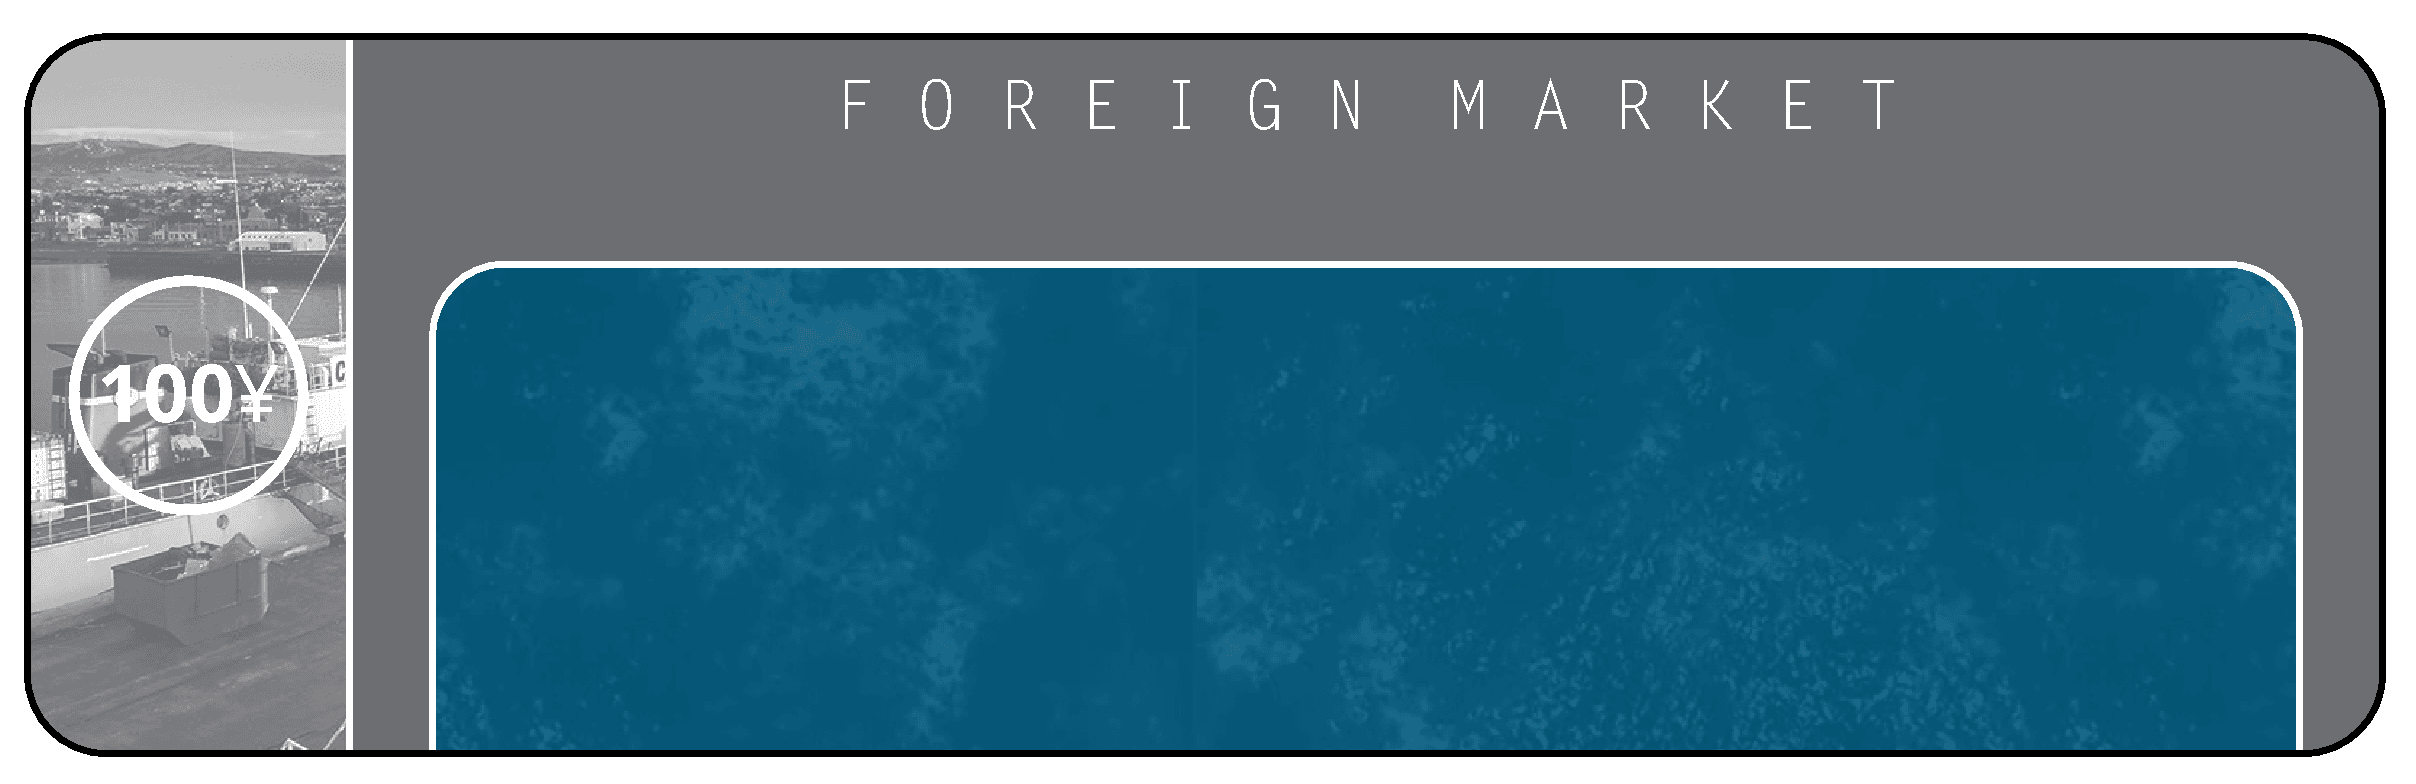
If you wish to Dock more than one boat in the Foreign Market during the same Fishing action but do not want to combine all boats’ Barrels in a single auction, you may bring multiple groups of one or more boats to the Foreign Market in separate visits within the same Fishing action, paying the ¥100 entry cost for each separate group that enters in this way.
Any of your boats Docked at the Foreign Market will remain there until you perform the Undocking activity with them as part of a subsequent Fishing action. When you Undock a boat from the Foreign Market, move it below your Harbor board, indicating it is at sea again. You do not pay the ¥100 Market entry cost to Undock boats.
Barrels auctioned at the Foreign Market are not unloaded at your Harbor, and therefore do not count towards those for which you take ¥100 from the general supply for every 2 unloaded.
Special rules for specific Fish types and the Foreign Market:
- Eel: For each Eel Barrel included in an auction at the Foreign Market, advance the Eel Value marker one space on its track.
- Spider Crab: For every 2 Spider Crab Barrels included in an auction, return them to the Spider Crab Market and draw 1 random Spider Crab token out of the Auction bag before the bidding. If there is a single Spider Crab Barrel remaining, return it to the Spider Crab Market board without compensation.
- Swordfish: For every 2 Swordfish Barrels included in an auction, return them to the Swordfish Market and take 1 Swordfish token before the bidding. If there is a single Swordfish Barrel remaining, return it to the Swordfish Market board without compensation. Each time one or more Swordfish tokens are auctioned, adjust the Swordfish Value marker on its track as follows. Compare the winning bid (for all Fish included in the auction) to the current Resource value of a single Swordfish token × ¥100: if the winning bid is the larger figure, move the Value marker up 2 spaces; if the winning bid is the smaller figure, move the Value marker down 2 spaces; and if the two figures are the same, leave the Value marker where it is.
- Tuna: For every 3 Tuna Barrels included in an auction, return them to the Tuna Market and draw 1 random Tuna token out of the Auction bag before the bidding. If there are 1 or 2 Tuna Barrels remaining, return them to the Tuna Market board without compensation.
Influence
When interacting with this Market, you may purchase as many Buyer and Expansion tokens as you like for ¥200 each, paid to the general supply.
Each Buyer token takes up a License space on your Harbor board while you have it, so you must have an empty space in order to purchase one. At any time on your turn, you may remove a Buyer token from your Harbor board and assign it to another player, placing it in front of their Harbor board. This does not count as an action. Then, immediately following the end of that player’s next turn, you may buy Barrels and/or Fish tokens from as many other players’ Harbors as you like, following all the normal rules of the Purchasing action. Return the Buyer token to the Influence Market board, whether or not you made any purchases, and resume play with the player to the left of the player you assigned the Buyer token to.
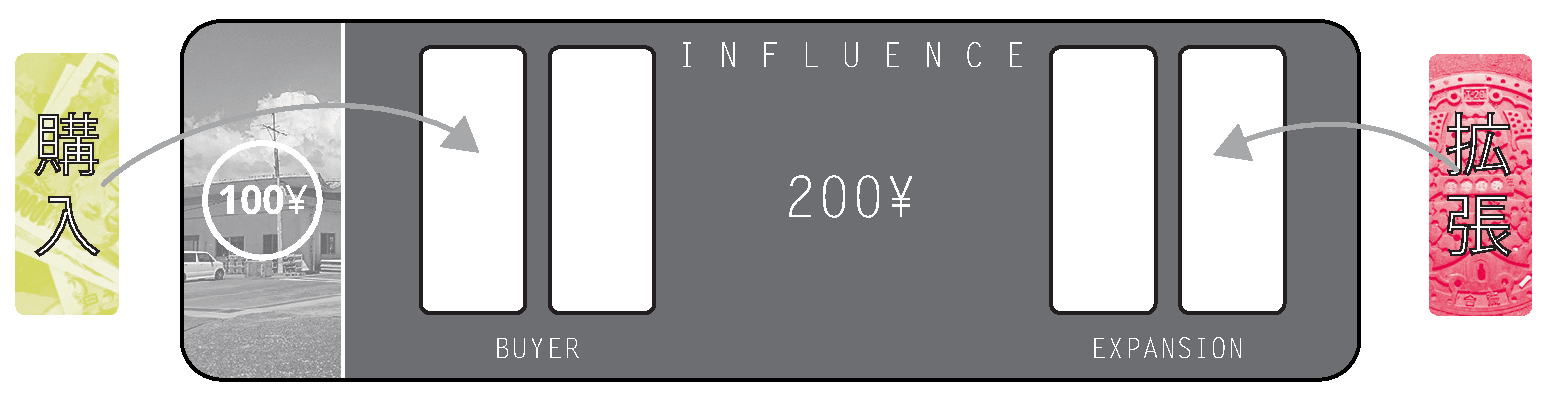
When you purchase an Expansion token, immediately return it to the box, choose whether to add a new Fish or External Market into play. Draw one of the corresponding type from the box at random, set it up as if it were the start of the game, and continue with it in play.
Note: when you draw the Mackerel Market in this way, do not set aside any Mackerel Fishing Licenses or give any to players.
New Aquarium
The visiting cost for this Market is 1 Fish Barrel, of any type, taken from those you have for sale on your Harbor board. Return the Barrel to its corresponding Market.
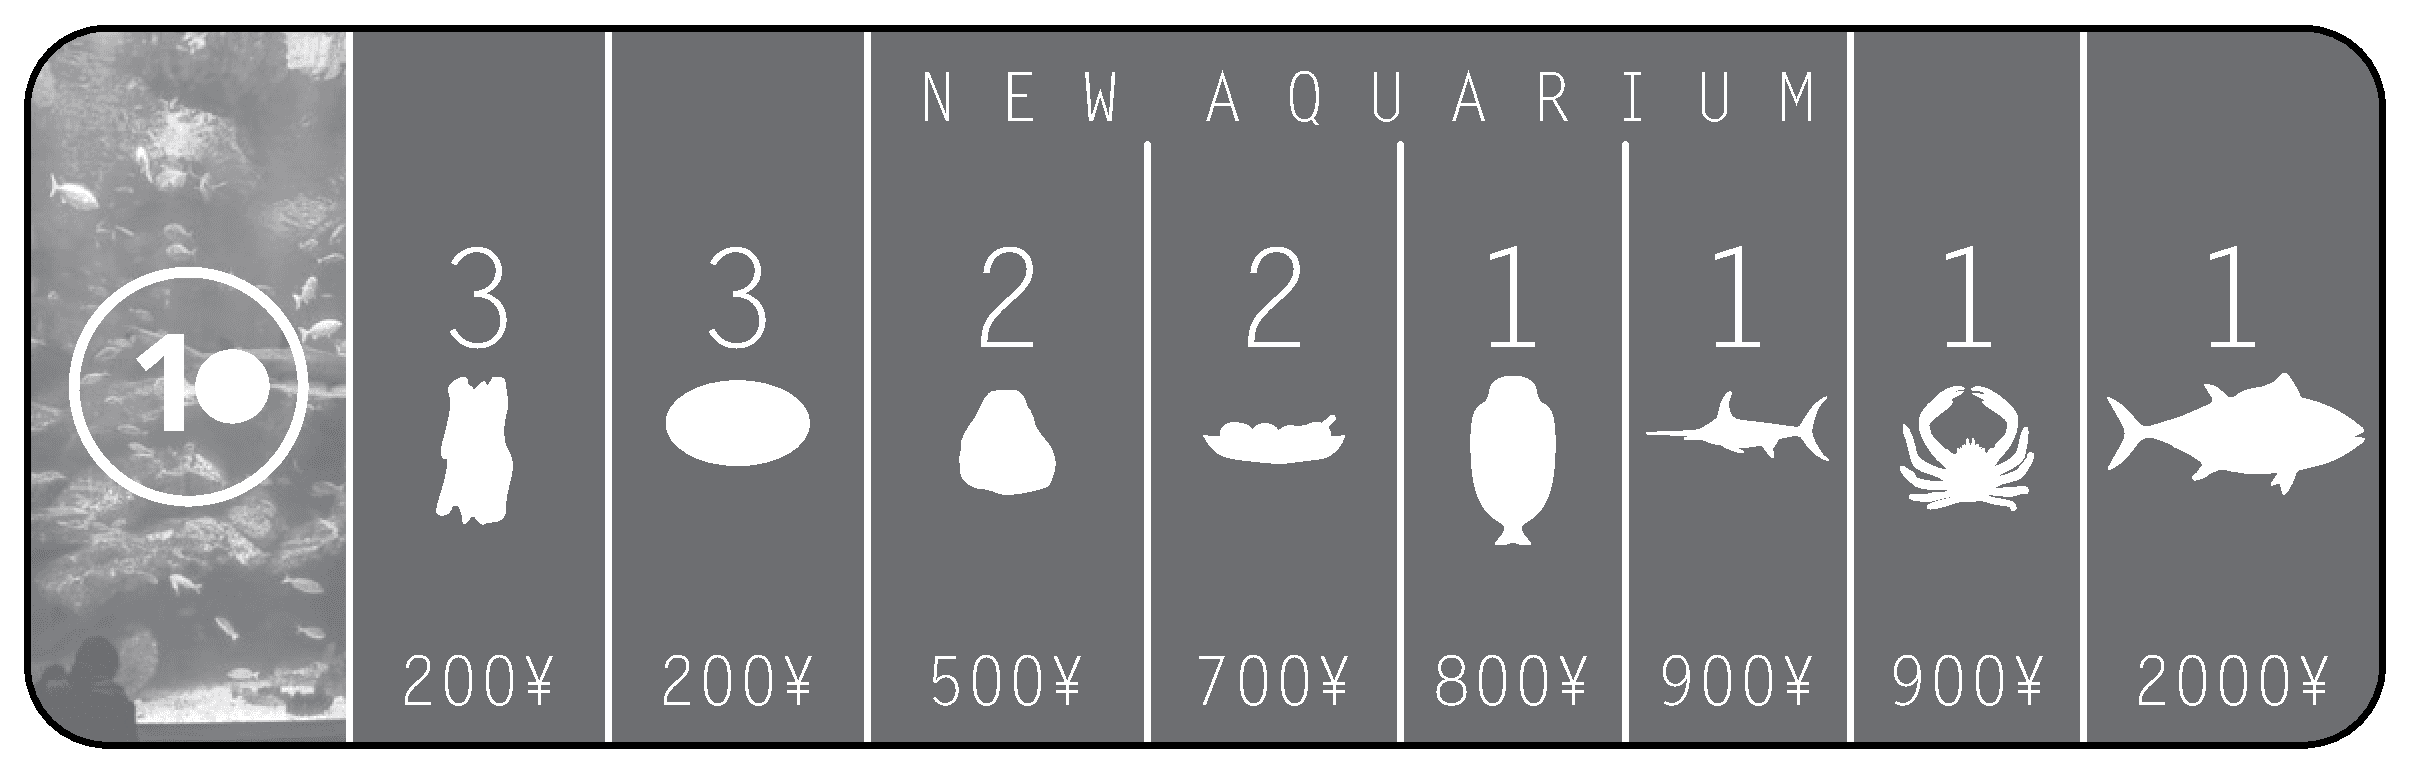
Interactions with this Market work in the same way as the Aquarium in the base game. The Clam/Oyster-shaped space can take either type of token, or one of each.
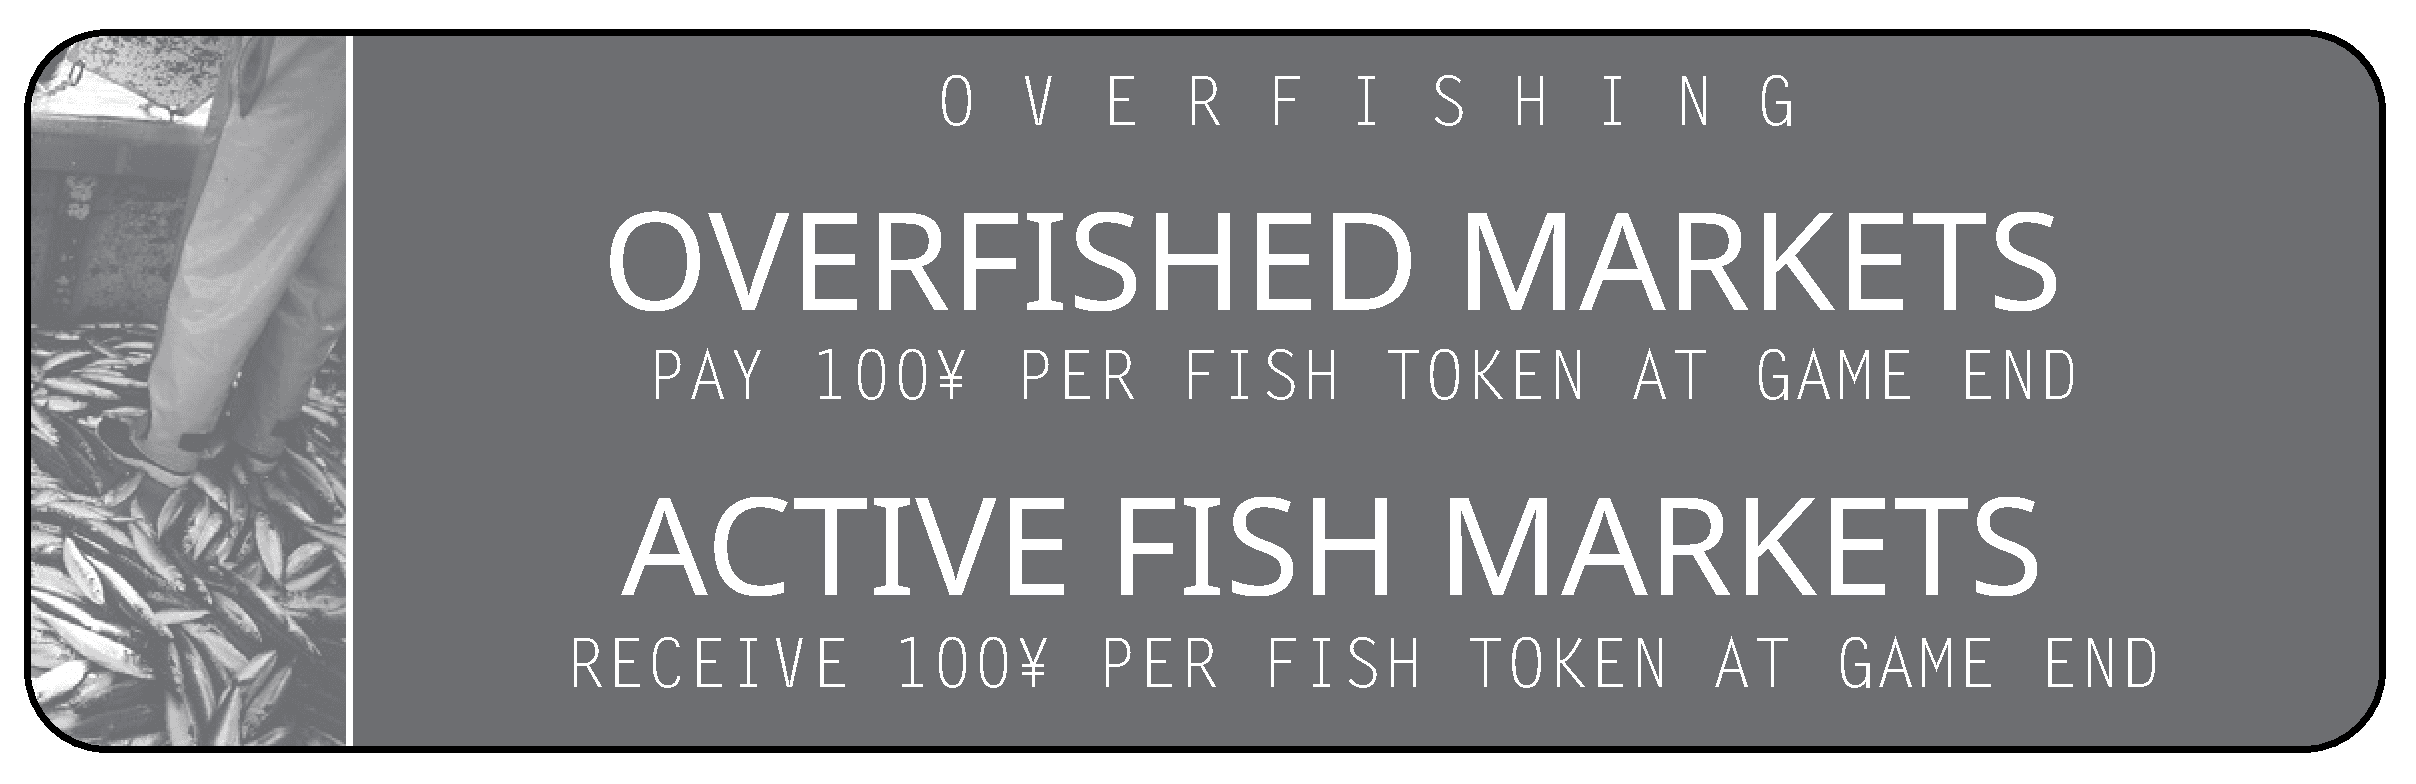
Overfishing Market
You cannot enter this Market. When it is in play, it adds the following step to scoring at game end, applying to all players and occurring immediately before any Loans are repaid:
Pay ¥100 to the general supply for each Fish token you have from Markets that are Overfished. Take ¥100 from the general supply for each Fish token you have from Fish Markets that are not Overfished.
Ship Rental
When interacting with this Market, you may rent as many boats from the Ships and/or Used Ships Markets as you wish and are able to. In order to rent a Ship or Barge there must be at least 1 Ship Rental token on this Market board and you must have space in one of your Ports for it to be placed at the point of purchase (it does not matter how many boats you have at sea when you do this). Remember that the rightmost “2” Port can hold 2 Ships at the same time, or 1 Barge, and that only the “2” Port can hold a Barge. To rent a boat, take a Ship Rental token from this Market and a Ship or Barge of your choice from the Ships or Used Ships Market (exception: it is not possible to rent the Blue Ship), pay its cost to the general supply, place it in an available space in one of your Ports, and place the Ship Rental token next to it, with the side corresponding to the Market the boat was rented from face up. Each Ship or Barge costs ¥100 for each slot it has. Each boat can only make one trip per rental: as soon as you Dock a rented boat back in one of your Ports, return it to the Market you rented it from (after unloading any Barrels that were on it) and its Ship Rental token to the Ship Rental Market.
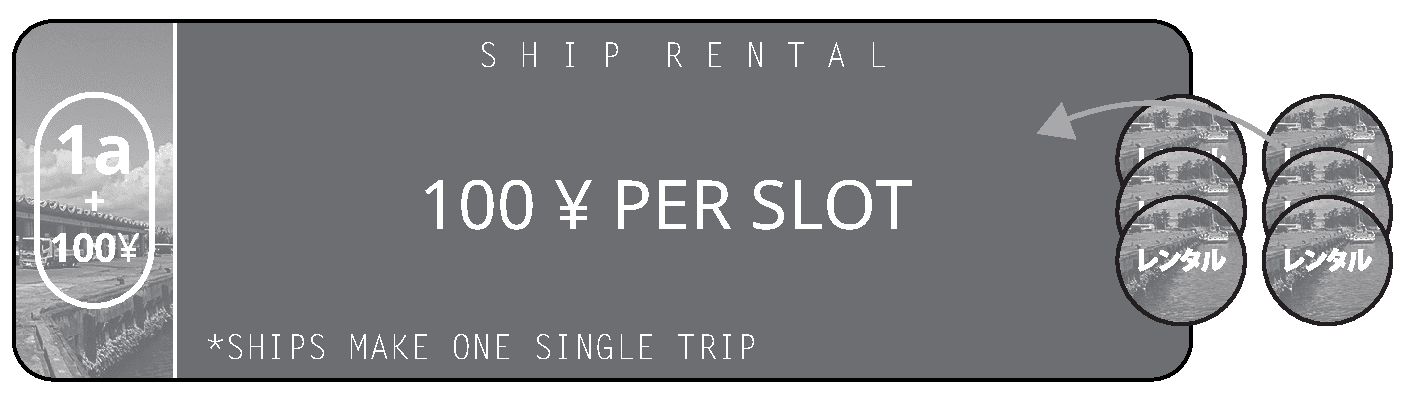
Note: You cannot transfer Barrels from rented Ships to a Barge.
Sushi Shop
When interacting with this Market, you may sell Fish tokens as many times as you like and are able to. You may only sell tokens to empty spaces, and you cannot sell any tokens that are the same shape (Mackerel and Jack Mackerel, or Clam and Oyster) to the same space. To sell to the Sushi Shop, place 1-5 different-shaped Fish tokens on the corresponding space on the Market board (provided it is empty) to take the amount of Yen shown from the general supply. Leave the Fish tokens you have sold in that space on the Market board; they will stay there for the rest of the game.
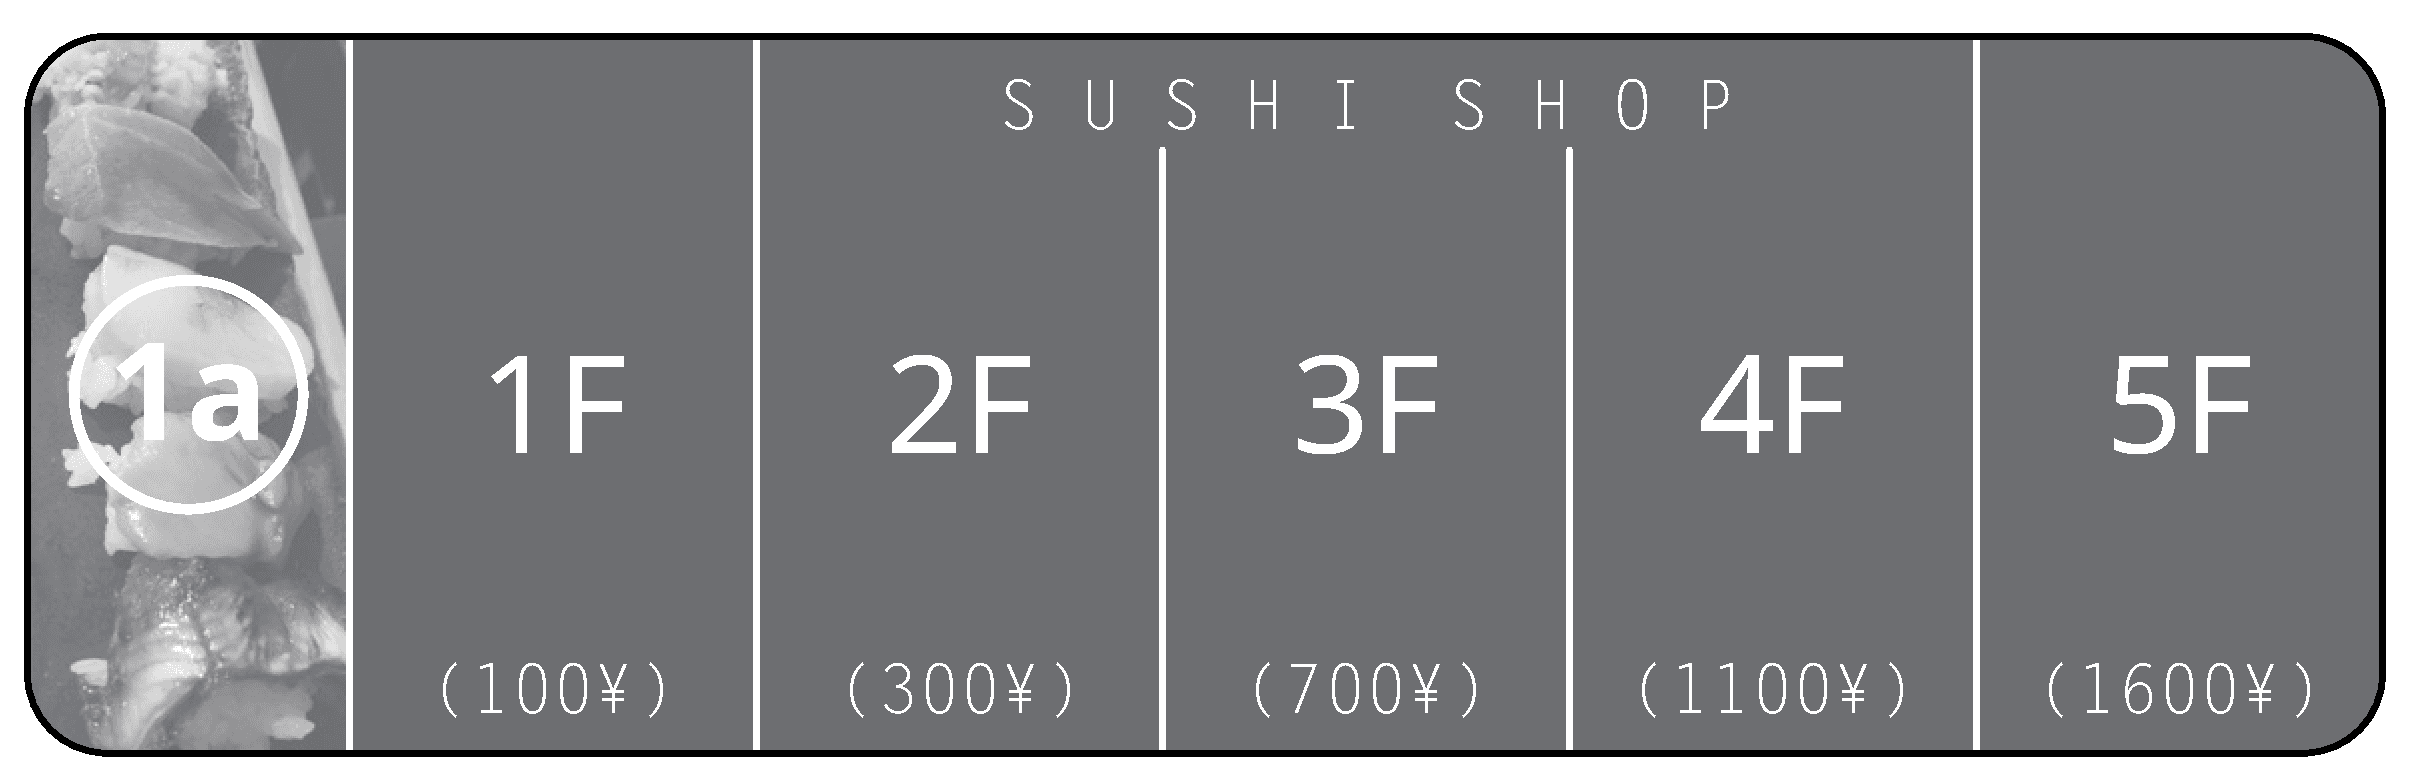
Example: You sell 1 Fugu, 1 Eel, and 1 Salmon token together for ¥700.
EXPANSION OVERFISHING
When the Mackerel Fish Market is brought into play due to the Overfishing of another Fish Market, set it up as if it were the start of the game (as per the normal Overfishing rules), with one exception: do not set aside any Mackerel Fishing Licenses or give any to players. Players only receive Mackerel Fishing Licenses during initial setup of the game, and only then if the Jack Mackerel Market is not in play.
VARIANTS
These variants can be played separately or in any combination to provide new twists to TOKYO TSUKIJI MARKET or TOKYO TSUKIJI MARKET EXPANSION!
ADDITIONAL MARKETS
Once you are familiar with the game, you may choose to add more Markets than are recommended for your player count in the table in step 2 of Setup. You may add as many as you like, but it is not advisable to play with all of the Markets unless everyone has played the game previously.
CRASHING EXT. MARKETS
With this variant, some External Markets can now Crash, bringing new Markets into play. During setup, place the Crash tokens in a general supply near the play area.
If, at any point during the game, an External Market meets the conditions under which it Crashes (see below), immediately draw a random External Market board from those in the box, set it up as usual as if it were the start of the game, and continue playing with it in play. In addition, place a Crash token on the Crashed Market’s board to indicate that the Market has Crashed. The Crash token is double-sided, and depending on which Market has Crashed, it will be placed with a specific side face up:
If the “Crashed” side is face up (the one showing the dead fish), this acts as a reminder that the Market has already Crashed and so cannot Crash again, but the Market may still be visited (by paying its normal entry cost) and interacted with.
If the “Closed” side is face up, the Market can no longer be visited or interacted with, for the rest of the game. Any components that would subsequently be returned to the Market are placed in the box instead.
Note: If you are playing with TOKYO TSUKIJI MARKET EXPANSION, and the Aquarium or the New Aquarium is drawn as the new External Market following a Market Crash, add both Market boards into play at the same time.
The External Markets which can Crash, along with the conditions under which this happens, the orientations of the Crash tokens to be placed on them, and where relevant, the ways in which they can still be interacted with, are as follows.
Base game External Markets which can Crash:
Aquarium: Crashes if all of its spaces (not just all those relating to Fish currently in play) are filled with Fish tokens. Place its Crash token with the “Closed” side face up.
Bank: Crashes if all Loans are taken and all Shares are bought. At game end, Loan repayments must still be made, with interest still paid to Share owners as normal. Place its Crash token with the “Closed” side face up.
Government: Crashes if both its spaces are filled to their capacity. Place its Crash token with the “Closed” side face up.
Rentals: Crashes if there are no Freezers and no Carts left on the Market. Place its Crash token with the “Closed” side face up. Freezers and Carts that would subsequently be returned to the Market after their second uses must be returned to the box instead.
Ships: Crashes if all boats have been purchased (i.e. none remain on the Market board). Place its Crash token with the “Crashed” side face up. The Market remains open.
Trading: Crashes if all of its spaces are filled with Fish tokens. Place its Crash token with the “Crashed” side face up. The Market remains open.
Expansion External Markets which can Crash:
Influence: Crashes if there are no Buyer and no Expansion tokens left on the Market. Place its Crash token with the “Crashed” side face up. Buyer tokens must still be returned to the Market as they are used, and they may subsequently be purchased again.
New Aquarium: Crashes if all of its spaces (not just all those relating to Fish currently in play) are filled with Fish tokens. Place its Crash token with the “Closed” side face up.
Ship Rental: Crashes if there are no Ship Rental tokens left on the Market. Place its Crash token with the “Closed” side face up. Ship Rental tokens that would subsequently be returned to the Market after its corresponding boat Docks must be placed back in the box instead.
Sushi Shop: Crashes if all of its spaces are filled with Fish tokens. Place its Crash token with the “Closed” side face up.
OPEN KNOWLEDGE MARKETS
If you wish to play with open knowledge of the order in which new Markets may enter the game, adjust step 6 of Setup as follows: instead of returning unused Market boards to the box, group the Fish and External Markets separately, randomize each set and display them face up in order near the play area so that all players can see them. During the game, when bringing a new Fish or External Market into play as a result of Overfishing or the use of an Expansion token, use the next Market from the corresponding order instead of drawing one from the box.
CREDITS
Design and artwork by: Jordan Draper
Rulebook editing by: Gaming Rules! (Paul Grogan, Chris Spath, and the team)
Special thanks and play testing/development by: Joe Wiggins, Andrew Plassard, and Andrew Denison
www.jordandraper.com
talk@jordandraper.com
ARCHITECTS ALSO SHOP
- Players
- 2-5
- Time
- 30 min
- Designer
- Stefan Brakman, Jordan Draper
- Game type
- Pick-up & Deliver, Dexterity (Optional)
- Games required
- TOKYO JIDOHANBAIKI, TOKYO TSUKIJI MARKET, TOKYO JUTAKU & TOKYO COIN LAUNDRY
In this game you are a Japanese architect, on a shopping spree for a plethora of the most expensive items you can manage to grab!
SETUP: Take the Jutaku cards and create a grid as shown on page 24. Note the width of the pathways should be gauged by the architect tokens.
- 1) Place the vending machine, and one crate with all 6 black drinks next to it.
- 2) Pull the rest of the drinks randomly from a box lid, until there are 5 on each of the cards on the second to top row.
- 3) Place the 6 color drink cards out, with 300 yen on all but the black, which gets 200.
- 4) Give each player an empty crate, and an architect token, at the bottom of the map.
- 5) Place magazines/newspapers on the bottom middle card, 2 washing machines and a dryer on the top 3 center cards.
- 6) Place one clothing item on each of the lower outside 16 cards. Note that socks are a single item.
- 7) Place a washer and dryer card in a stack with 500 yen.
- 8) Place the bed sheet and pillow case card in a stack with 400 yen.
- 9) Place the shirt and pants card in a stack with 300 yen.
- 10) Place the bra, underwear, and socks card in a stack with 200 yen.
- 11) Place two ‘15’ tuna and 500 yen on the top left most cards, with the other tuna in the bag.
- 12) Place 5 salmon on each of the top two middle cards.
- 13) Place two ‘4’ crabs on the top right most cards, with the other crabs in the bag.
- 14) Place mackerel barrels equal to 3x the number of players next to the cards.
- 15) Place yen as a general supply somewhere.
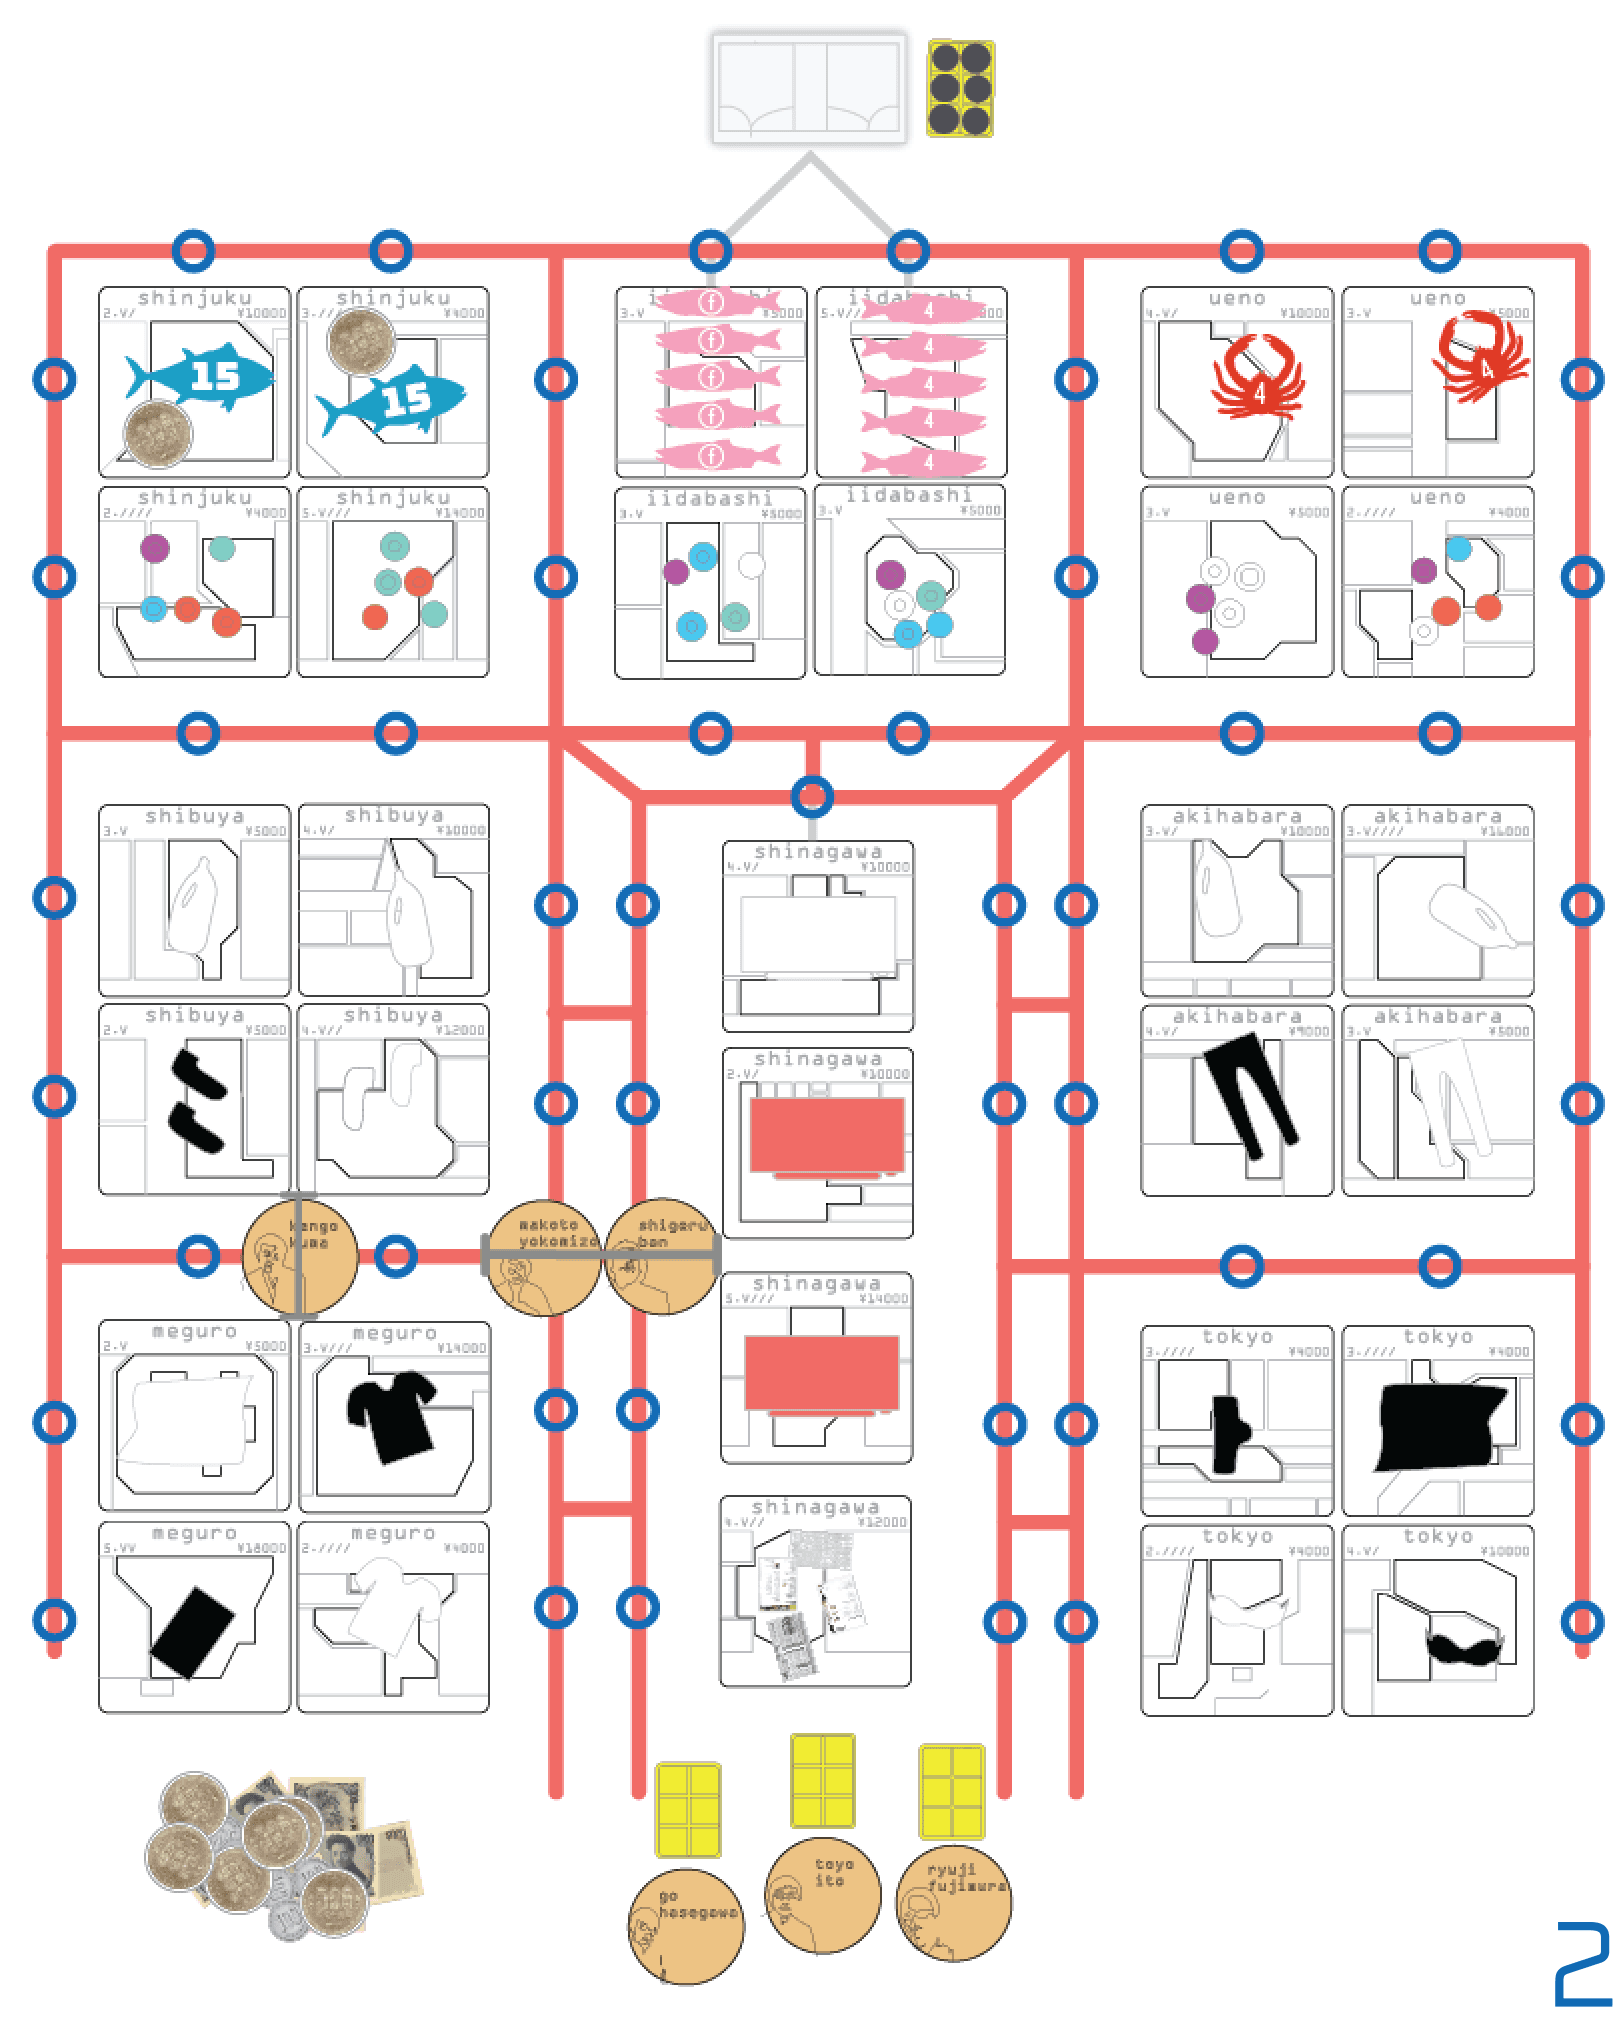
GAMEPLAY: There are two options for playing the game, with dexterity, or without. Decide as a group which version you would like to play. With the dexterity version, you will have to add items to your shopping basket, and once added, you may not touch them anymore and must push your basket using your architect token. If anything falls out, it is discarded as lost. With the strictly economic version, there is no pentaly for items falling out and you may touch everything in your basket as you wish.
The player to last go shopping will go first, then play will follow in clockwise order. On your turn you must move between 1-3 spaces (shown by the blue dots on page 19), and then you may take 1 item from a card you are directly in front of (or use the vending machine if touching it). From a blue dot location, you may move to any other blue dot connected by a line with no other blue dots between as shown on page 19. This is 1 space. You may make a 180 degree U-turn as a movement, but you may not end your turn on the same space you started on.
Begin moving through the shopping center, grabbing as many items as you can manage, and when you are ready, make your way back to the entrance at the bottom of the map. You may only exit out the double lanes in the center. You will exit the store with your lot of goods a total of two times. When you exit, take the items, a mackerel barrel, and a payout for each as shown by the market prices. Place the items in front of you. Then reduce yen on cards you were paid out for by 100 yen only, regardless of the number of items you took in that category. On your next turn, enter the store again at the middle double lanes.
EXAMPLE: You exit the store first with two shirts, a red drink, a salmon, and a crab pulled from the bag. Nice haul. You take 600 yen for the two shirts, removing 100 yen from that card stack. You take 300 yen for the red drink, and take 100 yen from the red card. You place the salmon with the ‘f’ side up in front of you and take 500 yen. You place the ‘6’ crab you pulled from the bag in front of you, and take 600 yen. Your turn is now over and you will enter the store again on your next turn.
While most items have a direct payout price, some are special as follows:
NEWSPAPERS/MAGAZINES: These are used as tie-breakers, and the player with the most will break any end game ties.
DETERGENT: Each detergent you exit the store with will double the value of a single clothing item payout. EXAMPLE: You leave the store with 2 bras, 1 shirt, and 2 detergent. You choose to apply the first detergent to the shirt, incresing the payout from 300 to 600, and the second to a bra, increasing the payout from 300 to 600. You may not apply multiple detergent to a single item.
CRABS: Instead of taking a crab from a card, you instead pull one from the bag randomly.
TUNA: First, you must have 500 yen and pay it to the bank, then pull a random tuna from the bag. Each tuna you purchase after the first will cost +500 yen.
SALMON: Take a salmon from the card, and if you are the first player out of the store, you will get 500 yen per salmon and place them with the ‘f’ side up. If any player (including yourself) has already left the store with any salmon, take 400 yen per salmon and place them with the ‘4’ side up.
VENDING MACHINE: To use the vending machine, you must be at one of the two blue locations shown with grey lines touching the vending machine. Dump the entire crate of black drinks in the vending machine. Take all drinks that come out, and remove any stuck drinks and place them back in the crate next to the machine. If any drinks are paid out, or dropped from carts, add them to the vending machine crate (or next to it if full).
GAME END: When all but one player have 2 mackerel barrels from exiting the store 2 times, the game will end immediately. The player left in the store will not receive any payout for current cart items.
Count up all of your yen, and the player with the most is the winner! If there is a tie, the player with the most magazines/newspapers wins. If there is still a tie, you are all consumers.
FAQ
Does Takoyaki count as its own Fish token type, distinct from Octopus? Yes. Takoyaki is a Fish token in its own right, worth 5 Resources once purchased, and its shape is different from Octopus; anywhere different token types matter (such as the Sushi Shop's different-shaped token spaces), Takoyaki and Octopus count separately.
Can I convert Fish to Himono right before those Barrels would be lost to degradation at the start of my turn? No. Fish Degradation resolves first at the start of your turn and is not optional, so Barrels in the lower selling row return to their Markets before you could move them onto a Himono License. Converting Fish to Himono "at any time during your turn" means before that turn ends, not at the start of the next one.
What is the Auction bag for, is only one bag included, and how does it work with both Tuna and Spider Crab in play? The bag holds the Tuna and Spider Crab tokens: when an auction triggers, draw 1 random token of that Fish type from the bag, and tokens sold back to those Markets return to the bag. Only 1 Auction bag is included and setup places both Markets' tokens in it together; the two token shapes are distinct enough to tell apart by touch when drawing.
If I enter a Market whose entry cost is Yen or Fish tokens rather than Action Points, do I still have both of my actions afterwards? Yes. Only Markets whose printed entry cost is 1 or 2 Action Points consume them; entering a Market by paying Yen or Fish tokens (or one with no entry cost shown) leaves your 2 Action Points untouched.
Can I sell my own Mackerel, what if a setup offers few ways to earn cash, and what is the ??? column on the Harbor board? Mackerel is the exception to the rule that Barrels are only sold to other players: at the Mackerel Market you may return your own Mackerel Barrels and/or tokens, taking ¥100 for every 2 in any combination. A random Market draw with few cash payouts just plays slower; many groups simply redraw the Markets in that case. The ??? selling column lets you set any multiple of ¥100 you wish as a sale price, declared when you place the Fish there.
Is the value of the Tuna or Spider Crab being auctioned visible before the blind bids? Yes. The token is drawn from the Auction bag and everyone sees its printed value (4, 6, or 8 for Spider Crab; 15, 20, or 25 for Tuna) before bidding; only the bids themselves are secret, revealed simultaneously from closed fists.
The rules say I must spend both Action Points; can I effectively waste one, for example by purchasing nothing? In practice, yes. You must spend both Action Points, but every part of a Fishing action is optional (the rulebook allows a Fishing action taken solely to adjust prices), so an Action Point can be spent to little or no effect. Markets are stricter: if you enter a Market you must interact with it at least once.
With 4 Mackerel Licenses, can I enter the Mackerel Market, collect ¥400 in License bonuses, then return one of my own Licenses and buy it back for ¥100 every turn? No. You may buy at most 1 Mackerel License each time you enter the Market, and the designer has ruled that you cannot return a License and buy it back during the same turn. You do still collect ¥100 per Mackerel License you hold whenever any player, including you, enters the Mackerel Market.
When can I sell Mackerel Barrels from my own Harbor board? On your turn, by taking a Markets action to enter the Mackerel Market. There you may return Mackerel Barrels from your Harbor board and/or Mackerel tokens, taking ¥100 for every 2 returned in any combination.
Is the retail copy missing barrels, fish, or a second bag compared with the early component overview video? No, nothing is missing; the video predates production changes. A complete copy matches the rulebook's contents list, including 64 wooden discs (63 Fish Barrels plus the natural-colored Value marker), 119 Fish tokens, and a single Auction bag; the red second bag seen in early videos was dropped because one bag serves both Tuna and Spider Crab.
Does triggering the end of the game require both ¥5,000 and 50 Resources, or the most of both? Neither; the two conditions are separate. The end triggers at the start of your turn if you have at least ¥5,000 and do not have the outright lowest total Resources, or you have 50 or more Resources worth of Fish tokens and do not have the outright lowest amount of Yen. Triggering does not guarantee a win: the final turns can still swing the totals.
How many Barrels can one Ship take per Fishing action, and can several Licenses of the same type stack onto one Ship? Each Ship performs 1 activity per Fishing action, and the Catching activity adds exactly 1 Barrel, so 3 Mackerel Licenses can only Catch 3 Barrels in one action by using 3 separate Ships at sea. Each License may be used at most once per Fishing action, an empty Ship may only Catch a type for which you hold more Licenses than you have Ships at sea holding that type's Barrels, and a partially loaded Ship may only Catch the same type it already holds.
Is there a tiebreaker if two players finish with the same total? No, a tie stands. The rulebook's official advice: in the case of a tie, settle it over fish and chips with a game of TURIN MARKET.
Does purchasing my own degraded Fugu at the start of my turn cost an Action Point? No. Buying your own degraded Fugu happens at the start of your turn, before your actions: pay the listed price to the general supply. It never costs an Action Point.
Does the ¥100 docking bonus cover Barrels that never reach my Harbor board, and can tokens just received at the Trading Market be traded again immediately? Yes to both. You take ¥100 for every 2 Barrels unloaded at your Ports during the same Fishing action (¥200 for 4), including Barrels that trigger auctions instead of being placed for sale. At the Trading Market trades resolve one after another and you may trade any number of times per visit, so tokens you just received can go straight back into another trade.
Does the docking bonus count Barrels from separate boats, how do Fish tokens enter my supply, and does the Barge tie up a License? The ¥100-per-2-Barrels bonus counts all Barrels unloaded at your Ports in the same Fishing action, even from separate boats (2 Barrels pay ¥100, not ¥200). Fish tokens enter your supply by purchasing Barrels (each returns to its Market for a matching token), winning Tuna or Spider Crab auctions, or buying your own degraded Fugu at the start of your turn. The Barge never Catches, so it never uses or ties up a License.
When a Fish Market becomes Overfished, what is removed, and can Barrels already in Harbors still be purchased? Remove only the Barrels remaining on the Market board (to the box); the board, its Fish tokens, and all Licenses stay in play. Barrels already on Harbor boards can still be purchased (they return to the box instead of the Market), and the Market can still be visited for Licenses and sales; you simply cannot Catch that Fish any more (a replacement Fish Market is also drawn from the box and set up).
When playing with closed money, must I declare reaching ¥5,000 at the start of my turn? Yes. With closed money you must declare at the start of your turn that you have at least ¥5,000 and/or 50 Resources, then check the end-game conditions; the designer's advice is simply to be honest.
Does unsold Takoyaki on my Harbor board count toward the 50-Resource end-game trigger, and does purchased Takoyaki trade at 5 Resources? Takoyaki still for sale on your Harbor board is worth nothing until another player purchases it, so it counts toward no one's Resources or score. Once purchased and in front of a player, a Takoyaki token is a normal Fish token worth 5 Resources and can be traded at that value at the Trading Market.
Do I collect the ¥100-per-License bonus when I enter that Fish Market myself, and can I trigger it again by entering twice in one turn? Yes to both: when a Fish Market is entered, all players including the one entering take ¥100 per matching License, and a second paid entry later in the turn pays out again. The condition is that you must interact with the Market at least once each time you enter; you cannot enter and do nothing just to farm the bonus. (Markets with no entry cost shown may only be entered once per turn.)
At the Trading Market, do the numbers mean token count or Resource value, must spaces be used in order, and how many trades does one entry allow? The numbers are Resource values, not token counts: place any combination of your Fish tokens whose combined worth is at least the number shown. Spaces may be used in any order: place tokens on an empty space to take the Yen shown, or exchange your own tokens (again worth at least the printed number) for the tokens sitting on an occupied space, once at least one trade for Yen has happened in the game. A single entry lets you trade any number of times, across as many spaces as you like.
When I take the Purchasing action to buy from another player's Harbor board, do my boats travel there? No boats move; Purchasing involves no travel. For 1 Action Point you may buy any number of Barrels from any number of other players: pay each owner the listed price, return each Barrel to its Market, and take 1 matching Fish token per Barrel. You may never buy Barrels from your own Harbor board, with the single exception of your own degraded Fugu at the start of your turn.
At the Rentals Market do I choose between Freezer and Cart for each rental, and how much is a Cart worth? Yes, each ¥200 rental is your choice of Freezer or Cart, and each occupies a License space on your Harbor board while you hold it. A Cart is used twice in total: each use grants 1 additional Action Point that may only be spent entering Markets (flip it from 2 to 1 on first use, return it on the second), and Carts can never fund Fishing or Purchasing actions. You may use the same Cart twice in one turn, for example to cover a 2-Action-Point Market.
Is buying Licenses the only interaction at the Red Snapper and Salmon Markets? Yes. Red Snapper's only Markets interaction is buying Licenses (¥300 each); Red Snapper tokens can never be sold back to their own Market, only at External Markets. Salmon works the same way: ¥400 to enter with Licenses at ¥400 each, and since its entry cost is Yen rather than Action Points, 2 Salmon Licenses cost ¥1,200 and no actions.
How many Red Snapper Licenses, Eel Barrels, and Squid Barrels should a complete copy have? 3 Red Snapper Licenses (matching the spaces on its Market board), 8 Eel Barrels, and 7 Squid Barrels; the rulebook's component photo can read as 4 Red Snapper Licenses, but 3 is correct. The base game also includes exactly 1 natural-colored disc, the Value marker used on the Eel Market's Value track.
What are all the ways Yen enters the game from the general supply? The docking bonus (¥100 per 2 Barrels unloaded in one Fishing action), the ¥100-per-License payouts when a Fish Market is entered, selling boats, Fish Markets with SELL prices, and External Markets that pay out, such as the Aquarium and Government. Two that are easy to miss: the Auction Market, where the general supply matches the winning bid, and the Trading Market, where placing tokens on an empty space pays the Yen shown.
Can I take the Fugu License and simply never use it, to block anyone else from getting more Fugu? Yes, nothing in the rules prevents it. The License occupies 1 of your 4 License spaces and takes a Market entry to acquire, but holding it unused is a legal blocking play.
What does the Barge sell for at the Used Ships Market, how many Salmon Barrels can a boat hold, and is a Freezer automatic? The Barge trades at its fixed ¥1,000 cost, not per slot: it sells to the Used Ships Market for ¥400 and rebuys for ¥600, in total. A boat using a Salmon License can hold only 1 Salmon Barrel at a time regardless of its slots (and Ships hold one Fish type anyway). A Freezer is not automatic: you choose whether to use one at the start of your turn to skip the Fish Degradation step.
Do Markets whose entry cost is Yen or Fish tokens still consume an action, and can I enter one in the middle of another action? Only Markets whose printed entry cost is 1 or 2 Action Points consume them; entry paid in Yen or Fish tokens costs no action, and you may also repeat the same action type twice in a turn. You must fully resolve one action before starting another, so you cannot pause mid-Fishing to visit a Market. Opening a blocked Port is the exception: paying its ¥500 cost is allowed at any time on your turn, in addition to your actions.
How many Barrels can a single selling column on the Harbor board hold? There is no limit. Any number of Barrels may sit in the same column; each is simply for sale at that column's price.
Fishing only yields Barrels, so how do players actually acquire Fish tokens? Through the Purchasing action: pay the owner the listed sale price, return the Barrel to its Market board, and take 1 matching Fish token per Barrel bought, regardless of type. The exceptions are Tuna and Spider Crab, whose tokens arrive via the blind auctions triggered when their Barrels are unloaded, and Fugu, which you may buy from your own Harbor board only at the start of a turn in which it would otherwise degrade off the board.
Can a Ship ever be sold while carrying Fish Barrels? No. A boat must be in one of your Ports to be sold, and Docking unloads all Fish Barrels immediately, so any boat you sell is already empty.
Why would anyone sell a boat to the Ships Market for 10% when the Used Ships Market pays ¥200 per slot? Because the External Markets in play are randomized during setup, the Used Ships Market is not always available. When it is, sell there for the better price; when it is not, the Ships Market's 10% buyback (rounded up to the nearest ¥100) is the only way to sell a boat. Note that the Used Ships Market cannot be used on your last turn once the game end has been triggered.
Does the Eel Value marker advance when Eel Barrels are Caught, or when they are put up for sale? When they are put up for sale: each time an Eel Barrel is unloaded and placed for sale on a Harbor board (not simply Caught), advance the Value marker 1 space per Barrel, so Docking 3 Eel Barrels advances it 3. Selling Eel tokens back to the Eel Market later moves the marker down 2 spaces per token sold.
Do players' starting Mackerel Licenses come out of the Market board's seed, and how many of the 8 Licenses are in play at each player count? No; set aside 1 Mackerel License per player first (each player starts with one), then stock the Mackerel board from those remaining, up to the number its formula asks for. Only 8 Mackerel Licenses exist, so the board starts with a License per player at 2 to 4 players, but only 3 remain for the board at 5 players and 2 at 6.
The Ships Market's seeding formula implies more Ships than the box contains, so are Ships missing? No, the counts are intentional: 6 One-slot, 4 Two-slot, and 3 Three-slot Ships, 1 Four-slot Ship, and 1 Barge. Set aside 1 One-slot Ship per player, then stock the Ships Market as the board indicates, placing as many of a type as remain when there are not enough; at 6 players every One-slot Ship starts with a player and none reach the Market. Even a 2-player game puts the Four-slot Ship on the Market.
Where are the rules for the Barter and Auction Market boards that were missing from the original printed rulebook? They were Kickstarter stretch-goal additions accidentally left out of the original printing; both are covered in the updated rulebook's External Markets section. Auction: pay the fee for your lot's Resource group, all other players make one simultaneous blind bid, and you must accept the highest bid, which the general supply matches. Barter: offer a group of tokens, all other players make one blind offer, and you may accept any one offer or decline them all.
At game end, is the conversion ¥100 per Fish token or per Resource? Per Resource: each Fish token converts at ¥100 for every 1 Resource it is worth, so a 20-Resource Tuna becomes ¥2,000 and 3 Red Snapper worth 3 Resources each become ¥900. Resources count at their current value all game for the end-game trigger, and the conversion is the final step, after the highest and lowest Resource bonuses and any Loan repayment.
When Fish tokens are sold for Yen, do they return to their Market board or leave the game? Tokens sold back to a Fish Market return to that Market's supply (or the Auction bag, for Tuna and Spider Crab); tokens sold to External Markets like the Aquarium and Government stay there for the rest of the game. Some Fish (Red Snapper, Salmon, and Octopus) cannot be sold back to their own Markets at all and must go to External Markets instead.
Can the Barge collect transferred Barrels and Dock in the same Fishing action, resolving my boats in whatever order suits me? Yes, all of that is legal. You activate your boats in any order within a Fishing action, the Barge's own activities are only Undocking and Docking, and transferring Barrels from Ships to the Barge is free at any time during your turn while both are at sea. The only cap is that each Fishing License may be used at most once per Fishing action.
When a Fish becomes Overfished, do I lose the matching Licenses or their ¥100 visit bonus? No. An Overfished Market and its Licenses stay in play: the Market can still be visited and interacted with, and every entry still pays ¥100 per matching License held. You may also return a License to its Market at any time during your turn, for free.
Does the end game trigger if I reach the threshold but am tied for the least in the other category? Yes. The conditions require not having the outright lowest Yen or Resources, and players tied for the least do not have the outright lowest, so the trigger fires. Scoring ties are also codified: players tied for the highest Resource value take ¥500 each, and players tied for the lowest pay ¥300 each.
The end-game rule gives every other player one more turn, so players seated before the trigger get an extra turn overall; is that intended? Intended. The player who triggers the end takes that turn as usual and each other player takes one final turn. The designer's reasoning: the real disadvantage falls on the players acting last, whose chances to sell off Fish shrink, final turns historically pay little, and triggering the end is itself an advantage worth playing for.
Can a single Ship carry Barrels of multiple Fish types if I hold the Licenses? No. A partially loaded Ship may only Catch the same Fish type it already holds, so each Ship carries one type at a time. The Barge is the exception, holding any combination (with at most 1 Salmon Barrel), as is the expansion's Blue Ship, which uses 2 Licenses at once and may hold up to 2 types.
When selling Fugu tokens back to the Market, must I sell all of them? No, you may sell only some. The sale pays ¥100 multiplied by the number of Fugu sold, multiplied by itself (4 Fugu pay ¥1,600), and you do not have to sell your whole group. Your remaining Fugu are then worth less, since the combined Resource value of your Fugu is the number you own multiplied by itself.
Must the 3 Tuna (or 2 Spider Crab) Barrels arrive on a single boat, and when does the auction happen? They may arrive across multiple boats: the auction counts Barrels unloaded during the same Fishing action, and it triggers immediately once the required number is unloaded. If that happens mid-action, hold the auction first, then finish the Fishing action with your remaining boats in any order; you may even pay to open a Port at any point during your turn. Getting there takes multiple Licenses and open Port spaces, since every Ship needs its own License to Catch and its own space to Dock.
Can I adjust the sale prices of degraded Fish, and only at certain times? Yes: whenever you take a Fishing action you may adjust the prices of the Barrels on your Harbor board, in both the upper and lower (degraded) selling rows, but at no other time. You may take a Fishing action solely to adjust prices.
Is opening a new Port part of the Fishing action, and does it cost an action? Neither: you may open a blocked Port at any time on your turn, in addition to your actions, by paying the ¥500 shown on its Port Covering; it never costs an Action Point. Ports must be opened in order from left to right, the 1 Port before the 2 Port.
When I trigger the end of the game at the start of my turn, do I still play that turn? Yes. The player who triggers the end takes that turn as usual, then every other player takes one final turn. The triggering player does not get an additional turn beyond the one that triggered.
When I sell a Ship back to the Ships Market, can it be bought again later? Yes: sold boats return to the Ships (or Used Ships) Market board and are available for purchase again. A boat must be in one of your Ports to be sold, never at sea, and the Used Ships Market cannot be used on your last turn.
Does the Barge use Fishing Licenses, and can many Ships share one License by dumping their catches onto the Barge? The Barge never Catches, so it never uses a License; the one wrinkle is that the Fugu License returns to its Market whenever a Fugu Barrel is unloaded at your Ports, whether a Ship or the Barge delivered it. Transferring Barrels to the Barge is free, may happen at any time during your turn while both boats are at sea, and cannot be reversed. No License can Catch more than 1 Barrel per Fishing action, and an empty Ship may only Catch a type for which you hold more Licenses than you have Ships at sea holding that type's Barrels; the Barge does not count for that check.
Does the Barge sell to the Used Ships Market per slot? No. The Barge trades on its fixed ¥1,000 cost: ¥400 when sold to the Used Ships Market and ¥600 when bought from it, in total rather than per slot, so there is no per-slot arbitrage.
How does the ??? pricing column on the Harbor board work? You set the price yourself: any multiple of ¥100 you wish, declared when you place the Fish in that column, or when adjusting prices during a later Fishing action. The declared price must be remembered and is not open to negotiation afterwards.