Living rulebook
Tokyo Metro
TOKYO METRO
- Players
- 2-5
- Time
- 60-90 MIN
- Designer
- JORDAN DRAPER
In TOKYO METRO, you are a Japanese investor, speculator, station builder, and bicyclist! The goal of the game is to plan the most efficient income system through the placement of action discs and station development. The map is based on the real world metro system in Tokyo, giving an educational insight into the Tokyo area, with a Euro-style economic twist!
CONTENTS
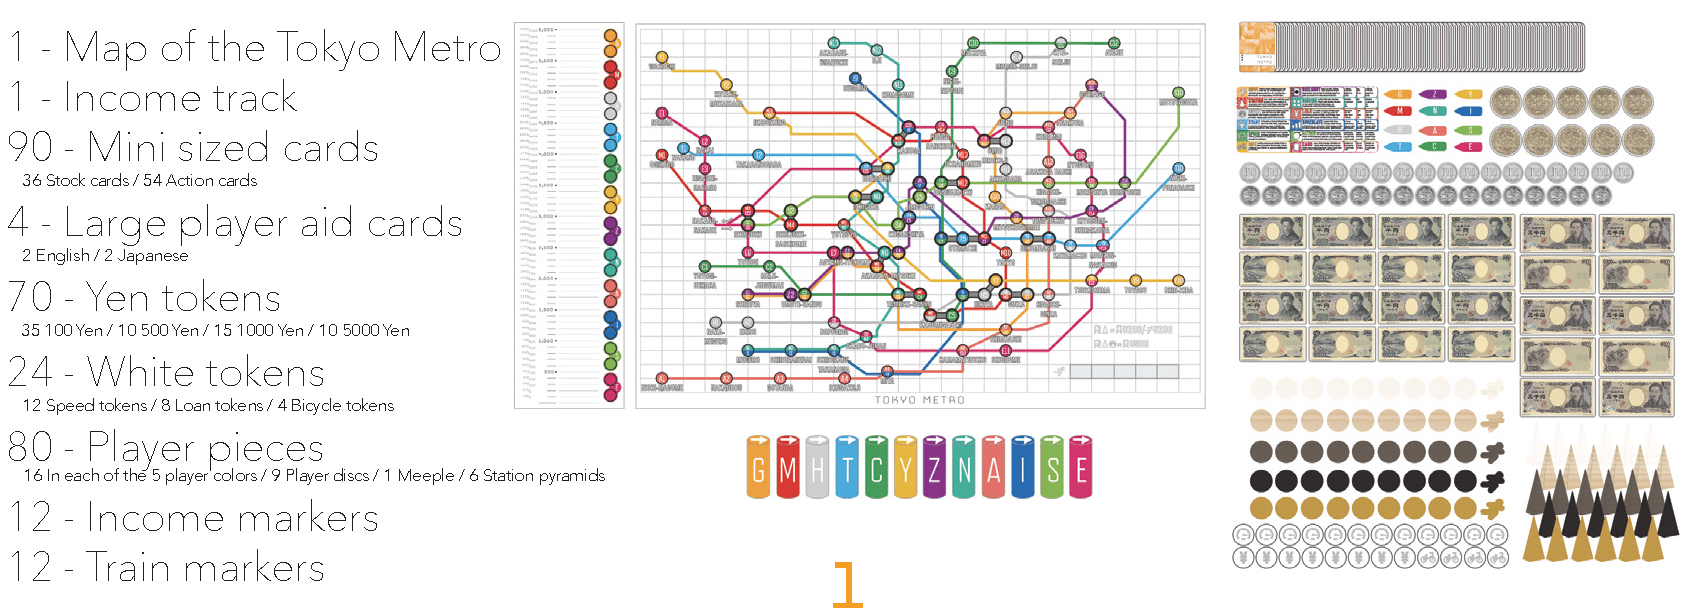
- 1 - Map of the Tokyo Metro
- 1 - Income track
- 90 - Mini sized cards
36 Stock cards / 54 Action cards
- 4 - Large player aid cards
2 English / 2 Japanese
- 70 - Yen tokens
35 100 Yen / 10 500 Yen / 15 1000 Yen / 10 5000 Yen
- 24 - White tokens
12 Speed tokens / 8 Loan tokens / 4 Bicycle tokens
- 80 - Player pieces
16 In each of the 5 player colors / 9 Player discs / 1 Meeple / 6 Station pyramids
- 12 - Income markers
- 12 - Train markers
SETUP
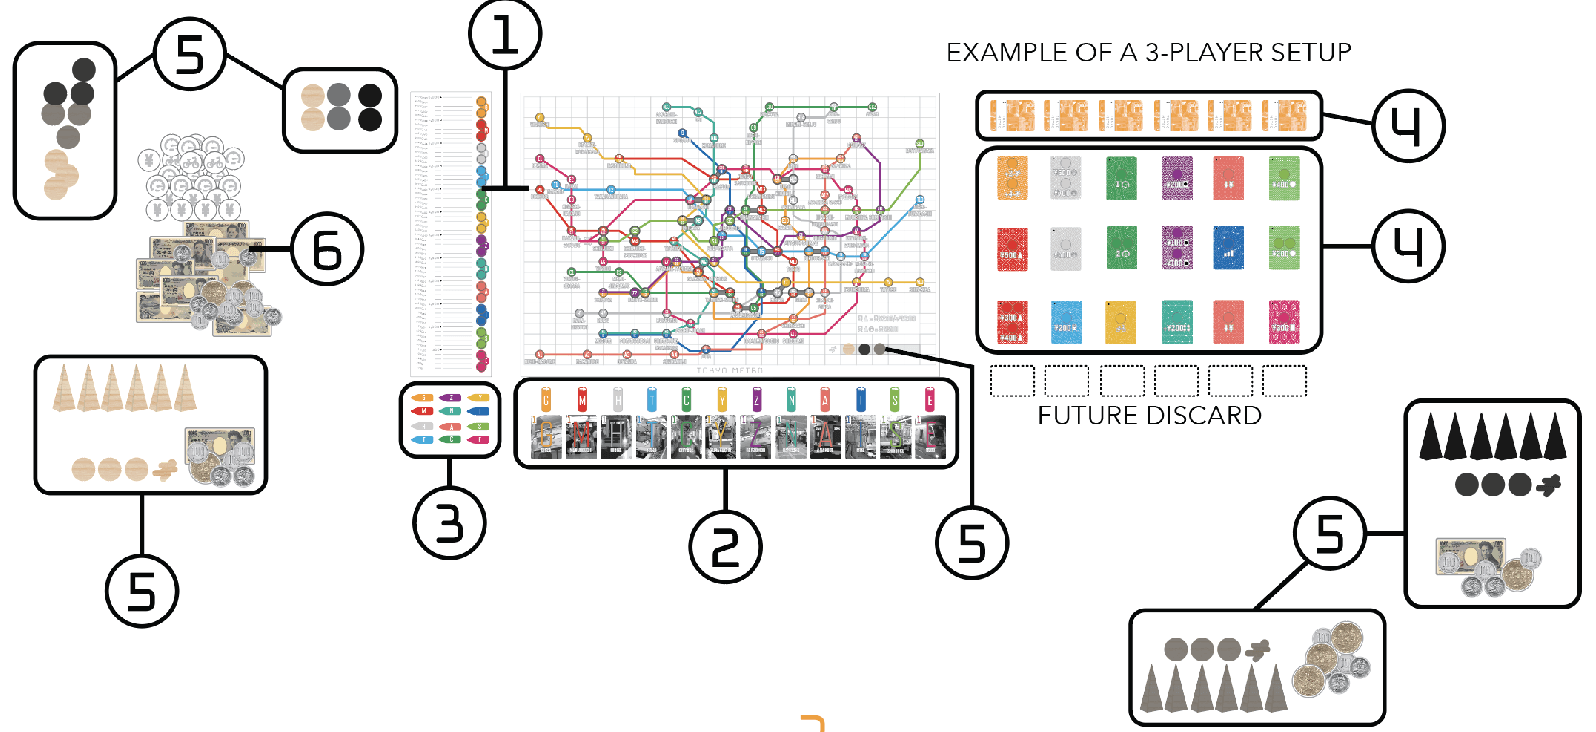
1 - Place the Map and Income track in the center left of the play area.
2 - Following the order of Train Lines on the right side of the Income track, starting with the G Line and working downwards, place the corresponding Train markers and Stock cards in sequence below the Map. Stack the Stock cards in ascending order with the number 1 Stock on top, followed by the 2, and then the 3 underneath.
3 - Place the Income markers at the bottom of the Income track (which represents zero income), with the sides showing just the Lines’ letters face up.
4 - Divide the 54 Action cards into 6 sets of 9 cards each, sorted by colors according to pairs of Lines from the Train Line sequence on the Income track (G/M, H/T, C/Y, Z/N, A/I, and S/E). Turn the first set face down and sub-divide it based on the numbers of dots on the back of each card. Shuffle each of these subsets separately, and make a face down stack by placing the cards with 3 dots on the bottom, 2 dots in the middle, and 1 dot on top. Repeat this for the other 5 colored sets, to form a row of face down stacks in the top right of the play area. Draw cards from each stack equal to the number of players, and place them face up in columns below their stacks, placing the cards from bottom to top in each column.
5 - Each player chooses a player color and takes ¥2,000 and the Player pieces in their color, keeping their 6 Station pyramids, 1 Meeple, and 3 of their Player discs in front of them (these are now “Action discs”). Place a further 2 of each player’s discs next to the Income track (“Speculation discs”) and 1 next to the Turn Order track (“Turn Order disc”) at the bottom right of the Map, leaving the remaining 3 Player discs of each color in a general supply to the side of the play area.
6 - Place the White tokens, and all remaining Yen tokens (“the bank”), in the general supply.
KEY CONCEPTS
VALUE: The Value of a Train Line is tracked on the Income track with the corresponding Income marker. During the game, a Line’s Value will go up primarily when its Train moves into Stations, and also as a result of certain player actions. When the movement of a Train or a player’s action increases the value of a Train Line, move the Line’s marker up on the Income track by the corresponding amount. At the end of the game, the Value of each Train Line will determine how much is paid out to players who have speculated on or invested in it.
Note: if the Train Line’s Value would exceed ¥6,000, flip its Income marker to show the side with +6,000 and continue advancing the marker from the bottom of the Income track.
MAP ELEMENTS: The Map is divided into rectangular spaces and shows the paths of the 12 Train Lines, their stops (the circles along the Lines), and the location and names of Stations (each being served by 1 or more Lines, and containing 1 to 3 stops). Meeples move between spaces, while Trains move between stops along their Lines.
PHASES OF PLAY
The game takes place over a number of rounds (5 in a 5-player game, 6 in a 4-player game, and so on). Each round, play progresses through the following phases, until there are no new Action cards to draw during the Action Card Refresh Phase. Then, the game ends immediately.
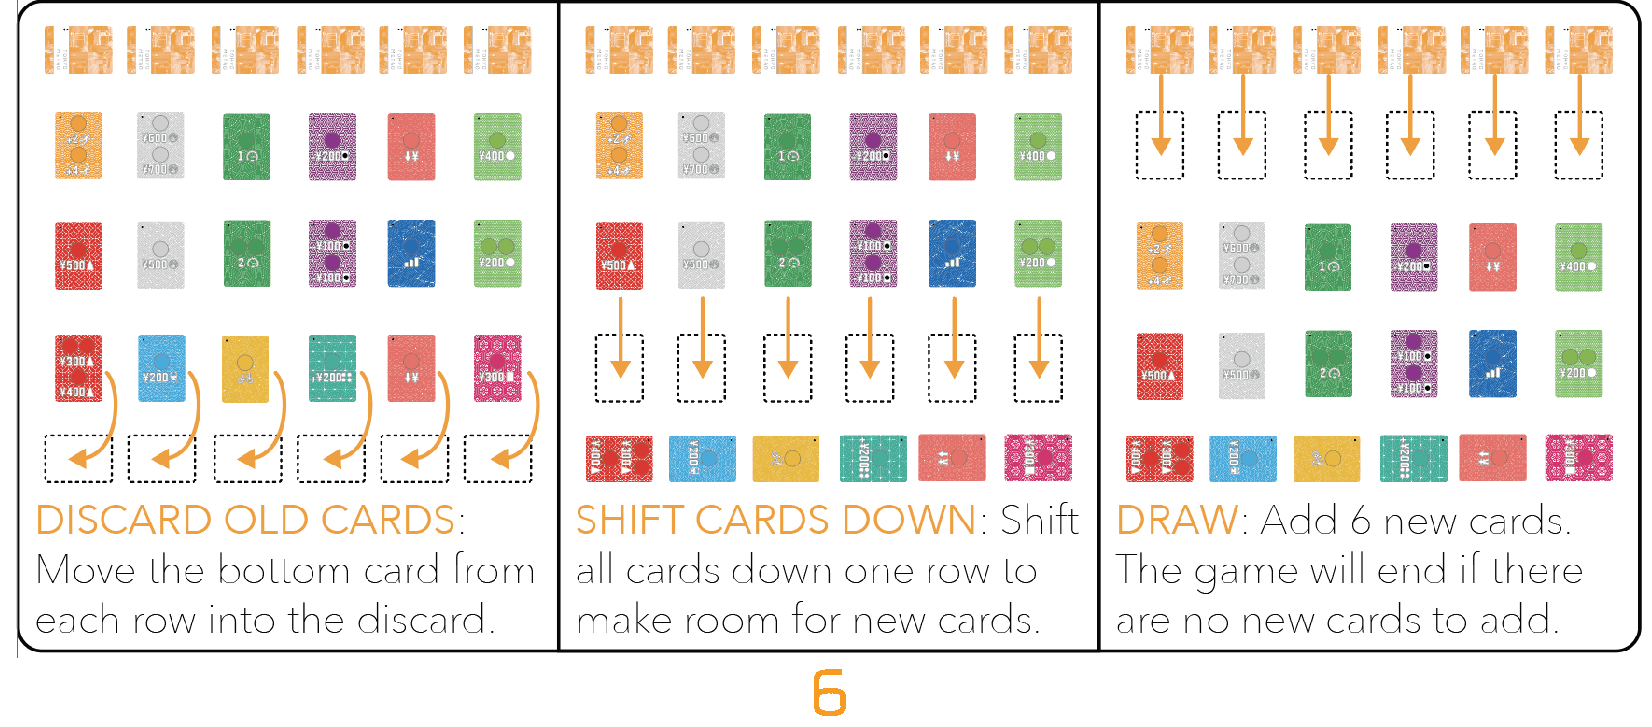
ACTION CARD REFRESH PHASE: Move the bottom Action card of each column to the top of its discard pile. Shift the remaining cards down, and draw 1 new card for each column.
TURN ORDER PHASE: Players secretly bid their Yen to determine turn order.
MOVEMENT PHASE: In turn order, players move their Meeples up to 2 spaces on the Map (or 3 with a Bicycle).
ACTION PHASE: In turn order, players place their Action discs on Action cards and perform the associated actions until they have no more discs or choose to pass. Then, return all discs from Action cards to players.
TRAIN PHASE: All Trains on the Map move 5 stops (and possibly more) along their Lines, triggering Station Payouts.
ACTION CARD REFRESH PHASE
The card at the bottom of each Action card column is turned sideways and moved into a discard pile for that column underneath. All remaining face-up cards shift down one space, and a new card from each draw pile is placed into the empty space at the top of its column. Players may not examine the discard piles. Note: Skip this phase during the first round.
TURN ORDER PHASE
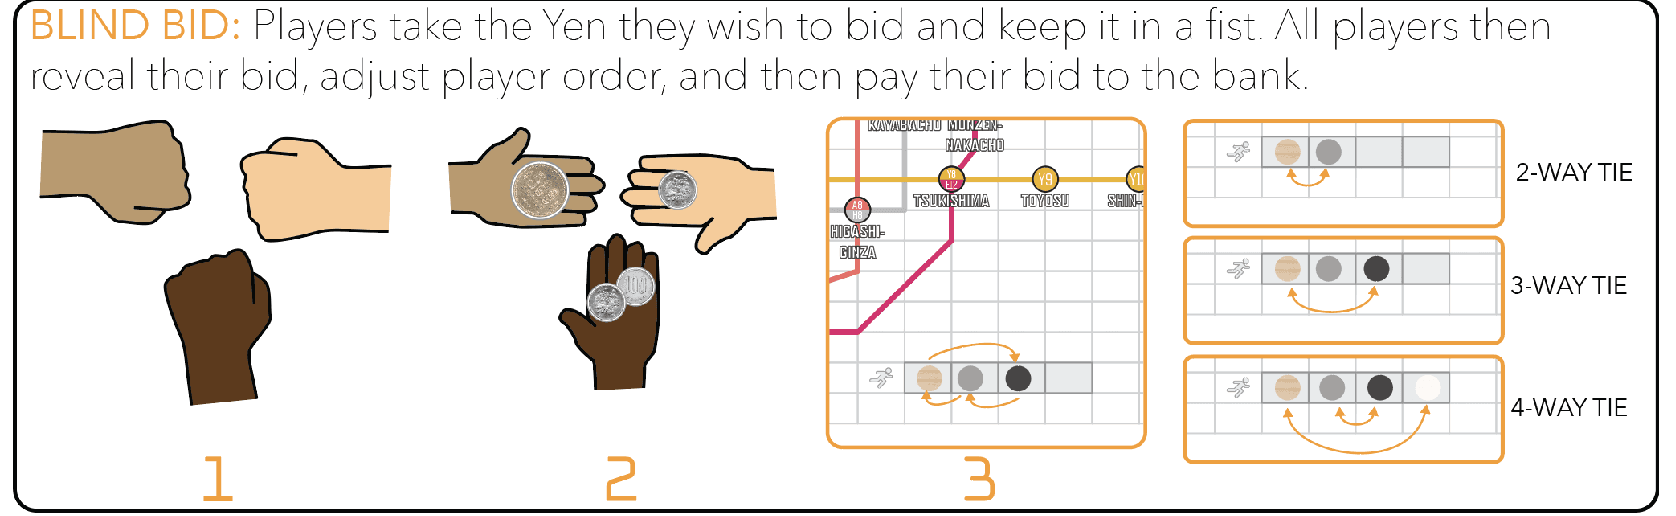
Each player secretly decides the amount of Yen they wish to bid, placing it in a closed fist. You are allowed to bid ¥0. When all players are ready, reveal bids simultaneously. If a player chose the Bidding action in the previous Action Phase, add their bonus Yen to their bid total. The player with the highest bid total moves to first in turn order on the left of the Turn Order track, then second highest, and so on. If there are any tied bids in the first round, randomly determine turn order among tied players. In the second and subsequent rounds, reverse the relative turn order positions between tied players. All bids are paid to the bank.
MOVEMENT PHASE
IN THE FIRST ROUND: In turn order, each player places their Meeple onto the Map, into any empty rectangular space of their choice in the marked grid.
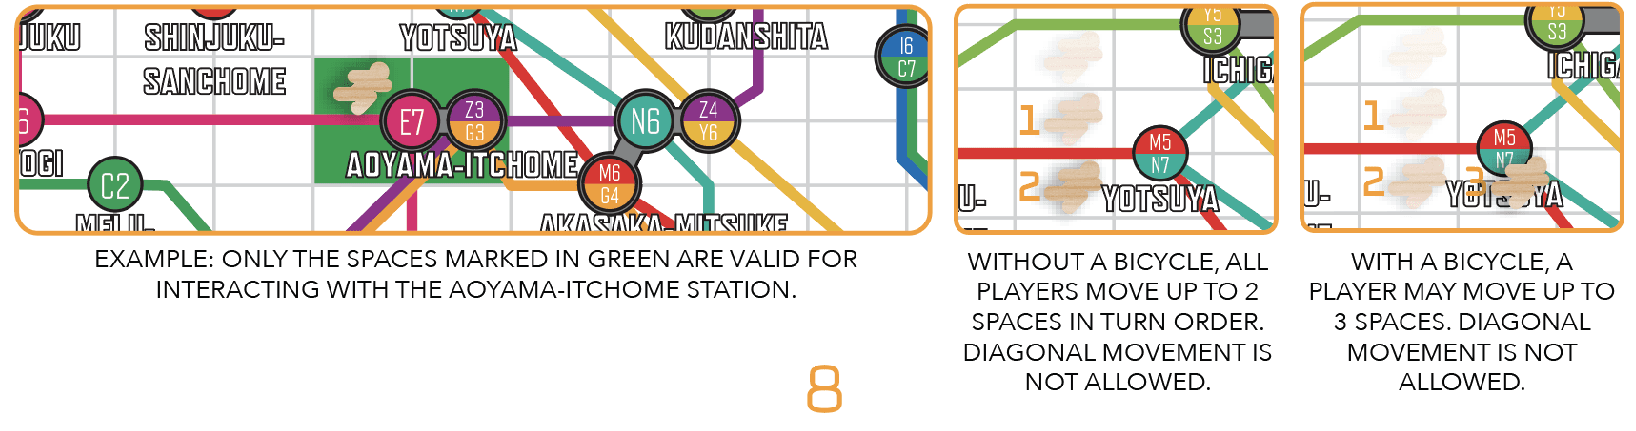
IN SECOND AND SUBSEQUENT ROUNDS: In turn order, players may move their Meeples up to 2 spaces on the Map (or 3 with a Bicycle; see Bike action below).
RULES FOR MOVEMENT: Meeple movement uses the gray rectangular grid on the Map, ignoring the colored Train Lines. A Meeple moves via orthogonally adjacent spaces (diagonal movement is not permitted), and can never enter a space with another Meeple. In order to interact with a stop on a Line (to build a Station or ride a Train), the player’s Meeple must be next to it (i.e. must occupy a rectangular space that touches the stop’s circle).
ACTION PHASE
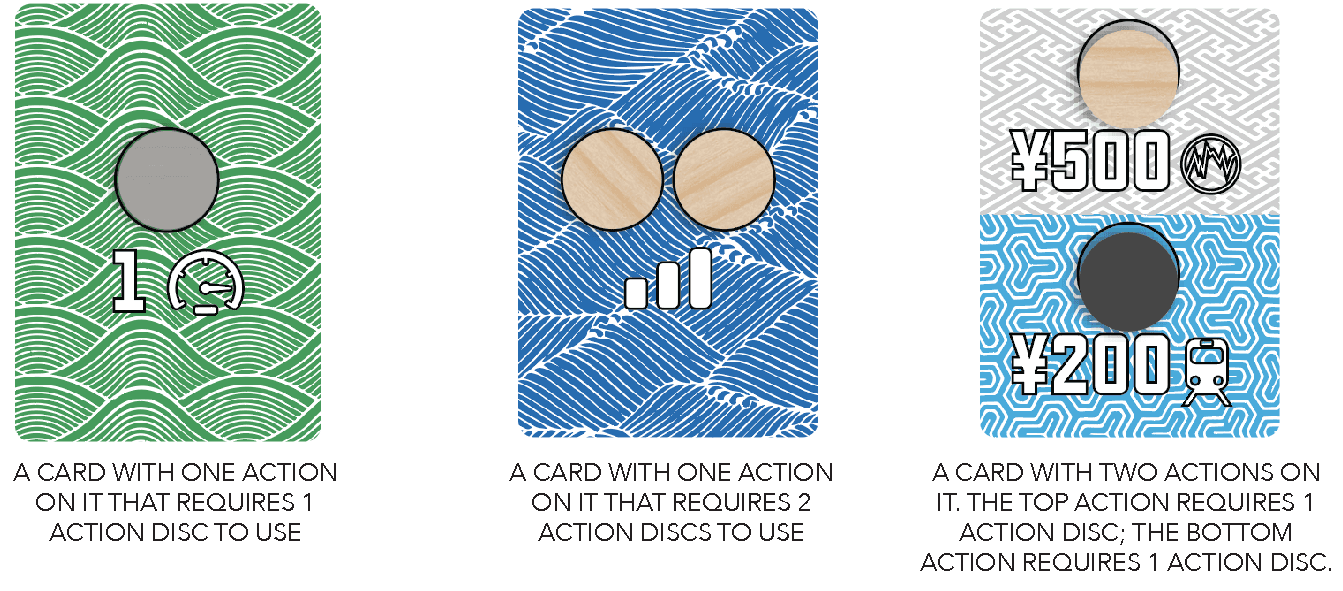
In turn order, players either pass, or choose an available action on an Action card and perform that action. Each Action card depicts either one or two actions, and each action consists of 1 to 3 spots and a symbol denoting which type of action it is. An action is available if its spots are empty. To perform an action, you must place an Action disc from in front of you on each spot on the action. Therefore, if you only have 2 Action discs remaining, you cannot choose an action that has 3 spots.
If a card has 2 actions on it, those actions are completely independent of each other; another player (or even the same player) may choose the other action on a card, and the actions may be performed in any order.
Note: While the colors on the Action cards match the colors of the Train Lines, these are used only to enable separation into the stacks required during setup, and as a way to distinguish between the different types of action. The actions themselves are not restricted to any specific Train Lines.
After a player performs an action, proceed to the next player in turn order, skipping over players who have passed earlier in the round. You may pass before you place all of your available Action discs, and must pass if you have no discs remaining. When passing, take ¥100 from the bank for each Action disc remaining in front of you.
At the end of the Action Phase, return all discs from Action cards to players. Descriptions of all the possible actions and the symbols which denote them can be found on the following pages.
MOVE
Immediately move your Meeple up to the number of spaces indicated by the action (+1 if you have a Bicycle). Follow the same rules for movement as in the Movement Phase.
STATION
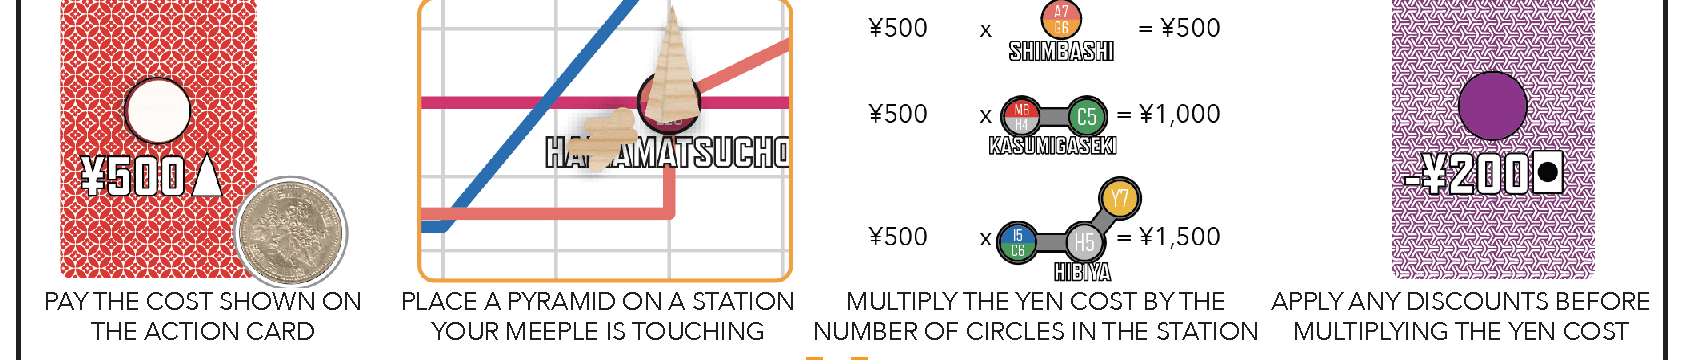
Pay the cost shown on the action to the bank; you may use Discount discs (see below) if you have them.
Indicate you have built a Station by placing one of your pyramids on a stop next to your Meeple. In case of a multi-stop Station (shown by circles connected with a gray outline; all part of the same Station), pay the cost shown on the action (less any discount) multiplied by the total number of stop circles, and place the pyramid between/near the circles; your Station is considered to cover all of these stops. Only 1 pyramid may be placed at each Station, whether single or multi-stop.
STATION TRADING: This action allows you to build a Station by returning one of your Speed or Bicycle tokens to the general supply instead of paying Yen to do so. Your Meeple must still be touching the Station you build with this action. When trading to build a multi-stop Station in this way, you still only return 1 token. All other Station rules apply.
INVEST
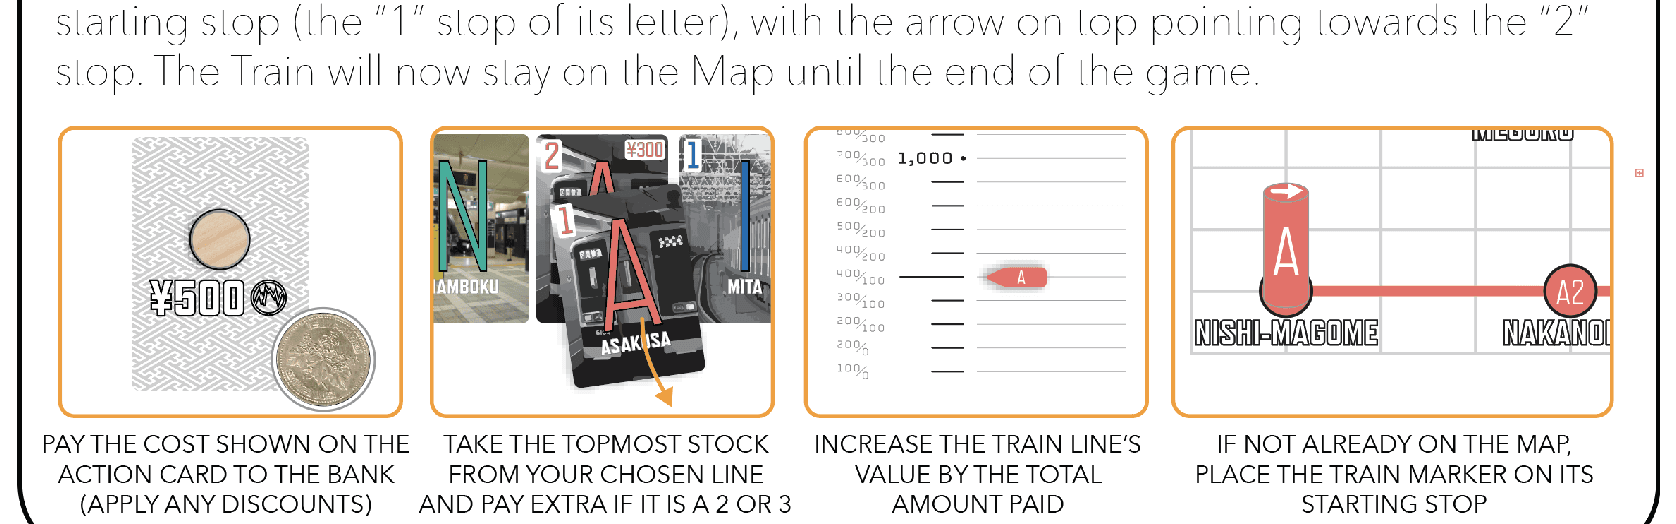
Pay the cost shown on the action to the bank, and take the top Stock card of a Line of your choice, subject to the restrictions that you may not buy Stock in a Line you already own Stock in, or in one you have speculated on (see the Speculate action).
If you have any discs on a Discount action (see below), you may remove those discs to get a discount on this action.
To purchase the number 2 or 3 Stock of a Train Line, you must pay an extra ¥300 or ¥600 respectively, as shown on the card. This extra cost cannot be discounted. After buying Stock, increase the corresponding Line’s Value by the total amount actually paid for the Stock (i.e. taking into account any discounts, and including the extra Yen paid for a number 2 or 3 Stock).
If the corresponding Train marker is not already on the Map, place it on the Line’s starting stop (the “1” stop of its letter), with the arrow on top pointing towards the “2” stop. The Train will now stay on the Map until the end of the game.
START
Choose a Train marker which is not already on the Map and place it on the “1” stop of its Line, with the arrow on top pointing towards the “2” stop. Increase the corresponding Line’s Value by the amount shown on the Action card.
This Train will move during the Train Phase each round while it is on the Map. If no player owns Stock in its Line when it returns to its "1" stop, it will be removed from the Map (see Train Phase). Note: This action is free to perform.
SPEED
Take the number of Speed tokens shown from the general supply (or, if there are fewer in the supply than shown on the Action card, take as many as are available) and place them in front of you. On a future turn, before you perform an action, you may assign them to any Train Lines with empty disc spots on the Income track (even if their Trains are not on the Map). You may assign more than one Speed token in the same turn. You may not assign them on a turn when you pass. During the Train Phase, a Train will move 1 extra stop for each Speed token assigned to its Line. Each Train Line can have more than 1 Speed token assigned to it; note however that the spots for each Train Line on the Income track are shared between Speed tokens and Speculation discs (see Speculate action). If there are no empty disc spots on a Line, no token may be placed there.
Note: Speed tokens assigned to Lines will stay there for the rest of the game. A Speed token that you have not yet assigned to a Line can be returned to the general supply as the cost of performing one type of Station action instead (see Station Trading, under the Station action).

BIKE
Take 1 Bicycle token from the general supply (if available) and place it in front of you. You may only hold 1 Bicycle at a time. If you have a Bicycle token, you may move up to 1 space more than normal when moving your Meeple with the Move action or in the Movement Phase.
Note: Bicycle tokens can also be returned as the cost for some Station actions (see Station Trading, under the Station action).
DISCOUNT
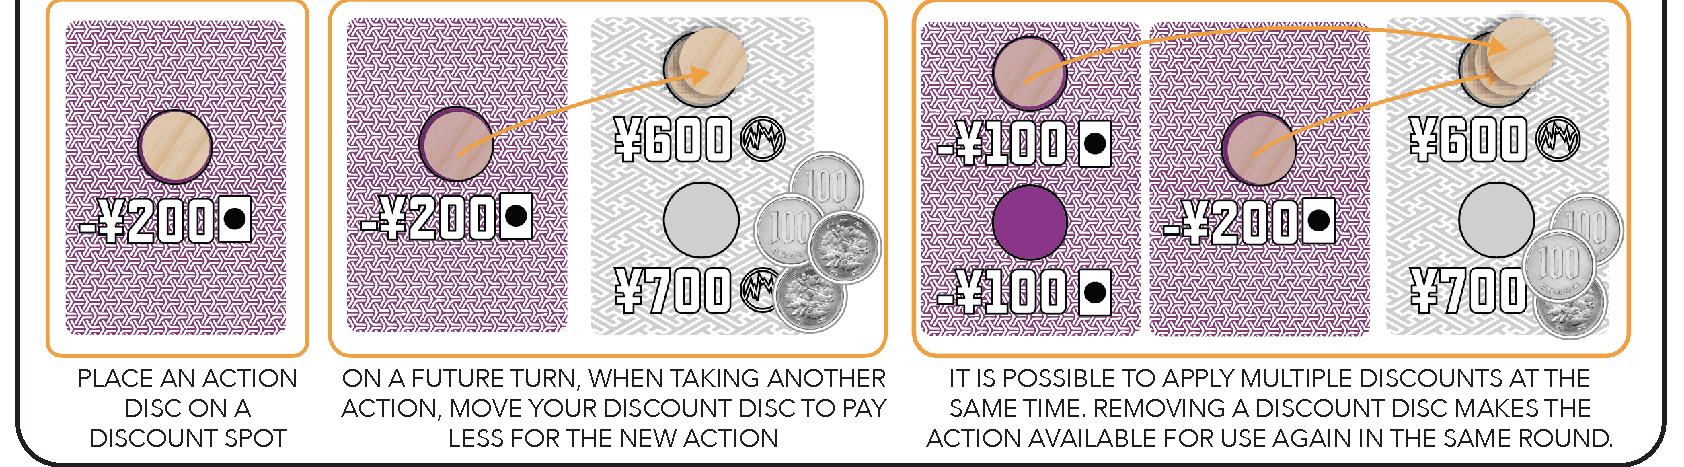
Place an Action disc on the disc spot to gain a discount on a future action in the current round. When taking an action later in the round, you may remove your Action disc(s) from the Discount action spots and place them on top of one of the discs on the newly-chosen Action to receive the indicated discount to the Yen cost printed on your current action’s card.
You may remove and use multiple Discount discs at once, but may not discount a cost below ¥0. Removing the disc(s) from a Discount action makes that action available to be performed again in the same round.
BIDDING
Take Yen equal to the amount shown from the bank and place it next to your Turn Order disc. In the next round, your bid for turn order is increased by that amount.
LOAN
Use the ↓¥ action to take a Loan token from the general supply and place it in front of you, as well as ¥1,000 from the bank. You may take multiple loans during the game; however if there are no Loan tokens available in the general supply, you may not perform this action.
You can repay a single loan without interest by using the ¥↑ action to pay ¥1,000 to the bank and return a Loan token to the general supply. Loan repayments cannot be discounted. Each Loan token you still hold at the end of the game will cost ¥1,500 in end game scoring.

SPECULATE
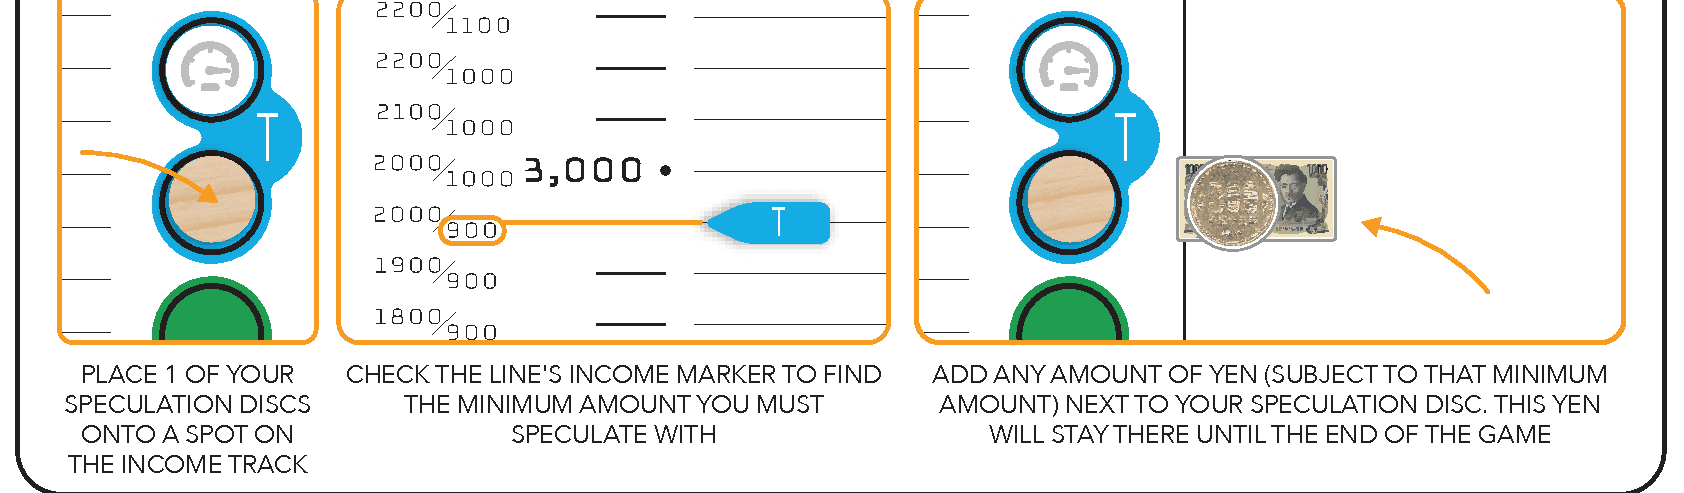
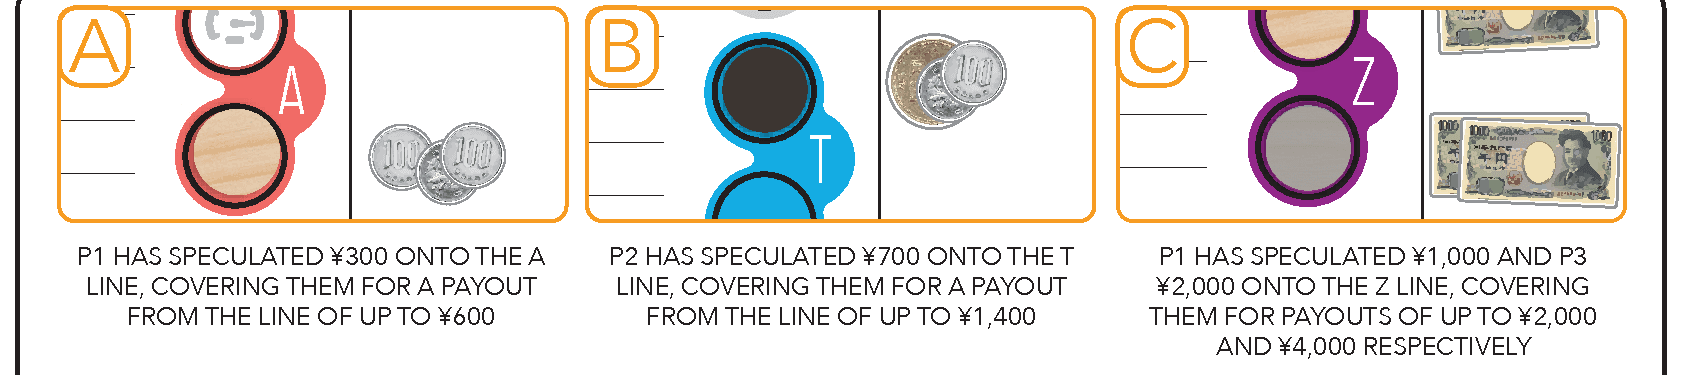
Place 1 of your available Speculation discs from next to the Income track onto an empty disc spot for the Train Line you wish to speculate on. You may choose any Train Line provided you do not own Stock in it, and provided the corresponding Income marker has reached at least ¥100 on the Income track. Displayed next to its Income marker are two numbers; the lower amount is the minimum Yen you must commit to speculate (this cannot be discounted). Take at least this amount of Yen (the indicated amount is the minimum but you may commit more provided you have it) from your personal supply and place it next to your Speculation disc. This will pay out at the end of the game; see Speculation Payouts.
- Note that the spots for each Train Line on the Income track are shared between Speed tokens and Speculation discs. If there are no empty spots on a Line, it cannot be speculated on.
- Each player is limited to 2 speculations per game, but may speculate on the same Line twice (with two separate Speculate actions) if spots are available.
- Players may not add to or remove money committed to speculate on a Train Line after the action is completed.
- Players are not allowed to speculate on a Train Line they own Stock in. Furthermore, they are not allowed to buy Stock in a Line on which they have already speculated.
ACTION
Pay the cost shown on the action to the bank to take 1 of your Player discs from the general supply and place it in front of you (you may apply any available discounts from Discount actions when doing so). This gives you an extra Action disc to use for the rest of the game, and which may be used later in the current round. Each player can have a maximum of 6 Action discs (the 3 they started with plus up to 3 from this action).
CARD
Pay the cost shown on the action to the bank to take the top Action card from any discard pile and place it face up in front of you (you may apply any available discounts from Discount actions when doing so). For the remainder of the game (including later in the current round), you (and only you) may use this Action card during the Action Phase. There is no limit to the number of such cards that you may gain during the game.
Players are not allowed to examine the contents of any discard pile; only the top card of each pile is visible at any one time.
TRAIN PHASE
During this phase, Trains on the Map move along their Lines. If they pass into or through player-owned Stations, payouts occur. It is also possible for players’ Meeples to board or exit Trains during this phase.
Each Train on the Map moves 5 stops, plus 1 extra stop for each Speed token assigned to its Line on the Income track, between consecutive circles containing its color and letter in its direction of travel (according to the arrow on top of the Train). Trains move in the order shown on the right side of the Income track, beginning with the G Line and ending with the E Line. If a train reaches an end stop on its route, turn it around (reversing the direction of the arrow on top of the Train to indicate this), and continue back in the other direction with any remaining movement. Where two Train Lines intersect, it is possible for both Trains to occupy the same stop at the same time. Trains not on the Map do not move.

If any players own Stock in a Train Line, its Train will stay on the Map and move in each Train Phase for the rest of the game. A Train placed on the Map with a Start action will also move in each Train Phase, but if it returns to its "1" stop and no Stock in its Line has yet been taken, it is removed from the Map and placed next to its corresponding Stock cards.
STATION PAYOUTS
As soon as a Train moves to a stop with a Station pyramid, a Station Payout is triggered. In the case of a multi-stop Station which has a pyramid, a payout is triggered when a Train reaches any of its stops.
Special case: Where a Train Line has multiple stops in the same Station (such as H6-H7 and T6-T7), and there is a pyramid on it, a Station Payout is triggered for each such stop the Train reaches, even in the same Train Phase.
When a Station Payout is triggered, there are two possible outcomes, depending on whether or not the owner of the Station also owns Stock in the Train’s Line:
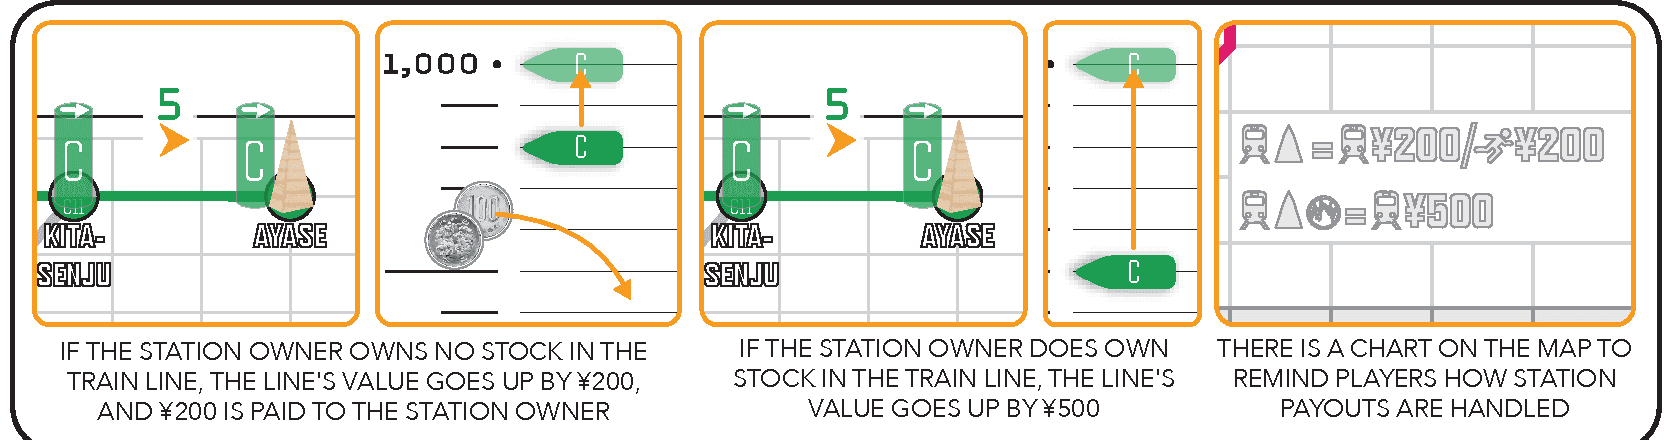
STATION OWNER DOES NOT OWN STOCK: Increase the Train Line’s Value by ¥200. The player who owns the Station receives ¥200 from the bank.
STATION OWNER ALSO OWNS STOCK: Increase the Train Line’s Value by ¥500. The player receives nothing.
RIDING TRAINS
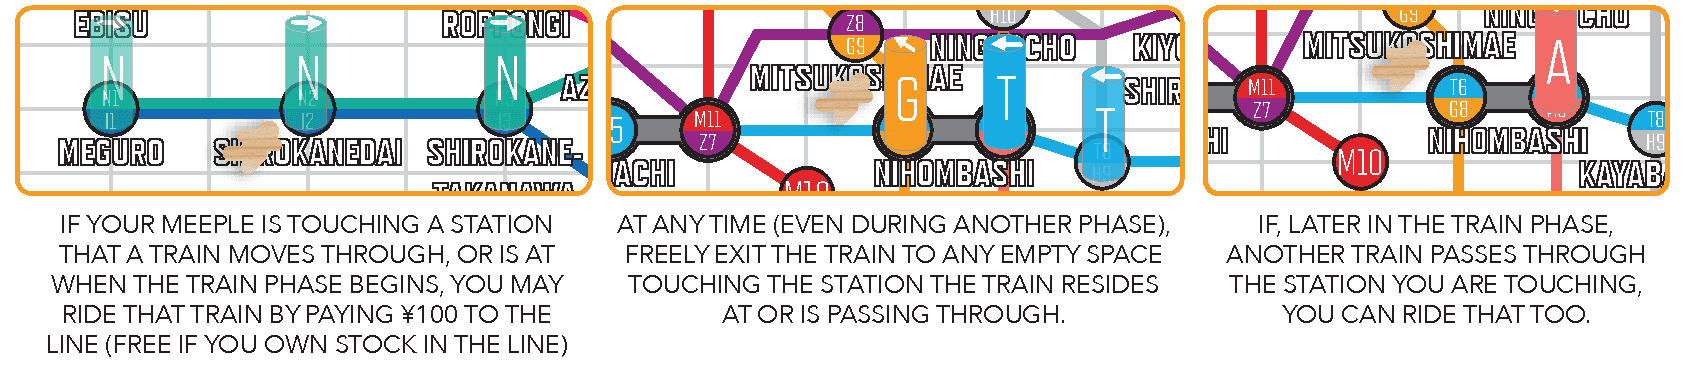
As a Train moves, players can board and/or exit the Train. Riding Trains allows Meeples to travel around the Map. Move the Train one stop at a time, and at each stop (including where the Train started), if there is a Meeple touching the Station, that player may board the Train, placing their Meeple next to the Train Line’s spots on the Income track to show it is now on the Train. Multiple Meeples can ride the same Train at the same time.
If you own Stock in a Train Line, riding its Train is free. If you do not own its Stock, you must pay ¥100 to the Train Line, by paying ¥100 to the bank and increasing that Line’s Value by ¥100.
At each stop the Train arrives at, anyone riding the Train may exit the Train. To do so, remove your Meeple from next to the Line on the Income track, and place it on an empty space touching the Station. You may stay on a Train between rounds, and may exit the Train at any time (even during another phase).
At multi-stop Stations, you may board a Train from, or exit a Train to, spaces touching any of the circles in that Station (not just the stop the Train is on). If multiple players are able to board or exit a Train at the same stop, the decisions whether or not to do so are made in turn order.
It is possible to ride multiple Trains in the same round. You cannot exit a Train until the Train has moved at least 1 stop after you boarded it. However, once you have exited a Train, you may re-board it in the following Train Phase at the same Station where you exited.
GAME END
During the Action Card Refresh Phase, if there are no more Action cards to draw, the game ends immediately. This is 5 total rounds in a 5-player game, 6 rounds in a 4-player game, 7 rounds in a 3-player game and 8 rounds in a 2-player game.
After the game ends, payouts commence by first paying for all speculations, and then paying stockholders based on each Train Line’s Value. Remaining loans must then be paid back with ¥500 interest: each player pays ¥1,500 to the bank for each Loan token they are holding at the end of the game.
It is important to remember that a player who speculates on a Line may not own Stock in it, and vice versa. If this rule is broken, any such speculation and Stock in the same Line are worth ¥0 to offending players, and they do not receive Speculation Payouts or Stock Payouts for them.
SPECULATION PAYOUTS
Speculation Payouts are made to players before Stock owners get paid. To determine how much a Train Line pays out for speculations, look at the lower of the two values shown to the left of the Line’s ending Value on the Income track. For each speculation on that Train Line (even if the Line has 2 Speculation discs on it from the same player), the speculating player receives from the bank up to 2x the amount they speculated, capped at that lower amount to the left of the Income track.
After all Speculation Payouts have been made for a Train Line, decrease the Line’s Value by the total amount paid, moving the Line’s marker down on the Income track accordingly. In addition, return the initial speculation amounts to their respective players.


STOCK PAYOUTS
Stock Payouts are made using the Income track, after it has been adjusted for Speculation Payouts. They are paid for each Line, one by one, starting with the G Line and moving down the order on the right side of the Income track.
IF ONLY ONE PLAYER OWNS STOCK IN A TRAIN LINE: They receive the full amount of that Line’s Value on the Income track.
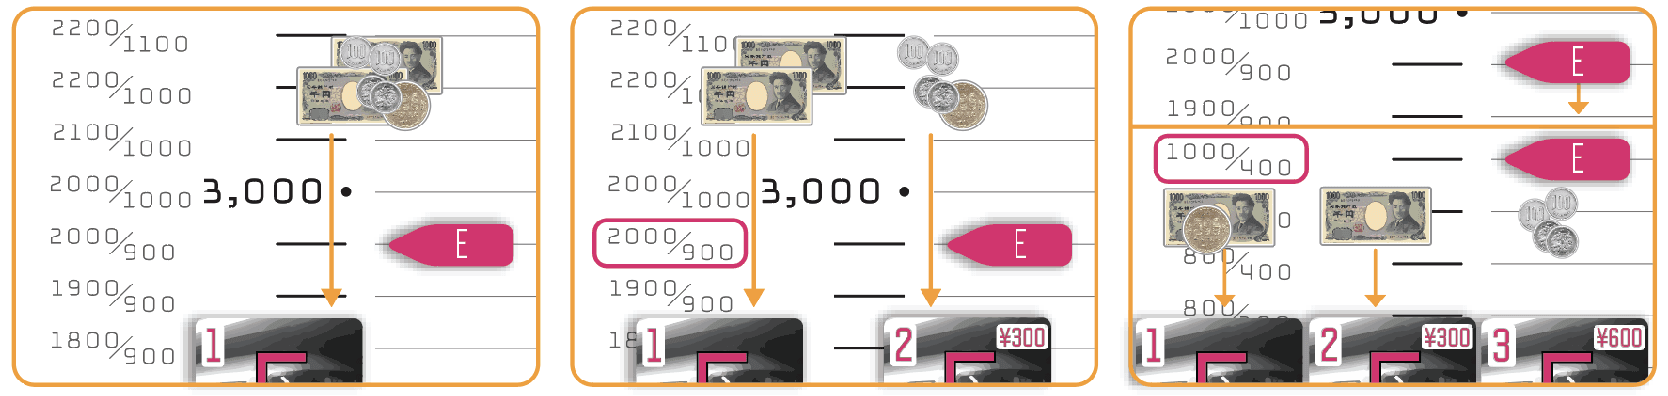
IF TWO PLAYERS OWN STOCK IN A TRAIN LINE: The number 1 Stock is paid the higher of the two values shown to the left of the Income track. The number 2 Stock is paid the lower of the two values.
IF ALL 3 STOCKS IN A LINE ARE OWNED: The number 1 Stock owner receives 50% of that Line’s Value, rounded up to the nearest ¥100. Move the Income marker down on the Income track by the amount paid. Then, the remaining amount is split between the number 2 and 3 Stock owners as described above, using the two values shown to the left of the Income track.
- SINGLE STOCK OWNER: ¥2,900 is paid to the owner of Stock 1.
- TWO STOCK OWNERS: ¥2,000 is paid for Stock 1 and ¥900 for Stock 2.
- THREE STOCK OWNERS: ¥1,500 for Stock 1, ¥1,000 for Stock 2 and ¥400 for Stock 3.
Note: where the Train Line’s Value is greater than ¥6,000, determine Speculation and Stock Payouts in the same way as described above, but add the equivalent numbers from the top, 6,000 line of the Income track to the relevant numbers beside its Income marker before making payouts.
ADD UP TOTALS
Players now add up their total Yen, and the player with the most is declared the winner! If there is a tie, the player furthest to the left on the Turn Order track is the winner.
OSAKA METRO EXPANSION
This expansion builds on the base game, and with a brand new map and different numbers of stocks available across the new train lines, there is now more possibility for player interaction. The new set of action cards spice up the game, shortening it by one round and offering new and exciting actions to perform, along with new trams and buses to discover!
OSAKA; CONTENTS
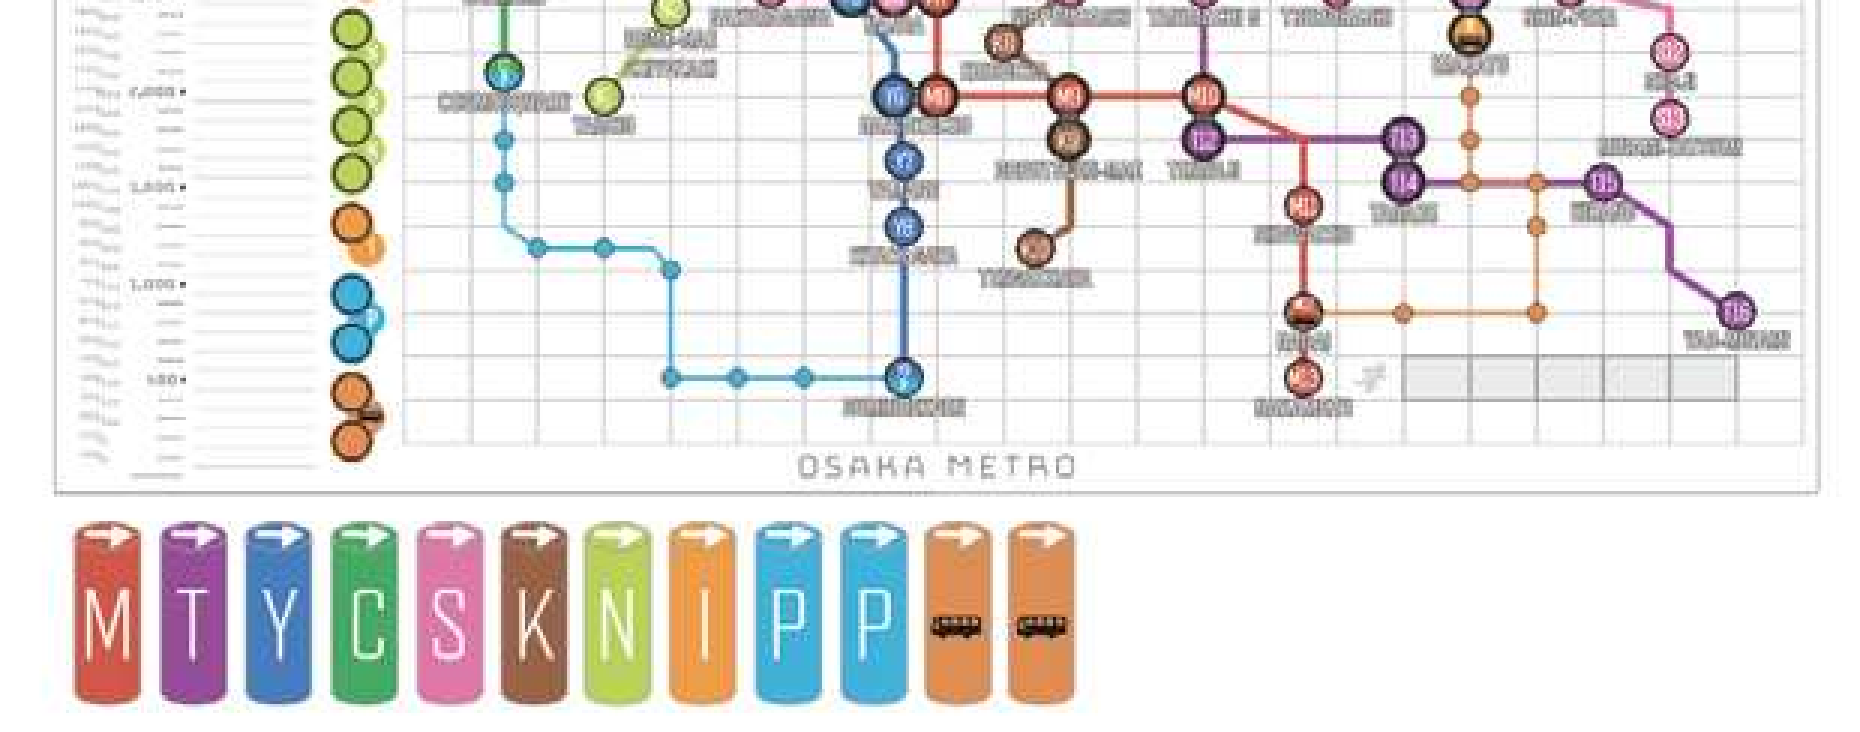
- 1 - Map of the Osaka Metro with Income track
- 68 - Mini sized cards
28 Stock cards / 40 Action cards
- 2 - Large player aid cards
- 10 - Income markers
- 8 - Train markers
- 2 - Tram markers
- 2 - Bus markers
OSAKA; SETUP
Set up as for a normal game of TOKYO METRO, but using all of the OSAKA METRO EXPANSION components in place of their TOKYO METRO counterparts. Leave the Map, Income track, Stock cards, Action cards, Player Aid cards, Income markers, and Train markers from TOKYO METRO in the box.
Make the following changes to the setup steps:
2 - Following the order of Lines on the right side of the Income track, starting with the M Line and working downwards, place the Train/Tram/Bus markers and Stock cards in sequence below the Map. Stack the Stock cards in ascending order with the number 1 Stock on top, and, where present, followed by the 2, 3, and then the 4 underneath.
3 - Divide the 40 Action cards into 5 sets of 8 cards each, sorted by colors according to pairs of Lines (M/[bus], T/Y, C/I, S/N, and K/P). Turn the first set face down and sub-divide it based on the numbers of dots on the back of each card. Shuffle each of these subsets separately, and make a face down stack by placing the cards with 2 dots on the bottom, and 1 dot on top. Repeat this for the other 4 colored sets, to form a row of face down stacks in the top right of the play area. Draw cards from each stack equal to the number of players, and place them face up in columns below their stacks, placing the cards from bottom to top in each column.
OSAKA; GAMEPLAY
Use all of the regular rules of TOKYO METRO, with the following changes:
OSAKA; NEW LINES: TRAMS AND BUSES
There are now two Lines which have two cylindrical tokens each: the P Line (which has 2 Tram tokens) and the [bus] Line (which has 2 Bus tokens). These work in the same way as normal Train Lines, with the following changes:
- The Lines on the Map for these do not have numbered stops, instead having 2 end stops marked with P or [bus] (as applicable), joined by a series of smaller circle stops. The end stops for each line form part of Stations as normal, but the smaller circle stops are not Stations and Station pyramids may not be placed on them. The smaller circle stops work in the same way as usual for the purposes of the Train movement and Riding Trains rules.
- Whenever an action would require you to place a P or [bus] Train on the Map, place both of the Line’s Tram or Bus tokens respectively, with one at each end of its Line on the Map.
OSAKA; INCOME TRACK DISC SPOTS
Note that Lines now have 1-4 disc spots on the Income track to be shared between Speed tokens and Speculation discs. These spots can hold Speed tokens and Speculation discs in any combination, subject to the normal placement rules for these.
OSAKA; STOCKS
There are now some Lines with a total of 1, 2, or 4 Stocks as well as some with 3 as for the TOKYO METRO Map. Investing in the number 2, 3, or 4 Stock of a Line costs a fixed extra ¥300 in each case; this extra amount does not increase for the number 3 (or 4) Stock. You may still only own at most 1 Stock in each Line, and may not buy Stock in a Line you have speculated on.
OSAKA; NEW ACTION CARDS
Since the new Action cards are divided into stacks of 8 cards during setup, rather than stacks of 9, there is one round fewer in a game for each player count; a game now takes place over 4 rounds with 5 players, 5 rounds with 4 players, and so on. The OSAKA METRO EXPANSION Action cards are also made up of a different mix of actions. While the majority of the actions are the same in both versions, the Start, Bidding, and Card actions from TOKYO METRO do not appear on any OSAKA METRO EXPANSION Action cards, there is an additional type of Invest action, and two brand new actions have been added (Sell and Copy; see Action Phase below).
OSAKA; ACTION PHASE
Refer to the TOKYO METRO rules for the Move, Station, Speed, Bike, Discount, Loan, Speculate, and Action actions.
OSAKA; INVEST
There is one new type of Invest action as follows:
This action allows you to take a Stock card by spending an Action disc instead of paying Yen. Return an Action disc from your personal supply to the box; this must be a different disc to the one you placed on the card as normal in order to perform the action.
Then take the top Stock card of a Line of your choice, subject to the normal restrictions of the Invest action in TOKYO METRO. You must still pay the extra Yen if you take a number 2, 3, or 4 Stock. Increase the Line’s Value for any extra Yen paid. If the corresponding Train marker is not already on the Map, place it on the Line’s starting stop as usual.
All other Invest actions work in the same way as those in TOKYO METRO.
OSAKA; SELL
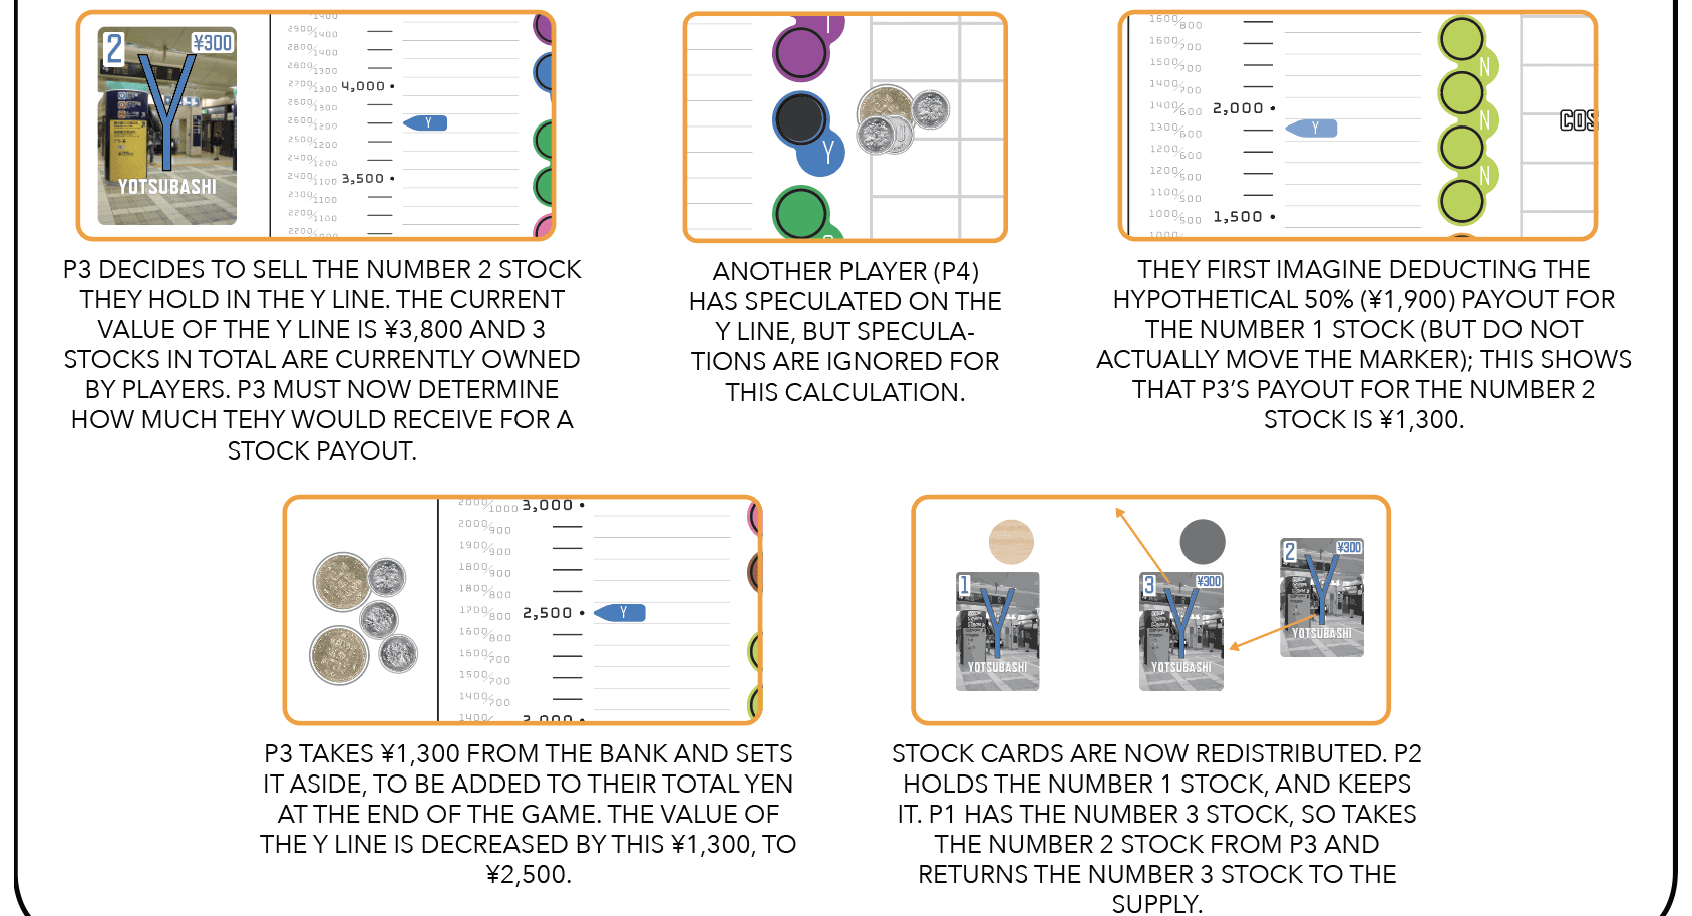
Choose a Stock that you own, then determine the amount you (and only you) would receive from a Stock Payout for the corresponding Line as if the game had ended. In determining this amount, ignore speculations and take into account Stocks in this Line owned by other players, but do not calculate payouts for any other stockholders. Take that amount of Yen from the bank and place it to the side of your player area, separate from the rest of your money; it will be added to your total Yen at the end of the game, but it is not available for you to spend during play. Decrease the Line’s Value by the same amount, moving the Line’s marker down on the Income track accordingly. Then, if necessary, redistribute Stock cards among any other players owning Stock in the corresponding Line so that they hold the lowest-numbered Stock cards between them, preserving their relative order, and return the spare (highest-numbered among those purchased) Stock card to the supply below the Map, after which it is available for purchase again (including by you). For example, if you have sold the number 1 Stock, and other players own numbers 2 and 3, then the player with the number 2 Stock takes the 1, the player with the 3 takes the 2, and the number 3 gets returned to the supply.
OSAKA; COPY
Pay the cost shown on the action to the bank (you may apply any available discounts from Discount actions when doing so). On a later turn in the current round, you may perform an action that has already been performed this round (either by you or another player), by placing the required number of your Action discs on top of the Action discs already there. When you do so, remove your disc from the Copy action spot and place it on top of one of your discs on the action you have copied.
OSAKA; TRAIN PHASE
Trams and Buses move when Trains do and trigger Station Payouts in the same way, following the normal rules. Each pair moves simultaneously (if they are on the Map, both Trams move together, and then both Buses move together). Any Speed tokens on the P or [bus] Lines apply to both vehicles on that Line. If multiple players are able to board or exit Trams or Buses at the same time (which might involve different vehicles and different stops), the decisions whether or not to do so are made in turn order. It is possible for the 2 Buses to occupy the same stop simultaneously.
Note: In OSAKA METRO EXPANSION, once Trains, Trams, or Buses have been placed on the Map, they will stay on the Map for the rest of the game, even if no Stock in their Lines are owned by any players when they return to their starting stops. This is always the case for the OSAKA METRO EXPANSION, even if you are playing with the Action card set from TOKYO METRO (see Modular Action Card Sets variant).
OSAKA; GAME END
After making Speculation and Stock Payouts, but before paying back any remaining loans, players add any money set aside when taking Sell actions to their total Yen.
OSAKA; STOCK PAYOUTS
If all 4 Stocks in a Line are owned at the end of the game, Stock Payouts are made as follows (after adjusting for Speculation Payouts as normal). The number 1 Stock owner receives 50% of that Line’s Value, rounded up to the nearest ¥100. Move the Income marker down on the Income track by the amount paid. Repeat this process for the number 2 and 3 Stock owners, paying them 50% of the updated Value and moving the Income marker down by the amount paid each time. Finally, the number 4 Stock owner receives the Line’s remaining Value.
For example, if the T Line’s Value at the end of the game is ¥2,000, the number 1 Stock owner receives ¥1,000, the number 2 Stock owner receives ¥500, the number 3 Stock owner receives ¥300, and the number 4 Stock owner receives the remaining ¥200.
VARIANTS
These variants can be played separately or in any combination to provide new twists to TOKYO METRO or OSAKA METRO EXPANSION!
MODULAR ACTION CARD SETS
It is possible to play TOKYO METRO with the new OSAKA METRO EXPANSION action card set, and vice versa. You can even do this with the METRO DRINKS variant too! This adds a unique way to think about how you approach the game as the cards differ in their strategic possibilities.
Set up and play according to the rules for the Map you are playing with (i.e. Tokyo or Osaka Metro systems) as well as the respective rules for the Action card set you are using. The following changes apply:
WHEN PLAYING WITH THE TOKYO METRO MAP AND THE OSAKA METRO CARDS: All Trains placed on the Map will stay on the Map for the rest of the game, even if no player owns any corresponding Stock (which is possible as a result of the Sell action) when they return to their starting stops in the Train Phase.
WHEN PLAYING WITH THE OSAKA METRO MAP AND THE TOKYO METRO CARDS: Remember that in OSAKA METRO EXPANSION, all Trains/Trams/Buses placed on the Map will stay on the Map for the rest of the game. This applies even if they were added with the Start action and no player owns any corresponding Stock when they return to their starting stops in the Train Phase.
SINGLE PLAYER
To play the Single Player variant, set up for a normal two-player game, but play with only one set of Player pieces. Play using the regular rules. At the end of the game, record your total score in Yen. The next time you play through, try to be more efficient and beat your score!
METRO DRINKS
TOKYO JIDOHANBAIKI can be used as an expansion to TOKYO METRO or OSAKA METRO EXPANSION, creating a new experience titled METRO DRINKS. By adding the Stock cards from JIDOHANBAIKI as a new Action card column, as well as the ability to build Vending Machines at Stations for extra income, METRO DRINKS gives TOKYO METRO a new layer of depth, strategy, and fun!
Use all of the regular rules of TOKYO METRO (and OSAKA METRO EXPANSION, if applicable), with the following additions:
METRO DRINKS; SETUP
4 - Take the 12 Stock cards from TOKYO JIDOHANBAIKI, remove any 3 of the Drink Shape cards (it does not matter which ones), shuffle the remaining 9 cards (6 Drink Color and 3 Drink Shape) together, and place them face down as a 7th stack of Action cards. Draw cards equal to the number of players, and place them face up in a column below this stack, placing the cards from bottom to top.
Note: If you are playing with the OSAKA METRO EXPANSION Action cards, remove any 4 instead of any 3 of the Drink Shape cards, and shuffle the remaining 8 cards to form a 6th stack of Action cards. The rest of the rules are the same whether you use the TOKYO METRO or OSAKA METRO EXPANSION Action cards.
5 - Place the 6 Crates above the JIDOHANBAIKI Stock cards, filling each one with a set of Drinks from a single color.
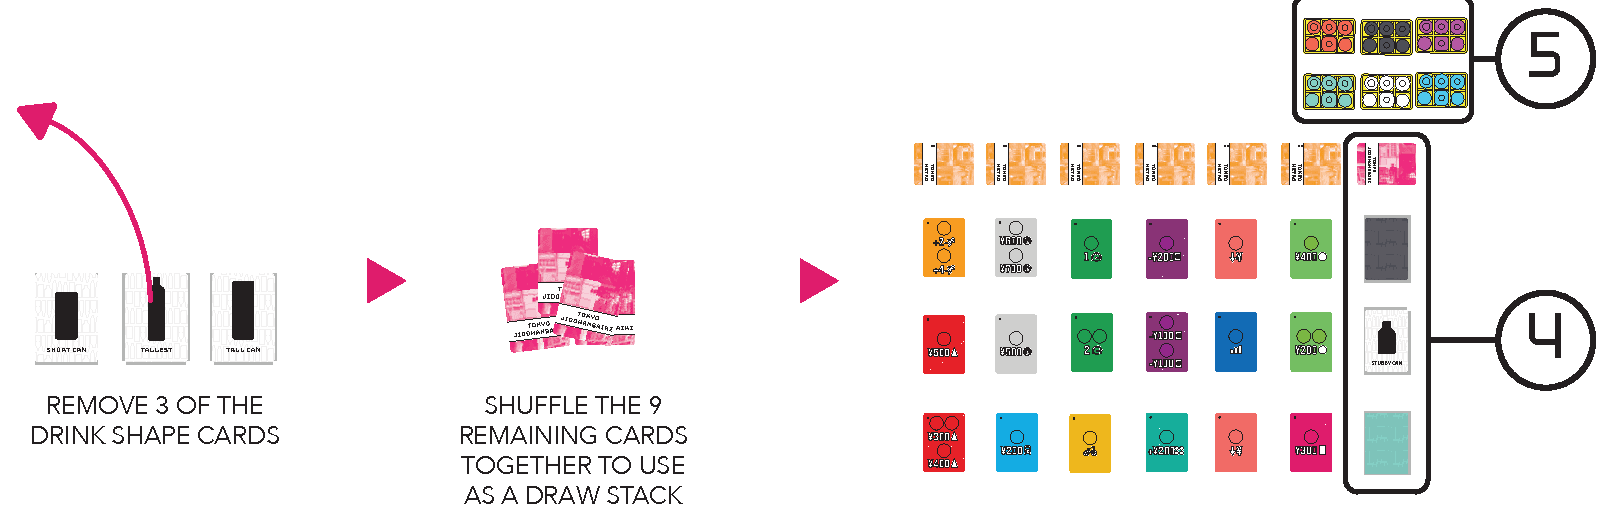
METRO DRINKS; ACTION CARD REFRESH PHASE
Treat the column of TOKYO JIDOHANBAIKI Action cards like the other columns, i.e. discard the card from the bottom row, shift the others down and draw a new one for the top row. If there are gaps in the display as a result of players taking Drink Color cards (see additional Action Phase rules below), treat any such gaps as if they still held cards, for the purposes of this phase. That is: if there is a gap on the bottom row then no card is discarded from this column; preserve any gaps when shifting cards down; and only deal 1 new card, in the top row.
METRO DRINKS; ACTION PHASE
The new column of Action cards offers 3 new actions:
DRINK COLOR CARDS: These cards allow for a set of 6 same-colored Drinks to be taken, in exchange for the permanent removal of 1 of your Action discs for the remainder of the game. To perform this action, place your Action disc back into the box, and take an available Drink Color card along with the matching Drink Crate, placing them in your personal supply. There is no limit to how many Drink colors a player may own.
BUILD A VENDING MACHINE AT A STATION: Place your Action disc on top of the JIDOHANBAIKI draw stack, then place a Drink from your personal supply at a Station your Meeple is touching that already has a pyramid on it, and no other Drink. This Action disc will be returned to you at the end of the Action Phase as normal. There is no limit to the number of times this action may be performed each Action Phase. If you build at a Station you do not own, you must pay the owner ¥100 the first time you build at one of that player’s Stations, ¥200 for the 2nd time you build at one of that same player’s Stations, ¥300 for the 3rd, and so on. (You can always check how many times you have built Vending Machines at a given player’s Stations by counting the number of Drinks in your Drink color(s) placed at Stations with that player’s pyramids.)
DRINK SHAPE CARDS: A Drink Shape card is treated as if it has a single disc spot; that is, there is only one action per card available in each Action Phase. Place your Action disc onto the card, and perform an unlimited number of free ‘Build a Vending Machine at a Station’ actions on your turns for the remainder of this Action Phase. You must still pay other players when building at their Stations. You are allowed to ‘Build a Vending Machine at a Station’ as your Meeple moves past a Station, as long as you touch its stop. Thus it is possible to perform the ‘Drink Shape Cards’ action, then a Move action, building Vending Machines at Stations as you take your movement. However, you are not allowed to ‘Build a Vending Machine at a Station’ while riding on a Train/Tram/Bus; you must exit the Train/Tram/Bus first.
You may take a Drink Shape from the top of the JIDOHANBAIKI Stock card discard pile with a Card action.
METRO DRINKS; TRAIN PHASE: STATION PAYOUTS
When a Train triggers a payout for a Station with a Drink, the Drink’s owner will receive Yen from the bank, in addition to the normal Station Payout. The amount of Yen the player receives depends on the number of Drinks of that color on the Map, in total (irrespective of which players own the Stations where the other same-colored Drinks are): ¥100 for 1-3; ¥200 for 4-5; and ¥300 for all 6 Drinks of that color on the Map.
CREDITS
Design and artwork by: Jordan Draper
Rulebook editing by: Gaming Rules! (Paul Grogan, Chris Spath, and the team)
Special thanks and play testing/development by: Joe Wiggins, Andrew Plassard, and Andrew Denison
www.jordandraper.com
talk@jordandraper.com
METRO DRINKS
- Designer
- JORDAN DRAPER
- Games required
- TOKYO METRO & TOKYO JIDOHANBAIKI
TOKYO JIDOHANBAIKI can be used as an expansion to TOKYO METRO, creating a new experience titled METRO DRINKS. By adding the stock cards from JIDOHANBAIKI as a new action card column, as well as the ability to build vending machines at stations for extra income, METRO DRINKS gives TOKYO METRO a new layer of depth, strategy, and fun!
Use all of the regular rules of TOKYO METRO, with the following additions:
SETUP:
- 1 - Take the 12 stock cards from TOKYO JIDOHANBAIKI, remove any 3 of the drink type cards, shuffle the remaining 9 cards (6 color & 3 drink type) together, and place them face down as an extra column of action cards.
- 2 - Place the 6 crates above the JIDOHANBAIKI stock cards, filling each one with a set of drinks from a single color.
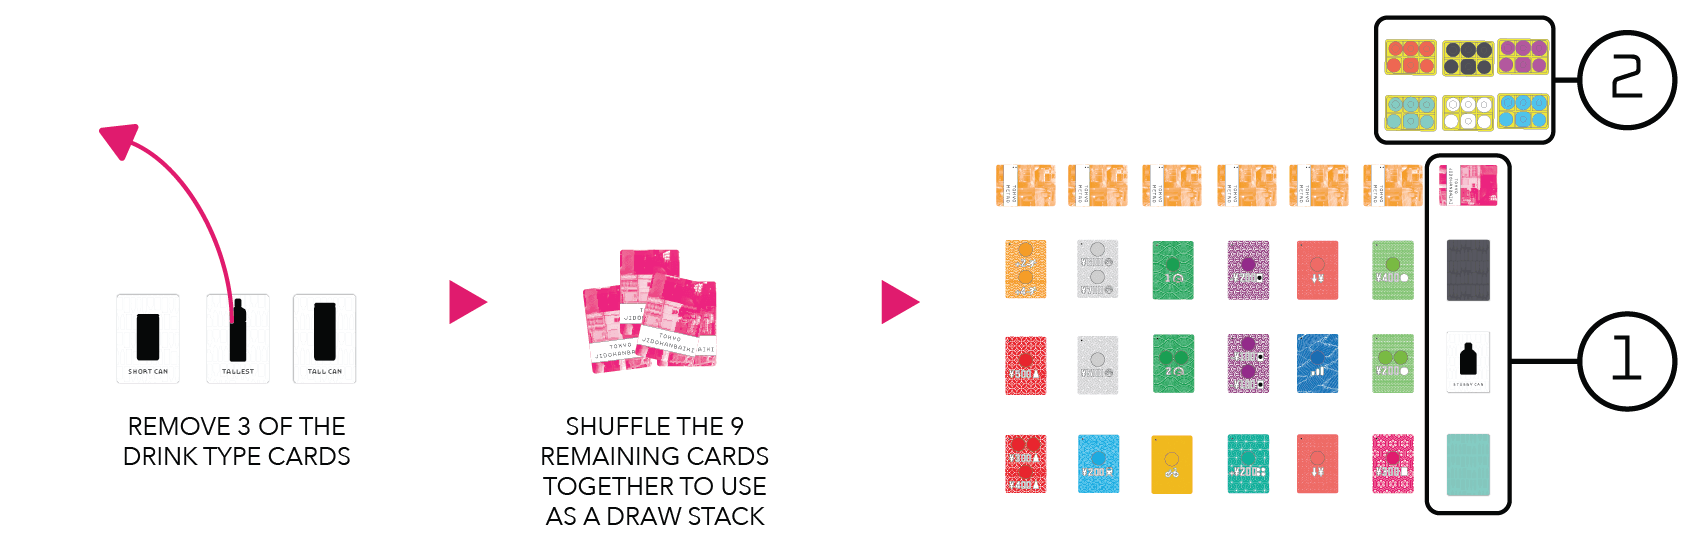
ACTION CARDS:
The new column of action cards offers 3 new actions to be taken:
DRINK COLORED CARDS: These cards allow for a set of 6 same-colored drinks to be taken, in exchange for the permanent removal of 1 of your action discs for the remainder of the game. To take this action, place your action disc back into the box, take an available color card, and the matching drink crate.
BUILD A VENDING MACHINE STATION: Place your action disc on top of the JIDOHANBAIKI draw stack, then place a drink at a station you are touching that already has a station pyramid there, and no other drink. This action disc will come back to you at the end of the phase like normal. There is no limit to the number of times this action may be taken each phase. If you build at a station you do not own, you must pay the owner 100 yen the first time you build at one of their stations, 200 for the 2nd time, 300 for the 3rd, etc.
DRINK TYPE CARDS: Only one player may take this action each action phase. Place your action disc onto the card, then take an unlimited number of free ‘build a vending machine’ actions until phase end. You must still pay other players when building at their stations. Take your disc back as normal.
STATION PAYOUTS:
When a train triggers payout for a station with a drink, the owner will receive yen from the bank. The amount of yen paid depends on the number of drinks of that color they have on the map in total:
- 1-3 drinks: 100 yen is paid when a station with that drink color is hit
- 4-5 drinks: 200 yen is paid when a station of that drink color is hit
- 6 drinks: 300 yen is paid when a station of that color is hit
EXTRA RULES:
There is no limit to how many drink colors a player may own.
It is allowed to ‘build a vending machine station’ as you walk past a station, as long as you touch it. Thus it is possible to take the ‘drink type card action’, then a move action, building multiple drink stations as you take your movement.
It is not allowed to build a vending machine station while riding on a train; you must exit first.
IZAKAYA
- Players
- 2-5
- Time
- 30 MIN
- Designer
- JORDAN DRAPER
- Games required
- TOKYO JUTAKU, TOKYO JIDOHANBAIKI & TOKYO METRO
IZAKAYA is a game about building a city with corner shops that mixes together JUTAKU, JIDOHANBAIKI, and METRO.
Setup: Shuffle the Jutaku cards and create a grid based on the number of players. Use the more difficult white side.
- 2-3 Players: Create a 3x3 grid. flip the center card to the blue side - it cannot be used.
- 4 Players: Create a 4x4 grid
- 5 Players: Create a 5x5 grid
Place one site card on its easy blue side to the left of the grid. Place all Jutaku pieces above the grid, and one architect token to the side of them. Take all 6 of the color stock cards from JIDOHANBAIKI, and place them in a row below the grid. Then, place a crate below each stock card, filled with all 6 drinks of that specific color.
Place one of the shape stock cards from JIDOHANBAIKI face down to the right of the row. Place 100 yen coins on the left two color cards, 200 yen on the middle two color cards, and 300 yen on the right two color cards. Give each player 6 pyramids and 9 matching discs of the same color from METRO, and 1,000 yen. Using players’ remaining disc, randomly draw them 1 at a time, and create a turn order row next to the grid.
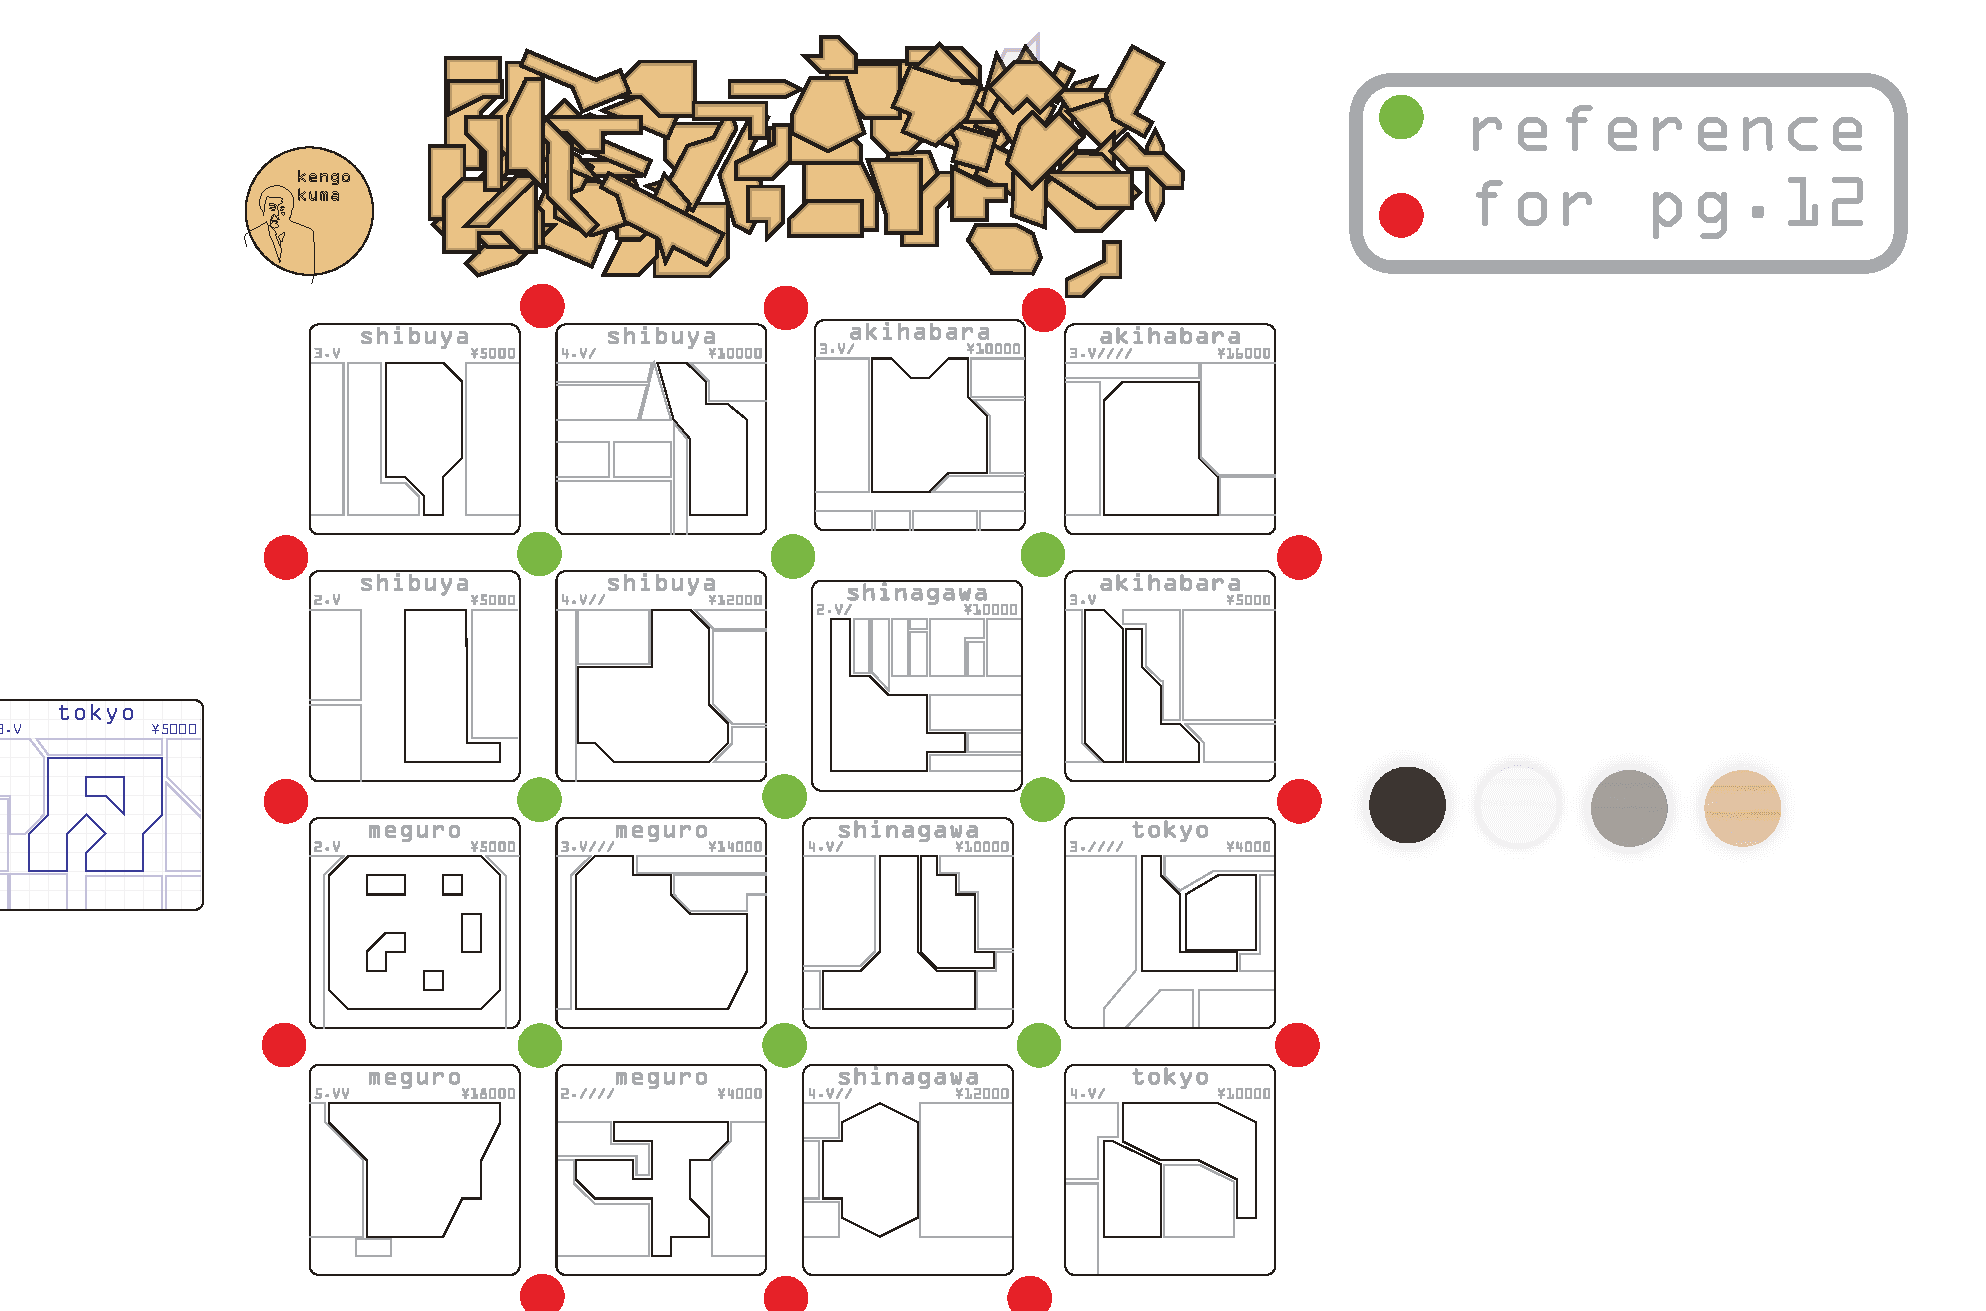
only three of the nine discs will be used to take actions with.

Gameplay: The game consists of two phases: bidding for turn order and taking actions.
Bidding for turn order: Decide the amount of yen you wish to bid and secretly place it in a closed fist. All reveal simultaneously. Whoever bid highest goes first, next-highest second, etc… Adjust the turn order track, and place all yen used to bid into a separate pile. Players who tied with their bids swap positions in turn order.
Action phase: In turn order, players will place 1 of their 3 discs on an action spot:
Colored bottle spot: Place your disc on a color stock card, take one of the drinks in that crate, and place it at a corner intersection between cards. Only one disc may be placed on each color per action phase. All 4 card intersection spots (shown in green on pg.11) must have drinks before any 2 card intersection spots (shown in red) may be chosen. It is never possible to place drinks on a single outside card corner that is not shared with another card.
Price adjustment spot: Place your disc on the face-down JIDOHANBAIKI card, then move a single 100 yen coin from a color stock card to a different color stock card. Only one disc may be placed on this action spot per action phase.
Site claiming: Place your disc on the blue site card. Then, place one of your six discs in the space between the edges of two site cards.
Finally, place one of your pyramids on a site card sharing a side with the previously-placed disc. Only one player may occupy each site card. There is no limit to the number of players that can use the site claiming action each action phase. If a player manages to get a straight line of 3 action discs (only possible in the 4 or 5 player games), they get to take a building piece from the supply and place it immediately anywhere they wish for free, following the normal building rules of JUTAKU.
Build action: Place your disc on the architect token, then take a single building piece (it is not allowed to test the piece out; it must be chosen first), and place it onto any site card that you wish, following the normal building rules of JUTAKU. If there are two dark site borders on a card, they may both be used as separate buildings. There is no limit to the number of build actions that can be taken each action phase.
Action round end: After all players have placed their 3 action discs and performed actions, return the action discs to their owners and begin a new auction round.
Game End: The game end is triggered when a certain amount of yen is met or exceeded while bidding for turn order. After the designated amount is reached, players take one more action phase. The game ends when the total amount of yen meets or exceeds: 1,500 yen for 2 players / 2,300 yen for 3 players / 3,000 yen for 4 players / 4,000 yen for 5 players.
Scoring: Each player scores points based off of their buildings and the values of the drinks directly adjacent to them. Sum the total yen amount of each bottle touching your building. Multiply that total with the number of floors built on your building.
Example: The grey colored player has a building with 3 floors and 3 drinks on the corners of the site card. They count up the sum total of all of the drinks touching the site card, and then multiply that by the number of floors (3). So if there were 2 white drinks (at market value of 200), and 1 blue drink (at market value of 300), the player multiplies their 3 story building by 700 yen, taking a payment of 2,100 yen. After players score all of their buildings, they add their total yen amounts as their score.
The player with the most yen is declared the winner! If there is a tie, the player who kept the most of their starting yen wins.
FAQ
Can TOKYO METRO be played on the Osaka map without the OSAKA METRO EXPANSION components? Not directly. Most route letters and colors differ between the two maps, so you would need the expansion's own Train, Tram, and Bus markers, Stock cards, and Income markers (or proxies for them). Only the Action card sets are interchangeable between the two games; that swap is the official Modular Action Card Sets variant.
Can a Speed token be used the turn it is earned, and does trading a token for a Station require an Action disc? No and yes. Speed tokens are assigned on a later turn, before you perform an action, never the turn you take them; and Station Trading is an action like any other, so it requires placing an Action disc. Remember also that only 1 pyramid may ever be built at a Station, even a multi-stop one.
What counts as my Meeple touching a stop when building a Station or riding a Train? Your Meeple must occupy a rectangular grid space that touches the stop's circle; any space the circle overlaps counts. A multi-stop Station (circles joined by a gray outline) is a single Station, so touching any of its circles is enough. A stop whose circle sits inside a single space can only be reached from that one space.
How does the Start action work, and can a started Line be invested in mid-trip? Start may only be taken for a Train not already on the Map: place it on the '1' stop of its Line, increase the Line's Value by the amount on the Action card, and pay nothing (the action is free). It then moves like any other Train, 5 stops plus Speed tokens each Train Phase; if it returns to its '1' stop with no Stock in its Line yet taken it is removed (the Line's Value stays), and if anyone has invested it stays on the Map for the rest of the game. Its Line can be invested in at any time, and investing always costs the Action card amount plus the printed extra for a number 2 or 3 Stock, never the Line's current Value.
How are the 54 Action cards divided into stacks during setup? Sort them by color into 6 even sets of 9 cards each, matching the pairs of Lines in the Income track sequence: G/M, H/T, C/Y, Z/N, A/I, and S/E. The card colors match the Line colors on the Map, which helps separate the similar shades.
Does a Train turn around when it reaches the end of its Line? Yes. When a Train reaches an end stop, turn it around (reversing the arrow on top) and continue in the other direction with any remaining movement. A Train whose Line has any Stock owned keeps running back and forth this way for the rest of the game.
What are the thin lines on the right side of the Income track for? They are the slots where the Income markers sit. They are offset from the printed numbers so that each marker's arrow points at an exact Value.
How many players does TOKYO METRO support? Up to 5, with components for exactly 5 player colors, and the rulebook includes a single player variant as well. A 6th player is only possible by borrowing pyramids and discs from another copy, and at high player counts it helps to have an experienced player run the upkeep.
May I place an Action disc on an action I cannot actually perform, just to block it? No. Placing discs is how an action is performed, so if you lack what the action requires (for example a token to trade for Station Trading, or an available Loan token for the Loan action) you may not place a disc there at all. This applies to every action that requires something.
How do multi-stop Stations work, and does a Line with two stops in the same Station pay twice? Circles connected by a gray outline are a single Station: only 1 pyramid may ever be built there (paying the action's cost times the number of circles), and it covers all of the connected stops, so a Train reaching any of them triggers a payout. Where one Line has two stops in the same Station (such as Nihombashi's T6 and T7), a payout is triggered for each such stop the Train reaches, even in the same Train Phase, and passing through both uses two stops of the Train's movement. It does not matter which circle the pyramid physically sits on.
In METRO DRINKS, who receives the Yen when a Train triggers a payout at a Station with a Drink: the Drink's owner or the Station's owner? The Drink's owner. Printed copies of the revised rulebook name the Station's owner in the METRO DRINKS Station Payouts text; that is an editing error, corrected here: the player who owns the Drink receives the ¥100, ¥200, or ¥300 (based on how many Drinks of that color are on the Map), in addition to the normal Station Payout.
Is it legal to speculate ¥0 when the Income track shows a ¥0 minimum, and is there any point? It is legal: at low Values the printed minimum can be ¥0, and you may commit exactly that. The payout is capped at 2x what you committed, so a ¥0 stake pays ¥0; the only use is as a block, since your Speculation disc fills one of the Line's shared spots and denies it to other players' speculations or Speed tokens.
Can Discount discs reduce a loan repayment? No: loan repayments cannot be discounted. Discounts apply only to the Yen cost printed on the Action card you are performing, and can never take a cost below ¥0, so they never generate money.
How do Speculation Payouts work at game end? When speculating you commit at least the lower of the two numbers shown next to the Line's Income marker (you may commit more). At game end you get that stake back, plus a payout of up to 2x the amount you committed, capped at the lower of the two values beside the Line's ending Value; the Line's Value then drops by the payouts made, not by the returned stakes. In the base game a Line's Value never decreases during play, so committing the minimum guarantees at least doubling your money, while over-committing can pay back less than 2x.
Is a Station Payout triggered when a Train is placed on the Map, or when a Station is built where a Train already sits? No. Payouts trigger only when a Train moves to a stop with a pyramid during the Train Phase; placing a Train with Start or Invest, and building a Station under a stationary Train, pay nothing. A newly placed Train's first move therefore runs from its '1' stop to its '6' stop.
Can multiple loans be repaid with one repay action? No. Each repay action pays ¥1,000 to the bank and returns a single Loan token, just as loans are taken one at a time.
Does the money committed when speculating increase the Line's Value? No. Speculation money sits next to your Speculation disc and does not move the Income marker. Investing is what raises a Line's Value directly, by the total actually paid for the Stock.
If one player holds two speculations on the same Line, how do the payouts resolve? Each speculation pays out separately, capped at 2x its own stake and at the lower value beside the Line's ending Value, and the Line's Value is then reduced by the combined payouts. The returned stakes come back on top and do not reduce the Value. Speculating on the same Line twice (with two separate Speculate actions) is allowed if spots are available.
The rules mention 8 loans but no limit on taking them; what is the actual limit? At most 8 loans can be outstanding at once across all players, because there are 8 Loan tokens and the action cannot be performed with none in the supply. Repaid tokens return to the supply and can be taken again, so there is no lifetime cap.
Do Action discs left on a Discount space carry over to the next round? No. At the end of the Action Phase all discs return from Action cards to their owners, used or not, so an unspent Discount is wasted; it must be earned and spent within the same round. Discs never go into the discard piles with their cards.
Is a 5-player game really only 5 rounds? Yes. The game runs 8 rounds with 2 players, 7 with 3, 6 with 4, and 5 with 5. With more players each round has more turns, so the game does not get shorter in practice.
In METRO DRINKS, how are gaps in the new card column handled, and when can Vending Machines be built after taking a Drink Shape card? A gap left by a taken Drink Color card is treated as if it still held a card during the Action Card Refresh Phase: gaps shift down with the column, no card is discarded when the gap is on the bottom row, and only 1 new card is dealt to the top. A Drink Shape card lets you perform unlimited free Build a Vending Machine actions for the rest of that Action Phase, but only on your own turns and only at a Station your Meeple is touching (one that already has a pyramid and no other Drink), never while riding a Train.
Do later players still receive starting Yen compensation during setup? Not in the current rules: turn order is bid in every round, including round 1 (first round ties are resolved randomly), so no compensation is paid. The first printing instead gave a one-time setup payment of ¥100, ¥200, and ¥300 to the 2nd, 3rd, and 4th players, plus a confirmed ¥400 for a 5th player that was missing from that rulebook.
Can two Trains occupy the same stop, and can you transfer onto a Train that has already moved this phase? Where two Lines intersect, both Trains can occupy the same stop at the same time. Trains move one at a time in the Income track order (G first, E last), and a Train that has finished its movement does not move again that phase, so you cannot ride it any further that round. The Action card showing a Speed or Bicycle token above a pyramid is the Station Trading action: trade the token in to build a Station.
When the Card action says the card taken from a discard pile is immediately available, do I get an extra action right away? No. The card becomes yours for the rest of the game, including later in the current round if you still have Action discs to spend. Turn order is unaffected and you never take two actions in one turn.
Can one player buy all three Stocks in a single Train Line? No. You may not buy Stock in a Line you already own Stock in, so each player holds at most 1 Stock per Line. You also may not buy Stock in a Line you have speculated on.
When may Speed tokens be placed on Train Lines, and how many at once? On a later turn than the one you took them: before you perform an action, you may assign as many of your Speed tokens as you like to Lines with empty disc spots. You cannot assign one the moment you acquire it mid-action, you may not assign any on a turn when you pass, and once you are out of Action discs or have passed you must wait until the next round. Tokens assigned to a Line stay there for the rest of the game.
What does buying Stock actually cost, and by how much does the Line's Value rise? Stock always costs the amount printed on the Action card, regardless of the Line's current Value, plus the printed extra ¥300 or ¥600 for a Line's number 2 or 3 Stock. Discounts apply only to the Action card amount and never to the extra cost. The Line's Value then rises by the total you actually paid: the discounted card amount plus any extra.
What happens when a Train Line's Value passes ¥6,000? Flip its Income marker to the +6,000 side and continue advancing it from the bottom of the Income track. At game end, add the equivalent numbers from the top ¥6,000 row of the track (¥4,000 and ¥2,000) to the numbers beside the marker's ending position when determining Speculation and Stock Payouts. This rule was missing from the first printing and was confirmed on the forums; the current rulebook includes it.
Can a Discount be applied to the Yen committed when taking the Speculate action? No. Discounts apply only to Yen costs printed on Action cards, and the speculation minimum cannot be discounted.
When two different players speculate on the same Line, do they split the payout? No; each speculator is paid in full, receiving the lower of 2x their own committed amount or the lower value shown beside the Line's ending Value. Both payouts (but not the returned stakes) are then deducted from the Line's Value before stockholders are paid.
When using a stored Discount, do I still place a normal Action disc, and does the discount apply before a multi-stop Station's multiplier? Yes to both. You place Action discs on the chosen action as normal, then move your Discount disc(s) from the Discount spots on top of one of them, so a discount never saves a disc or grants an extra action. For a multi-stop Station you pay the action's cost less any discount, multiplied by the number of stop circles: the discount is applied before multiplying.
Are extra Action discs gained from the Action action kept for the whole game? Yes. A new disc is yours for the rest of the game and may be used later in the same round you take it, up to the maximum of 6 Action discs per player. The only way to lose one is in METRO DRINKS, where taking a Drink Color card permanently removes one of your discs.
How does riding Trains work: boarding, paying, and exiting? You may board whenever a Train is at a stop of a Station your Meeple is touching, paying ¥100 to each Line you ride that you do not own Stock in (which also raises that Line's Value by ¥100); riding a Line you own Stock in is free. You may exit at any time, even during another phase, but only onto an empty space touching a Station the Train is physically at, and not until the Train has moved at least 1 stop after you boarded; you may also stay aboard between rounds without paying again. Trains move one at a time in Income track order, so transfers between Lines depend on that sequence.
How does the Action Phase end, and can a player pass repeatedly for ¥100 each time? When you pass you immediately take ¥100 from the bank for each Action disc still in front of you, and you take no further part in that Action Phase; you cannot jump back in or pass again. The phase ends once every player has passed or run out of discs (a player with no discs remaining must pass).
What is on the third single-dot Action card of the Z/N set? It carries two separate Discount actions, each with a single disc spot and each giving a ¥100 discount. The two actions are independent, so they may be taken by different players or the same player.
Does the E Line Train run from E22 back to E1, stopping at the stops in between? Yes. Follow the direction arrows printed on the track: the Train runs from E1 to E22, turns around, and returns to E1, stopping at every consecutive numbered stop in both directions. It never skips or jumps stops.
Are the 12 Speed tokens a hard limit? Yes, the supply of 12 is intentional; if fewer remain than an action shows, you take only what is available. Tokens assigned to Lines stay there for the rest of the game; only an unassigned token traded in through Station Trading returns to the general supply and becomes available again.
Is the Bicycle token spent when you use its extra movement? No; you keep it, and it grants up to 1 extra space of movement for the rest of the game (you may hold only 1 Bicycle at a time). The only way to spend it is returning it as the cost of a Station Trading build. Only Speed tokens can be assigned to Train Lines; Bicycles cannot.
When you pay ¥100 to ride a Train you do not own Stock in, does that payment increase the Line's Value? Yes: you pay ¥100 to the bank and increase that Line's Value by ¥100. The same applies to each additional Line you transfer onto, unless you own its Stock, in which case riding is free.
How does trading a Speed or Bicycle token for a Station work? Use the Station Trading action (the card showing a token above a pyramid): return 1 unassigned Speed or Bicycle token to the general supply instead of paying Yen. Even a multi-stop Station costs only that 1 token, your Meeple must still be touching the Station, and all other Station rules apply. Without a token to trade, you may not place a disc on this action at all.
How does a 5-way turn order bidding tie resolve? From the second round on, tied players reverse their relative turn order positions, so in a 5-way tie the outer pairs swap and the middle player stays 3rd. In the first round, ties are resolved randomly instead.
Is Yen a limited resource? No, Yen is not limited. The included tokens only come close to running out during end game payouts, even with the expansion.
In the Stock Payout example, why does Stock 1 receive ¥1,500 when the Income marker shows ¥1,400? Read the example in sequence: the Line ended at ¥2,900, the number 1 Stock owner was paid 50% rounded up to the nearest ¥100 (¥1,500), and the marker was then moved down to the remaining ¥1,400. Stocks 2 and 3 are paid from the two values beside that adjusted position (¥1,000 and ¥400).