Living rulebook
Tokyo Capsule Hotel
TOKYO CAPSULE HOTEL
You take the role of a capsule hotel developer, utilizing multiple hotel brands and attractions to fill your hotels to their capacity! After taking out an initial loan with accruing interest, you can invest in and subdivide land, purchase hotel brands, and barter in real time in an attempt to come out debt free the fastest!
CONTENTS
- 6 - Paper Pads — 10x Map sheets / 1x Game Ledger pad / 5x Player Ledger pads
- 5 - Land Parcel boards
- 5 - Game boards — 1x Franchise income / 1x Capsule board / 2x Attraction boards / 1x Round Spend board
- 7 - Wooden markers — 2x Round Spend markers / 5x Player Seals
- 26 - Coupons & Attraction Cards
- 20 - Entrances
- 88 - Capsules
- 4 - Graveyards
- 20 - Vending Machines
- 11 - Buildings
- 3 - Bonus dice
SETUP
- 1. Place a blue paper Map sheet in the center of the table, with the Land Parcel boards next to it.
- 2. Each player takes a Player Ledger and a Player Seal of their choice, placing each in front of them, and draws their chosen Player Seal in the blank circular space on their Ledger.
- 3. Place the Franchise Income board on the table, with 1 Capsule of each color below it.
- 4. Place the Capsule board on the table, with the Entrances on its right half. Sort the remaining Capsules by color, and arrange
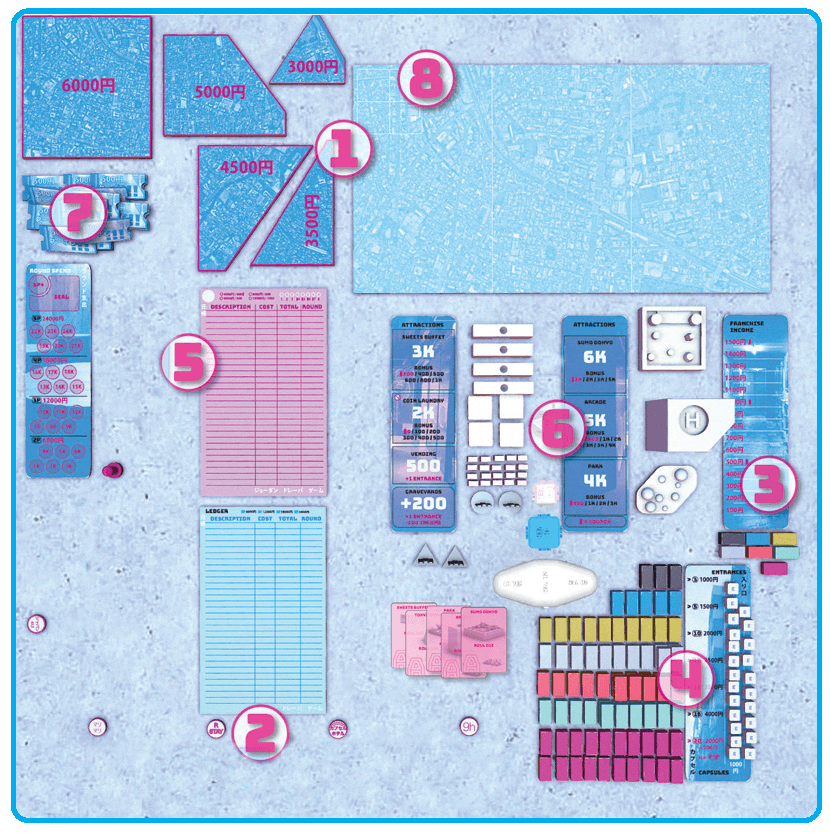
each color in a group to the left of the board in the position corresponding to the number of remaining pieces of that color.
KEY CONCEPTS
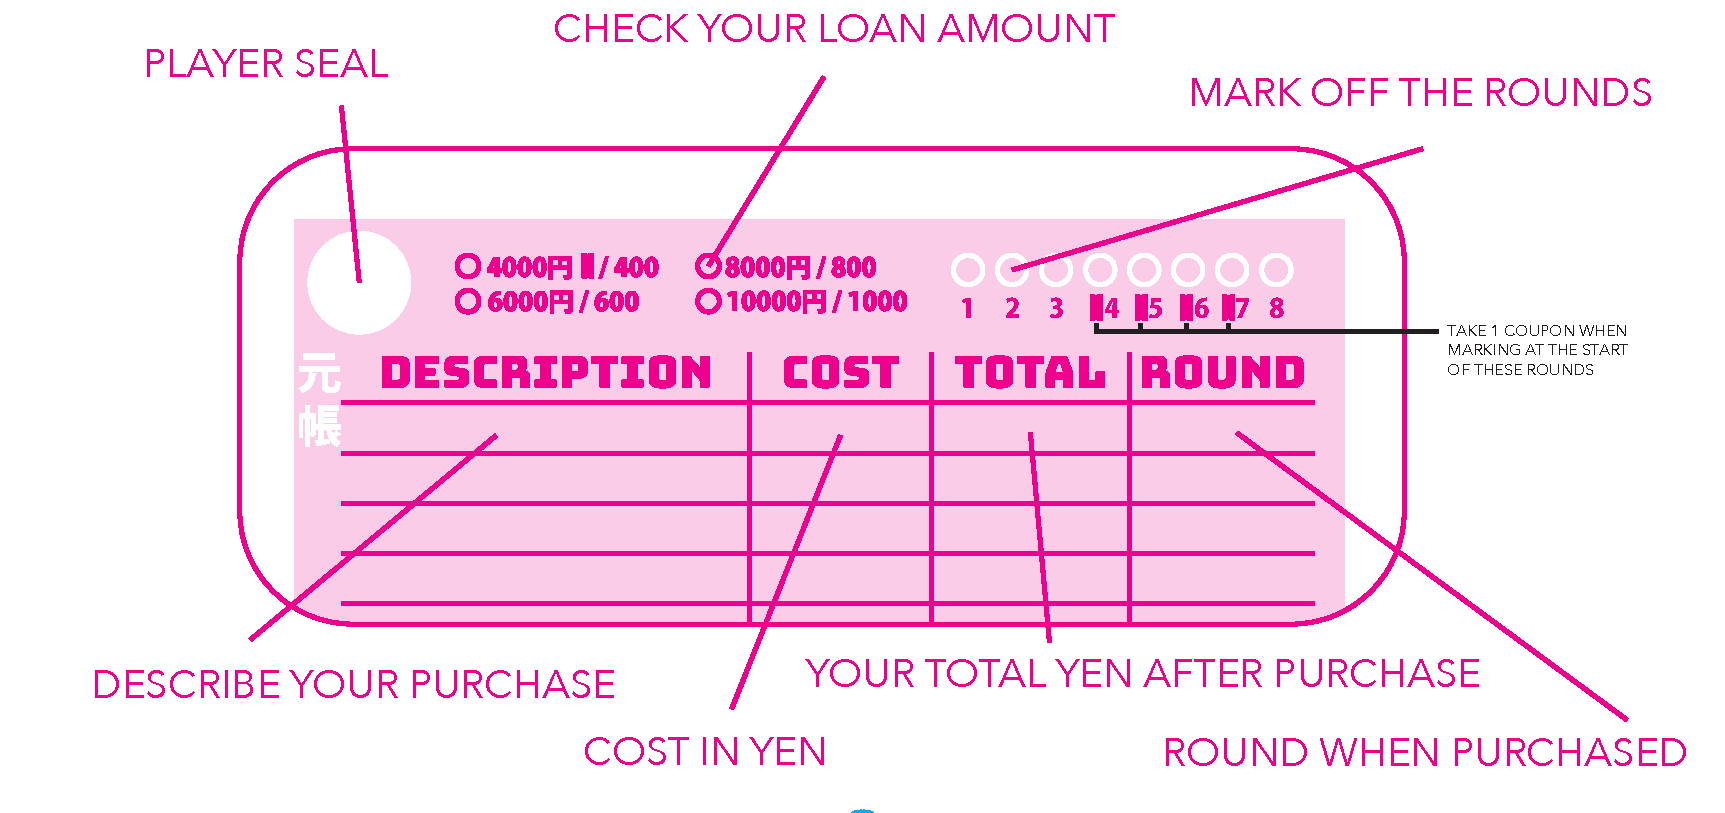
Debt: Your total Debt in Yen (円) is equal to your starting loan, chosen at the start of the first round, plus interest accumulated per round at 10% of your starting loan value (as indicated on your Player Ledger, next to your starting loan):
Debt = Starting Loan + [Interest × Current Round Number]
For example, if your starting loan was 6,000円, your total Debt in the second round would be 7,200円 (6,000円 + 2×600円).
Marking Player Ownership: During the game, players will use a pen to outline certain areas on the Map. It is very important to always be able to identify which player each area belongs to and it is therefore recommended that each player uses a unique color of pen to mark their own areas. If this is not possible, use player initials or other markings to differentiate between players’ outlines.
Land Parcels and Subdivisions: Areas of the Map outlined by players fall into two categories: Parcels and Subdivisions. A Parcel refers to any of the four small square starting Parcels claimed during setup as well as new areas players will Purchase during the game (see
Land Parcels under Purchases). During the game, players may divide up their Land to trade with other players, creating Subdivisions (see Subdividing under Bartering). A Subdivision is therefore an area wholly contained within another area of Land (either a Parcel or another Subdivision). A given piece is owned by the player who owns the smallest area of Land that contains that piece.
Hotels and Franchises: A Hotel is defined as a single Entrance (or Coin Laundry) with any number of connected Capsules. All Capsules in a Hotel must be the same color. A Franchise refers to all Hotels of a common color.
Golden Rule for Hotel Placement: In any given area of Land (whether Parcel or Subdivision), there must always be at least as many Vending Machines and/or Graveyards as there are Hotels (that is, there can never be more Hotels in an area of Land than there are Vending Machines and/or Graveyards combined). There is only one exception to this rule, when playing with the Attraction cards variant (see the side B effect for Sumo Dohyo under Buildings).
Coupons: Coupons have a value of 500円 each and can be used as if they were Yen when making a Purchase. They can also be traded with other players during Bartering. However, they do not count towards your total Yen balance, and cannot be used to pay off your Debt. Coupons are not intended to be limited; if you need to take one and there are none left in the supply, use a suitable substitute.
GAMEPLAY
Each game takes place over a number of rounds, with each round consisting of the following four phases:
1. Mark current round > 2. Loans > 3. Purchase/Barter > 4. Income
The game ends when, during the Loans phase, at least one player is able to repay their total Debt, or at the end of the eighth round, whichever happens first. The player with the most Yen remaining after repaying their Debt (or, if no player can repay their total Debt, the one with the lowest net Debt) will be the winner.
1. Mark Current Round: In the first round, mark off the first circle on the round track of the Game Ledger and all Player Ledgers. In subsequent rounds, mark off the next circle (which will correspond to the current round number each time) such that all Ledgers always indicate which round is the current round. To avoid confusion, it is important that all players keep the round tracks on their Ledgers up to date.
If a Coupon symbol is indicated next to the current round number on the round track, each player takes 1 Coupon from the supply when marking it off.
2. Loans: In the first round: Each player simultaneously chooses a loan amount by marking the spot corresponding to the amount of their choice on their Player Ledger. Once all players have chosen, reveal all Player Ledgers, with each player then writing their loan amount down in the total column of their Ledgers to indicate that they currently have this amount of Yen. Any players who chose 4,000円 as their loan amount also take 1 Coupon each (as indicated by the Coupon symbol on the Player Ledgers).
In the second and subsequent rounds: Check for game end: If any players have sufficient Yen to pay off their total Debt (starting loan plus all interest accrued up to and including the current numbered round), the game ends immediately (see Game End below). Otherwise, continue with the remaining phases in this round.
Notes: Coupons do not count towards your total Yen balance, and cannot be used to pay off your Debt.
You must be able to pay off your Debt in its entirety; you cannot pay off Debt partially at any point.
3. Purchase/Barter: This is the main phase of the game, and is where you perform Purchase actions, make deals with other players, spend money, and develop your franchises.
The Purchase/Barter phase takes place in real-time, with players Purchasing and/or Bartering as described below until the Purchase Limit on the Round Spend board corresponding to the number of players is exceeded, or until all players have flipped their Seals to the “Pass” side.
Note: It is possible in some cases that the Purchase Limit can be exceeded by a single Purchase, and for the phase to end before all players have had a chance to do anything. You must act quickly or risk losing the opportunity to do so!
Purchasing: To make a Purchase, you must first place your Player Seal on the Round Spend board. There is a queue of spaces on this board, which determines the order in which players will have the opportunity to make a Purchase.
At the start of each Purchase/Barter phase, all players must place their Seals face up in this queue based on the Yen they have (not counting Coupons): the player with the least amount of Yen places their Seal first in the queue and the player with the most Yen places theirs last (in case of ties for Yen, determine relative order by selecting a first tied player at random and then proceeding among other tied players in clockwise order from the first).
Whenever your Seal is in the Purchase queue, you may at any time give up your place in the queue by removing it and placing it back in front of you (this enables you to Barter with other players, as below). You may freely return your Seal to the back of the queue later in the phase, provided you are not Bartering at that time.
At any given time, the player whose Seal is at the front of the queue has the opportunity to make a Purchase. As soon as your Seal reaches the front of the queue, you must promptly declare which one Purchase you are making. If you do not do so, another player may warn you and then count out 5 seconds aloud; if you do not declare a Purchase by the time they reach 5, the player who counted may remove your Seal from the Round Spend board and return it back in front of you, with you forfeiting the Purchase action (though you may, of course, place your Seal back in the queue at any point in this phase to initiate another Purchase, provided you are not Bartering at that time).
After declaring what you are Purchasing, complete your Purchase, including making any corresponding markings and/or placing components on the Map or in your player area as applicable (see Purchases below for details of items available for Purchase). You must also account for your spend (which can be a combination of Yen and/or Coupons), filling out your Player Ledger and the Game Ledger and *advancing the Round Spend marker on the Round Spend board accordingly. You may only Purchase one item per Purchase action; once you have completed your single Purchase in full (including updating the Ledgers and Round Spend board), remove your Player Seal from the “Seal” space and place it back in front of you.

Important: When building a Hotel as part of a Purchase action, update the corresponding Franchise Income accordingly (see Franchise Income, below). As marked on the Franchise Income board, as soon as a Hotel Franchise reaches or surpasses Franchise Income of 500円, 1,000円, or 1,500円, each player owning at least 1 Hotel of that Franchise on the Map takes 1 Coupon (irrespective of how many Hotels of that Franchise they own). These Coupons can be used immediately, so keep the Franchise Income board up to date!
Bartering: To Barter with other players, each of the involved parties must have their Player
Seal in front of them (i.e., not on the Round Spend board, or in the queue to make a Purchase). During Bartering, you may freely trade with other players using Yen, Coupons, Capsules from your player area, pieces of Land (together with any components on them; see Bartering Land and Subdividing, below), and/or future promises. Each player participating in a Barter must offer something as part of the transaction (however, any future promises made in a Barter transaction are not binding).
Bartering does not contribute towards the Purchase Limit; do not adjust the Round Spend marker on the Round Spend board for any Barter transactions.
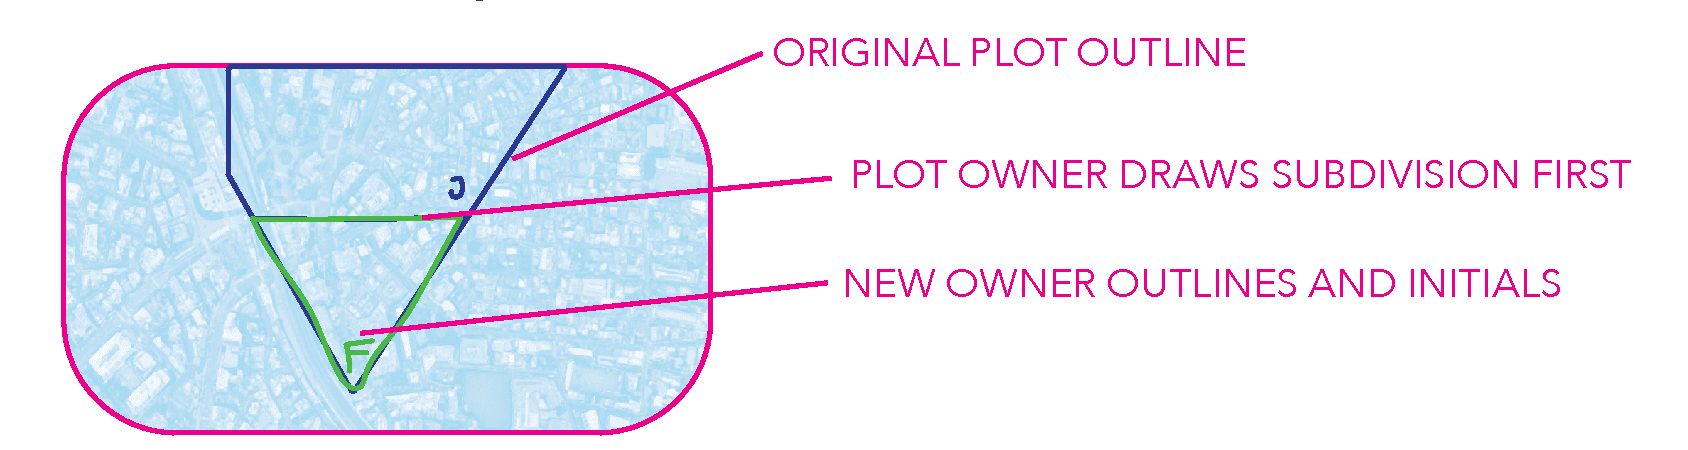
Bartering Land and Subdividing: You may divide up your own Land to create Subdivisions to trade with other players as part of Barter transactions. To do so, first agree with another player which part of your Land will form the Subdivision, as well as what you will be trading it for. Then you, as the current owner of the Land, first mark the outline of the Subdivision with your pen before the other player then outlines it again with their pen, ensuring that it is clearly identifiable as a Subdivision that they now own.
You may also trade entire areas of Land you own (i.e. whole Parcels or pre-existing Subdivisions) as part of Barter transactions, without creating new Subdivisions.
Important notes: Components on the Map cannot be moved once they have been placed, and therefore when ownership of an area of Land is transferred to another player as part of a Barter transaction, ownership of any Hotels, Buildings, Vending Machines, and Graveyards on that Land will by necessity be transferred with it. Any Subdivisions must be made (i.e. marked on the Map) by the player who owns the Land immediately prior to the Subdivision, never by the player who is about to receive the Subdivision. When forming a Subdivision, you must ensure that the Golden Rule for Hotel Placement (see Key Concepts) is observed both for the Subdivision being formed and the remaining portion of the Land being Subdivided.
Items traded or promises made in a Barter transaction must not break any Construction Rules (see Purchases, below). Players are otherwise free to Barter creatively and use their imaginations with promises (just remember that future promises are not binding)!
For example, Player A gives Player B 1,000円 in exchange for one of Player B’s green Capsules. Player A gets a Capsule to build with, and Player B gets money while also benefiting from the increase in value of their Franchise that will follow once Player A has built that green Hotel.
For example, Player A wants to invest in a Coin Laundry but cannot afford it. On the other hand, Player B can afford a Coin Laundry, but does not have the Land to build it on. Player A agrees to Subdivide part of their Land Parcel to allow Player B to build a Coin Laundry on it later this phase. Assuming that Player B keeps their promise and builds the Coin Laundry there, when resolving the Income phase, both players’ Hotels on the larger Land Parcel will benefit from the Coin Laundry bonus. Note that even if Player B does not keep their promise to build the Coin Laundry, the Subdivision that Player A made as part of this Barter transaction still stands.
For example, Player A gives Player B 2 Capsules and a Subdivision, in exchange for Player B’s promise to Purchase a Park for their shared Parcel and another promise that they (player B) will not build any more Hotels on their shared Parcel.
Passing: If you are not able or do not wish to make any more Purchases or Barter transactions this round, you may pass by flipping your Seal to its “Pass” side and placing it in front of you. Once you have passed, you may no longer participate in this phase. If all players have passed, the phase ends.
Exceeding the Purchase Limit: If the Purchase Limit is exceeded, once the Purchase that exceeded it is completed, no further Purchases can be made this round; any remaining Seals in the Purchase queue are returned to their corresponding players. No new Barters may be begun, however Barter transactions that are already in progress may be completed (or abandoned), after which the phase ends.
4. Income: Once the Purchase/Barter phase has concluded, players receive Income from their Hotels. No Bartering or Purchasing is permitted during this phase.
Each player receives Yen equal to the sum of the Income from each of their Hotels (see below), recording their total Income on their Player Ledger.
A given Hotel’s Income is determined as follows:
Hotel Income = Franchise Income + Attraction Income − Graveyard Deduction
Notes: A Hotel’s individual Income cannot exceed 1,000円 × the number of Capsules used in the Hotel. For example, a player owning a Hotel comprised of 2 Capsules will receive an Income of at most 2,000円 for that Hotel, even if the Hotel Income calculation determines a higher amount.
A Hotel’s individual Income cannot be reduced below 100円 by their Graveyard Deduction.
Franchise Income: Franchise Income is the base Income for each Hotel, and is the same for all Hotels in the same Franchise (i.e. all Capsules of the same color). It is determined as follows:
Franchise Income = 100円 × [Total # of Hotels of that Franchise on the Map + # of different Parcels containing Hotels of that Franchise]
The Franchise Income board is used to track the Franchise Income for each Franchise (this should be updated every time a new Hotel is built, but it is recommended to check the values are correct at the start of each Income phase). Remember: When a Hotel Franchise reaches or surpasses Franchise Income of 500円, 1,000円, or 1,500円, each player owning at least 1 Hotel of that Franchise on the Map takes 1 Coupon (irrespective of how many Hotels of that Franchise they own).
Attraction Income: Attraction Income is determined separately for each Parcel, but is the same for all Hotels within a given Parcel. The Attraction Income for a Parcel depends on which Buildings are in that Parcel, and specifically their corresponding Bonus die rolls in a given round.
To determine Attraction Income, work through each Parcel one at a time, with the owner of each Building in the Parcel (including any Buildings in Subdivisions) rolling the corresponding Bonus die for that Building. The total of the Yen shown on all die faces rolled for that Parcel is this round’s Attraction Income for all Hotels contained within that Parcel (including any Hotels in Subdivisions). Notes on special Bonus die faces If a rolled die face shows a small figure (the No-Graveyard symbol), it negates the effect of the Graveyard Deduction (i.e. there will be no deductions for Graveyards for any Hotels within that Parcel this round).
If a rolled die face shows a Coupon symbol (the pink bar), the owner of the corresponding Building (i.e. the owner of the Parcel, or if the Building is in a Subdivision, the owner of the Subdivision) immediately takes 1 Coupon. This Coupon bonus applies to the owner of the Building only, and does not form part of the Attraction Income for Hotels in that Parcel (however this only applies to the Coupon symbol; any Yen showing on the die face along with it counts towards Attraction Income as normal).
Graveyard Deduction: Each Graveyard in a Parcel (including any in Subdivisions) reduces the Income of all Hotels within that Parcel by 100円 (including any Hotels in Subdivisions). The Graveyard Deduction can never be more than 500円, since there can be at most 5 Graveyards in each Parcel (see Graveyard under Purchases).
For example, all Hotels within a Parcel that contains 3 Graveyards will have their Income reduced by 300円.
The end of a round: After completing the Income phase: in rounds 1-7, proceed to the next round, beginning with the Mark current round phase. in round 8, the game is over (see Game End below).
GAME END
There are two ways in which the game can end.
During the Loans phase in rounds 2-8: When at least one player has enough Yen to pay off their total Debt (starting loan plus all interest accrued up to and including the current numbered round) during the Loans phase, the game ends immediately, and the player with the most Yen remaining after paying off their total Debt wins!
At the end of round 8: If no players have been able to pay off their total Debt during any Loans phase by the end of the eighth round, the game ends anyway. All players deduct their total Yen from their total Debt (starting loan plus 8 rounds of accrued interest) to determine their final net Debt. The player with the least net Debt wins!
Remember: Coupons do not count towards your total Yen balance, and so are worth nothing at the end of the game.
In case of ties, the tied players share the victory.
PURCHASES
Construction Rules: The following rules apply to all Purchases:
With the exception of Capsules, all Purchased items must be placed on the Map at the time of Purchase. When placing an item you are Purchasing on the Map, you must place it wholly within Land you own, and such that it does not touch any other items; i.e., there must be at least a visible gap between each of the structures on the Map. Once an item has been placed on the Map, it cannot be moved for the rest of the game (though it may of course be transferred to another player if the Land it is on is traded with during Bartering).
Remember: You may only make one Purchase per Purchase action, though you may perform more than one Purchase action in the same round, provided the Purchase Limit has not been exceeded.
Items available for Purchase: The items available for Purchase are as follows:
Land Parcel: Cost: 3,000-6,000円, as indicated on each Land Parcel board. Choose one of the five Land Parcel boards, pay the amount shown on it, and place it on the Map so that it doesn’t overlap any other Parcels but shares at least part of one side with at least part of one side of any existing Parcel (i.e., it must share more than a single point or corner). Trace around all edges of the Land Parcel board with your pen (using your unique color and/or initialing or otherwise marking the corner, e.g. with a triangle, to identify the Parcel as yours), then return the Land Parcel board to the side; it can be used again for future Purchases.
Note: Any small square starting Parcels that were not claimed during setup (i.e. are not outlined by any player color) are not in play and should be ignored; they can therefore be partially or fully covered by Purchased Land Parcels.
Capsules: (other than pink) Cost: 1,000-4,000円, as indicated on the Capsule board. Choose one of the non-pink Capsule colors available next to the Capsule board, pay the amount corresponding to that color, and take all Capsules of that color into your player area. Do not place them on the Map yet (you must take a future Purchase action to Purchase an Entrance or Coin Laundry to do so; see below).
Pink Capsules: Cost: 2,000円 for the first + 500円 per additional. Unlike the other colors, when Purchasing pink Capsules you will not necessarily take all available Capsules of that color. Instead, you may choose how many you take, so long as you can afford to pay for them: the first pink Capsule you Purchase in a given Purchase action costs 2,000円, with each additional pink Capsule Purchased in the same action costing an additional 500円. Take the number of pink Capsules you have paid for and place them in your player area.
For example, Player A takes a Purchase action and Purchases 4 pink Capsules for a cost of 3,500円 (2,000円 + 3×500円). Later, Player A takes another Purchase action and Purchases a further 3 pink Capsules for a cost of 3,000円 (2,000円 + 2×500円).
Vending Machine: Cost: 500円. Pay 500円 for a single Vending Machine, which you must immediately place on the Map, following the Construction Rules. Notes: A Vending Machine or Graveyard in the same area of Land is required for each Hotel you build (see below).
Graveyard: Cost: −200円 (gain 200円). Add 200円 to the Yen balance on your Player Ledger and take a single Graveyard piece, which you must immediately place on the Map following the Construction Rules, and trace around with your pen, before returning the Graveyard piece to the supply. Identify the area you have just traced around as a Graveyard by drawing a small figure (the No-Graveyard symbol) in it. Notes: Each Graveyard reduces the Income of all Hotels within the same Parcel (see Graveyard Deduction under Income). Each Parcel may contain at most 5 Graveyards (including any in its Subdivisions). A Graveyard or Vending Machine in the same area of Land you own is required for each Hotel you build (see below).
Entrance (+ build Hotel): Cost: 1,000円 for the Entrance; requires Capsules. Pay 1,000円 for a single Entrance, which you must immediately place on the Map along with 1 or more Capsules of the same color from your player area to form a Hotel, according to the following rules:
Important: Remember the Golden Rule for Hotel Placement (see Key Concepts): there can never be more Hotels in an area of Land than there are Vending Machines and/or Graveyards combined. With one exception (with the Sumo Dohyo when playing with the Attraction cards variant; see Buildings below), this rule can never be broken, so in order to Purchase an Entrance, you must be able to place the Hotel while still observing it!
The Entrance and any Capsules you build with it form a Hotel. Once built, a Hotel will remain there for the rest of the game, and cannot be changed or added to later.
You must place the Entrance on the Map (i.e. on the “ground floor”) such that one side of it touches the side of one of the ground floor Capsules.
Capsules must be placed horizontally, with their longest edges parallel to the Map; they cannot be vertically oriented.
Any Capsules placed directly on the Map (the “ground floor”) must be placed such that they share sides. You may stack Capsules on top of each other to create a multi-story Hotel, but you cannot build more stories than your Hotel has Capsules on its lowest story (i.e. you may not build a Hotel 3 stories high without having at least 3 Capsules on the “ground floor”). Exception: Hotels using pink Capsules may be built with more stories than they have Capsules on the ground floor, provided they are built in a single stack at least 4 stories high. This still requires an Entrance on one side of the stack.
You may build more than one Hotel, even of the same color, in the same Parcel or Subdivision (but only one per Purchase, and there must be enough Vending Machines and/or
Graveyards to support the additional Hotel, as explained above).
After building a Hotel, remember to update the corresponding Franchise Income on the Franchise board (see Franchise Income).
Buildings: Cost: 2,000-6,000円, as indicated on the Attraction boards. Pay the corresponding cost to take a single Building from alongside the Attraction boards, which you must immediately place on the Map, following the Construction Rules.
Each Building generates Income via its Bonus die for all Hotels contained within the same Parcel, and may generate Coupons for its owner (see Attraction Income under Income). In addition, a Coin Laundry provides a way to build a Hotel without an Entrance.
The available Buildings are as follows:
- Coin Laundry · 2,000円 · die faces: [Coupon] / 100円 / 200円 / 300円 / 400円 / 500円
- Sweets Buffet · 3,000円 · die faces: [Coupon] 200円 / 400円 / 500円 / 600円 / 800円 / 1,000円
- Tokyo Spike · 3,000円 · die faces: [No Graveyard] (2x) / 600円 (2x) / [Coupon][Coupon] (2x)
- Park · 4,000円 · die faces: [Coupon] 500円 / 1,000円 / 2,000円 / 3,000円
- Arcade · 5,000円 · die faces: [Coupon] 500円 (2x) / 1,000円 / 2,000円 (2x) / 3,000円 (2x) / 4,000円
- Sumo Dohyo · 6,000円 · die faces: [Coupon] 1,000円 / 2,000円 / 3,000円 / 5,000円
[Coupon] = the Building's owner takes 1 Coupon · [No Graveyard] = no Graveyard Deduction in that Parcel this round · (2x) = this face appears twice on the die. See Attraction Income under Gameplay.
Special rules for the Coin Laundry (build Hotel): When building a Coin Laundry, you may place up to 2 Capsules of the same color from your player area on top of it to form a Hotel (but whether you decide to place 0, 1, or 2 Capsules there, you cannot add more later). This is the only way to build a Hotel without an Entrance. Even so, a Hotel on top of a Coin Laundry still requires a Vending Machine or Graveyard in the same area of Land in order to build it (see the Golden Rule under Key Concepts). However, there is no Vending Machine/Graveyard requirement if you place 0 Capsules on top of a Coin Laundry (because then it is not a Hotel).
Remember: You may build more than one Hotel, even of the same color, in the same Parcel or Subdivision (but only one per Purchase, each Hotel must have either an Entrance or a Coin Laundry, and there must be enough Vending Machines and/or Graveyards to support the additional Hotel, in keeping with the Golden Rule).
Whenever you build a Hotel, update the corresponding Franchise Income on the Franchise board (see Franchise Income).
Attraction cards variant If you are playing with the optional Attraction cards, there are two ways to play. Before starting the game, players must collectively decide either:
That when a larger Building is Purchased, the Purchasing player chooses whether to apply the effects of side A or side B of the corresponding Attraction card to that Building; or
That Side B is to be chosen in advance for all Attraction cards, so that the effects of the B sides will be applied to all larger Buildings (i.e. the A sides will not be used at all; this reduces the element of chance by removing almost all of the Bonus die rolls).
Whichever option you choose, during the game when you Purchase one of the larger Buildings, you must also take its corresponding Attraction card and immediately place it with the chosen side – A or B – face up in front of you. Note: The Sweets Buffet Attraction card is only taken with the Purchase of the first Sweets Buffet Building; all Sweets Buffets in this game will use the same side as the one chosen for the first one.
For a given Building, if side A of its corresponding Attraction card is chosen, it works as described above with its Bonus die being rolled during the Income phase as normal. If side B is chosen, the Building works as follows:
Sweets Buffet: During the Income phase, do not roll a Bonus die for each Sweets Buffet. Instead, Attraction Income for a Sweets Buffet is fixed at 300円, and in addition, the Graveyards on the same Parcel do not reduce Income (i.e., the effect of the Graveyard Deduction for all Hotels within the Sweets Buffet’s Parcel is ignored).
Tokyo Spike: This gives an immediate one-time bonus of 7 Coupons to the player who Purchases it, but nothing else: during the Income phase, do not roll a Bonus die for this Building; it has no Attraction Income.
Park: During the Income phase, roll a Bonus die for this Building as normal. In addition, an extra 500円 Attraction Income is given to all other Parcels that are adjacent to (i.e. share at least part of one side with) the Parcel containing the Park. Special case: If at least one of the small square starting Parcels claimed during setup is adjacent to the Parcel containing the Park, all small square starting Parcels in play receive this extra 500円 Attraction Income, even if they are not all adjacent to that Parcel themselves.
Arcade: The Arcade becomes a Manga Hotel, and gives an immediate one-time bonus of 1 Coupon to the player who Purchases it. During the Income phase, do not roll a Bonus die for it. Instead, Attraction Income for this Building is fixed at 1,000円.
Sumo Dohyo: During the Income phase, do not roll a Bonus die for this Building; it has no Attraction Income. However, once the Sumo Dohyo is built, Hotels may be built on the same Parcel (including in Subdivisions) even if there are not enough Vending Machines/Graveyards to support the number of Hotels on that Parcel (i.e., when Purchasing an
Entrance or Coin Laundry to place in the same Parcel as the Sumo Dohyo, the normal Vending Machine/Graveyard requirement for building Hotels no longer applies; this is the only time that the Golden Rule can be broken!).
VARIANTS
Attraction cards: Attraction cards offer alternative Building effects; see the Buildings section above for details.
External Money: Money tokens are not included with this game; however, you can optionally use physical money, such as CURRENCY SAKANA or some other suitable tokens, instead of using Ledgers to record all Yen transactions.
During setup, place a small bowl (or similar) for Yen on the table instead of the Game Ledger, and place your chosen money tokens in a general supply. Each player still takes a Player Ledger as normal. During the game, you will still use your Player Ledger to mark the value of your starting loan and keep track of the rounds by checking them off; however, whenever you gain Yen (such as from your initial loan, during Income, or when Purchasing a Graveyard), take the corresponding amount in money tokens from the general supply, instead of recording it on your Player Ledger. Whenever you spend Yen to make a Purchase, take the corresponding amount in money tokens from in front of you and place in the bowl (you are allowed to make change by exchanging your tokens with some from the general supply at any time). At the end of the Purchase/Barter phase, return any money tokens in the bowl to the general supply.
Tallest Hotel: With this variant, players are incentivized to build taller and taller Hotels. With the exception of the first Hotel built in the game, each time any player builds a new Hotel that is taller than any pre-existing Hotel (among all players, including themselves) on the Map, they take 1 Coupon. As a reminder of this, use a special token you own (not included in the game) and hand it to the player who is first to build a Hotel that is taller than the very first one that was built, and subsequently to whoever builds the next tallest one, and so on. This token acts as a reminder both of the Coupon bonus and the builder of the current tallest Hotel!
CONCIERGE RECOMMENDATIONS
You may find the following tips helpful in order to get the best out of your games of TOKYO CAPSULE HOTEL:
Placement of Purchases on the Map: When a player places a Purchase on the Map, if one or more other players think their placement is not valid, they may question the placement. Such a disagreement should be settled via a majority vote to decide if the placement is acceptable or not: at least 50% of the other players must agree that the placement is valid (the player placing the item does not vote); otherwise the player must adjust the placement until at least 50% of the other players are satisfied. All players should act in good faith: do your best to obey the Construction Rules, but in the event of disagreements it is encouraged to be understanding and lenient too.
Under the Construction Rules, visible gaps must be left between different structures. This is particularly important for Hotels and Buildings, and no exceptions should be permitted for those. However, players are encouraged to be a little more relaxed when it comes to the placement of Graveyards and Vending Machines; visible gaps should still be left if possible, but if there is not enough space to leave a gap (that is, if a Graveyard or Vending Machine will fit while obeying all Construction Rules with the exception that a visible gap cannot be left), it is recommended that such placement should be permitted.
Discovering the Golden Rule has been broken: The Golden Rule for Hotel Placement (there can never be more Hotels in an area of Land than there are Vending Machines and/or Graveyards combined; see Key Concepts) is fundamental and should never be broken (unless when applying the side B effect for the Sumo Dohyo when playing with the Attraction cards variant); however, mistakes can and do happen… If it is discovered that a player has contravened the Golden Rule by building a Hotel that they shouldn’t have, they must immediately pay a penalty of 1,000円 per Capsule in the corresponding Hotel for each Income phase that has passed since that Hotel was built (if they don’t have sufficient Yen to pay the full penalty, they pay all they have), and may not make any Income from that Hotel until the Golden Rule’s requirement has been met again. Similarly, if a player breaks the Golden Rule by making a Subdivision that they shouldn’t have, they may not make any Income from that Parcel until the Golden Rule’s requirement has been met again.
Bartering: Bartering is an important part of the game. Your starting Yen will run out quickly and your Purchases won’t recoup their initial investment immediately. Pursue deals with other players to take advantage of spare Yen or open Land, and seek to maximize your Hotels’ Franchise Income. Full creativity in what you Barter and promise is encouraged! It is also important that deals made are in the spirit of the game: aim for honesty and fair value for the best experience.
Running the Income phase: For efficiency, and to avoid confusion, it is recommended that one player takes the lead and “runs” each Income phase. This helps ensure that players are all focused on one Parcel at a time to correctly evaluate the Attraction Income and Graveyard Deduction for each Parcel. State the Hotel Income for each Hotel in a given Parcel one by one, with players confirming this and accounting for their Income from each of their Hotels accordingly as you go.
FRONT DESK QUESTIONS
Does Purchasing a Graveyard move the Round Spend marker? No. The Round Spend marker never moves backward: a Graveyard's negative cost simply does not move it.
What if the Round Spend marker lands exactly on the Purchase Limit? Reaching the Purchase Limit exactly ends the phase just as exceeding it does: the Purchase that reaches it is completed, and no further Purchases are made this round.
How do Subdivisions count for Franchise Income? They don't. Only Parcels matter here: count the Parcels (never Subdivisions) containing at least 1 Hotel of that Franchise, plus the total number of Hotels of that Franchise on the Map. A Hotel inside a Subdivision counts toward the Parcel that contains it.
A Hotel's Income cap and the Graveyard Deduction: which applies first? The cap applies last. Work out Franchise Income + Attraction Income − Graveyard Deduction (never below 100円), then cap the result at 1,000円 × the Hotel's Capsules.
Can I take another loan after round 1? No. You take a loan once, at the start of the game; the Loans phase in later rounds is only the check for game end.
Doesn't a Coin Laundry Hotel break the stacking rules? The stacking limits under Entrance do not apply to it: the Coin Laundry itself acts as the ground floor, with up to 2 Capsules placed on top.
Can pink Capsules form a single stack of 2 or 3 stories? No. Pink Capsules build under the normal rules like every other color. Their exception is optional and only unlocks at height: a single pink stack of 4 or more stories may ignore the ground-floor story limit.
What is the greatest Capsule building ever created? The Nakagin Capsule Tower, RIP. Hopefully I will rebuild it again one day.
What is a good Capsule Hotel to stay at? Any 9h Capsule Hotel, bring ear plugs.